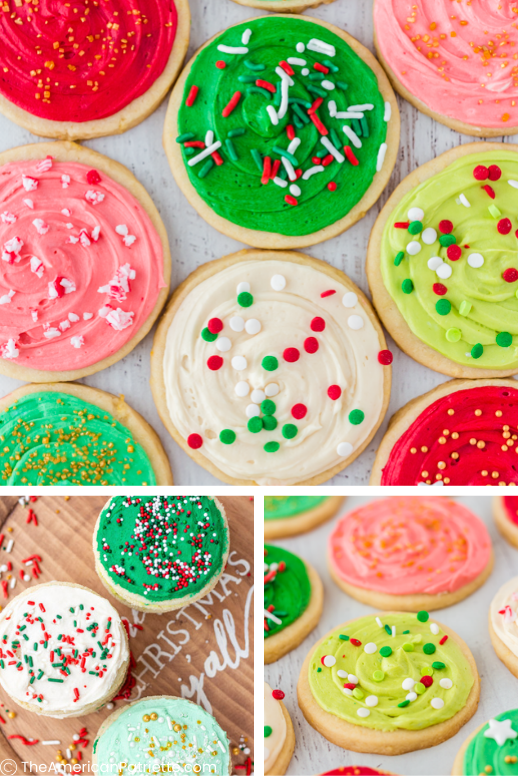
How to decorate cookies with buttercream – 4 ways!
Learn how easy it is to decorate sugar cookies with buttercream frosting – without any kind of fancy equipment or fussy frosting! I’ll walk you through 4 simple ways to create beautifully decorated cookies that you’ll be excited to share with others. 😉
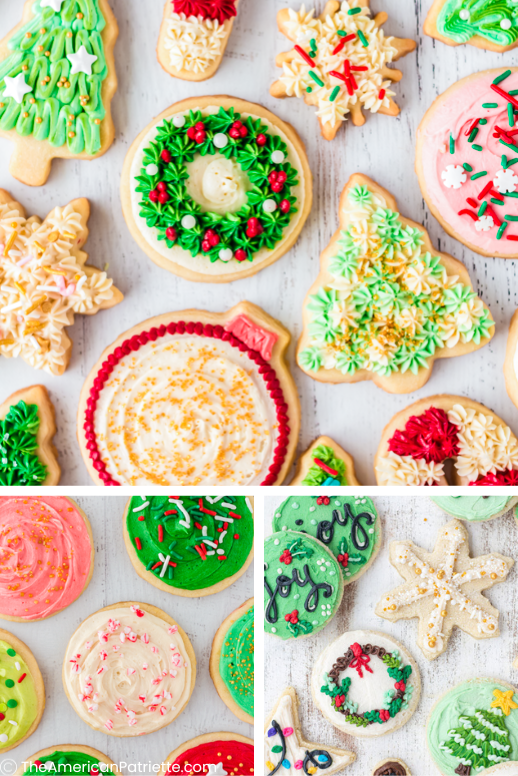
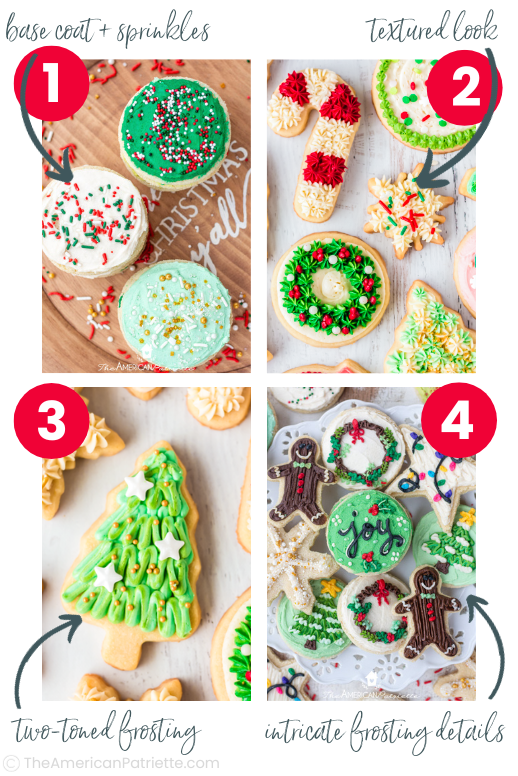
In this post, I’m going to walk you through four simple ways to decorate cookies with buttercream frosting:
- METHOD 1: Spread a base coat & add sprinkles – the easiest method, but still produces beautiful & festive cookies!
- METHOD 2: Textured look – super easy to do with some basic piping bags & piping tips, and gives off a “boutique cookie” look.
- METHOD 3: Two-toned frosting – great for adding some dimension to your cookies, and is especially pretty if you’re wanting to make an assortment of Christmas trees!
- METHOD 4: Intricate frosting details – if you have a steady hand and are wanting cookies with detailed designs.
I’ll share some pros of each method, as well as make sure you know exactly what materials you need and how to accomplish the look you’re going for!
Before we get there, though, let’s talk about what you’ll need starting out.

What you’ll need for decorating cookies with buttercream:
You just need a handful of items to make some deliciously beautiful decorated sugar cookies!
1. Homemade buttercream frosting – of course! 😉
I’ve got 2 amazing buttercream recipes that I recommend – you choose which one seems better for what you’re needing:
- Recipe #1: Buttercream frosting that hardens – the best buttercream recipe to use if you want to be able to stack/transport your cookies with minimal icing smudges. While no true buttercream will 100% harden up the same way that royal icing will, this buttercream-that-hardens recipe does dry and hold up really well compared to other traditional buttercreams. It’s made with cold butter, and I walk you through step-by-step how to make it in that post!
- Recipe #2: Easy buttercream for sugar cookies – the best recipe to use if you just want a delicious, super-simple-to-make frosting for your cookies and you don’t mind if the icing is more…delicate. It’s a relatively fluffy buttercream (still decadent!), so this version won’t harden up like the first recipe. (i.e. You won’t really want to plan to stack cookies with this icing, and if you’re transporting the cookies with this icing, you’ll need to be more careful). However, this recipe is very tasty, makes for a super creamy bite, it’s a little easier to make than the first, and it’s a little easier to decorate with because the icing is fluffier, especially since it’s made with room temperature butter.
Both frosting recipes actually have the same basic ingredients, but the ingredient ratios and method of making the frosting is a bit different for each. They both taste absolutely DELISH, and they both have a creamy texture – the 2nd is just creamier than the 1st since it doesn’t need to harden up!
>> Not sure which icing to choose? Check out this comparison of cookie icing recipes – I’ll help you figure out exactly which icing would be best for what you’re needing!
I’ll also tell you which icing works better for each of the 4 methods in this post. See all the details in the “how to” section toward the bottom of this page.
2. Sugar cookies!
The perfect compliment to buttercream frosting! Plus, you can’t decorate cookies without cookies! 😆
I have two recipes you’ll love:
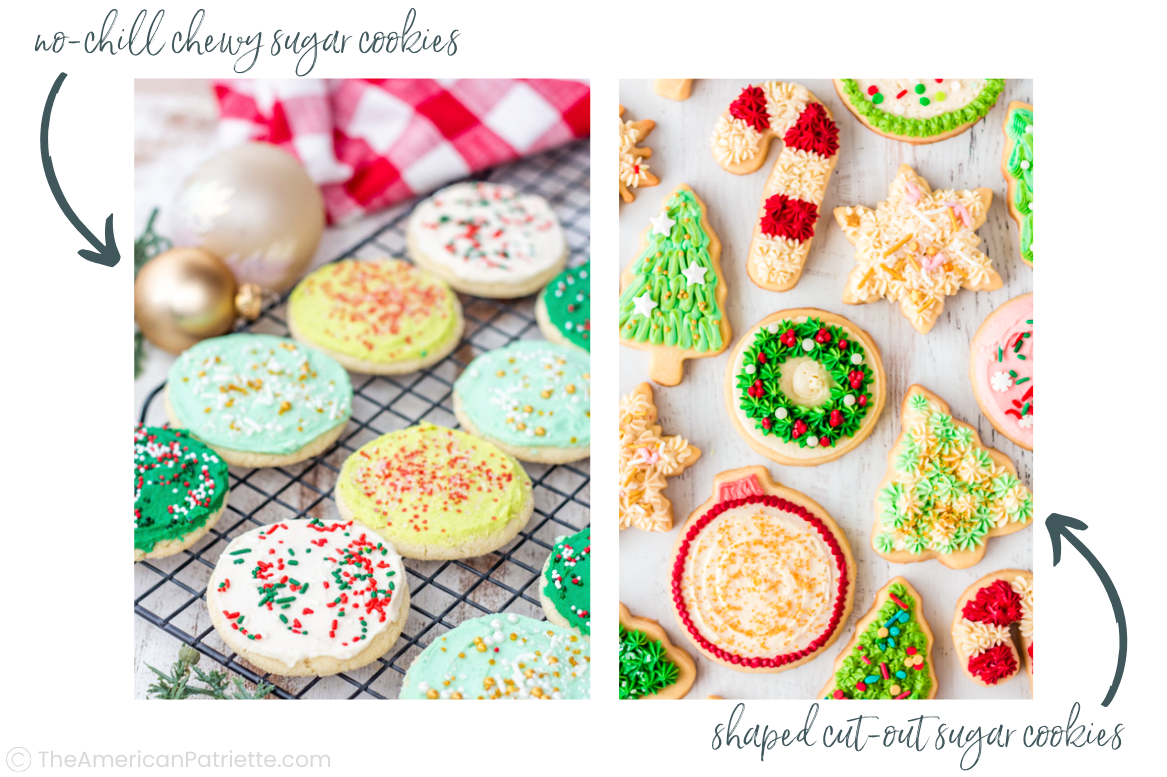
- Soft & chewy sugar cookies – this is my favorite sugar cookie recipe! Perfect if you just want to decorate round cookies (i.e. not cutout cookies) & prefer a cookie with a softer, chewier bite. Plus, you don’t have to chill the dough in this recipe!
- Easy cut-out sugar cookies – a very tasty version of cutout cookies – great for you if you want to decorate various shaped cookies. Cutout sugar cookies are notorious for being hard & rather…tasteless. This recipe is VERY good & has a great texture, but the cookies still hold their shape well – no spreading! They come out of the oven looking like perfect sugar cookies!
Once you have your cookies + frosting, you’re ready to gather up the rest of your supplies and start decorating!
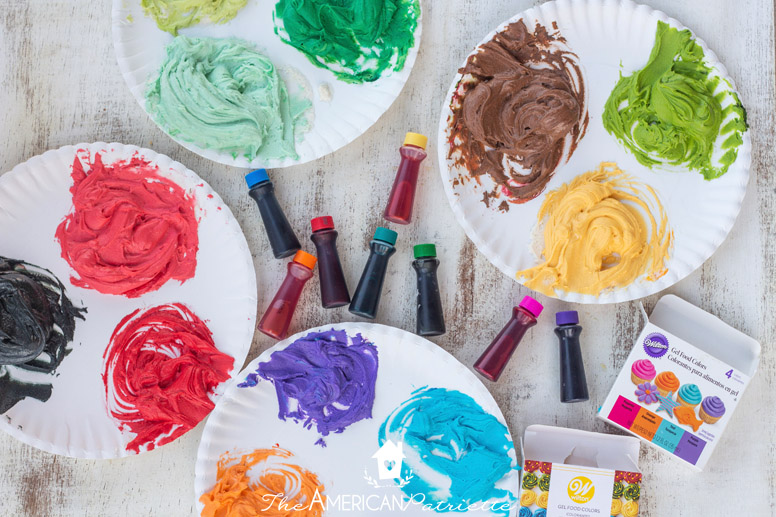
3. Gel food coloring
Gel food coloring is far superior to liquid food coloring – the colors are much more vibrant and they’re much less likely to mess with icing consistency. (Too much liquid can = grainy or runny frosting.) You don’t have to get fancy here! You can likely find the same kind I use – Wilton gel colors in a box of 4 – from your local grocery store. They’re also easy to find at craft stores like Hobby Lobby & Michaels, as well as Walmart.
I like to have 2 boxes on hand – one of the four standard colors (red, green, blue, and yellow), as well as a box with some “off” colors (turquoise, pink, purple, and orange). You probably don’t need both – just the standard box will be fine; you can do several variations of colors just using those 4!
4. Basic items for mixing colors
Small bowls, spoons, and plastic wrap. You’ll need some small bowls to split up icing, spoons to stir in the colors, and plastic wrap to cover the icing as you’re mixing colors, just so it doesn’t start to crust over before you start using it.
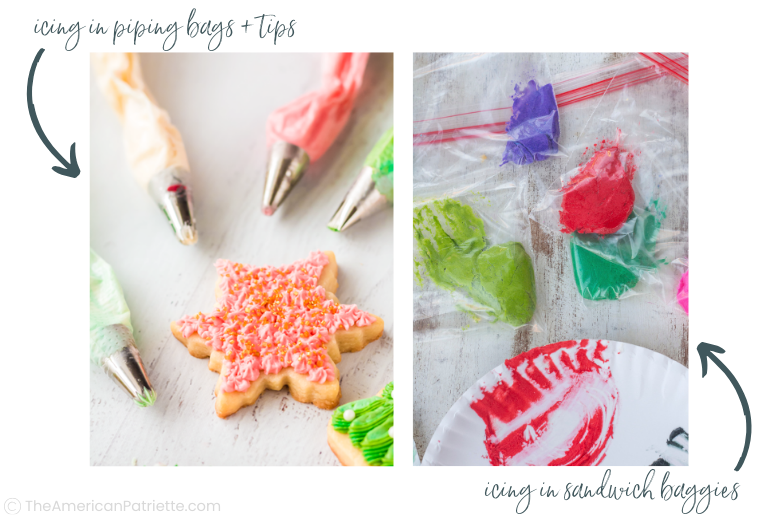
5. Piping bags OR sandwich bags + Maybe piping tips
I’ll help you decide if you need piping tips depending on the decorating method.
(And, if you’re just wanting to decorate using method #1 of just spreading frosting + adding sprinkles, you really don’t need any of these!)
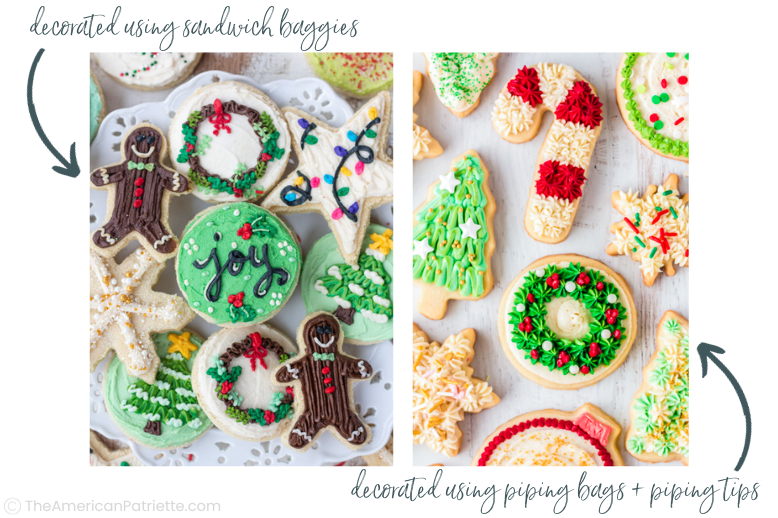
I used to exclusively decorate cookies by 1) Spreading a base coat of frosting on top of a cookie, and then 2) Dividing up lots of colors of icing into sandwich baggies, cutting out the tip, and using those to decorate.
I will still use sandwich baggies from time to time, but now that I’ve discovered these awesome piping bags that are just so easy to work with, I prefer to work with them now.
Pros of using piping bags:
- They’re sturdier (i.e. they’ll rarely, if ever, bust at the seams – sometimes sandwich baggies will split open at the seams)
- They’re easier to hold (goes back to them being sturdier)
- They’re much easier to work with if you’re piping a lot of frosting
- You have to use them if you want to accomplish that textured design look (because you’ll use piping bags + piping tips)
Pros of using sandwich bags:
- Great for doing small, fine detail icing!
- You probably already have some on hand and don’t need to make an extra trip!
As I walk you through each of the four decorating techniques, I’ll help you decide which option – piping bags or sandwich bags – would be better.
6. Other helpful household items:
- Sharp scissors – if you’re using piping bags or sandwich bags, you’ll need to cut the tips
- Butter knife & paper towels – you might prefer to use a butter knife to mix colors, and then instead of using several, just use a paper towel to wipe it off between colors
- Paper plates – these are only helpful if you’re going to do detailed decorating. When you’re decorating with lots of details, you’ll likely have several colors in small quantities of icing. Instead of using up a zillion bowls, I like to mix up 3-4 different colors in small sections on one paper plate.
Alright, let’s get decorating!

Getting started with decorating sugar cookies: coloring the icing
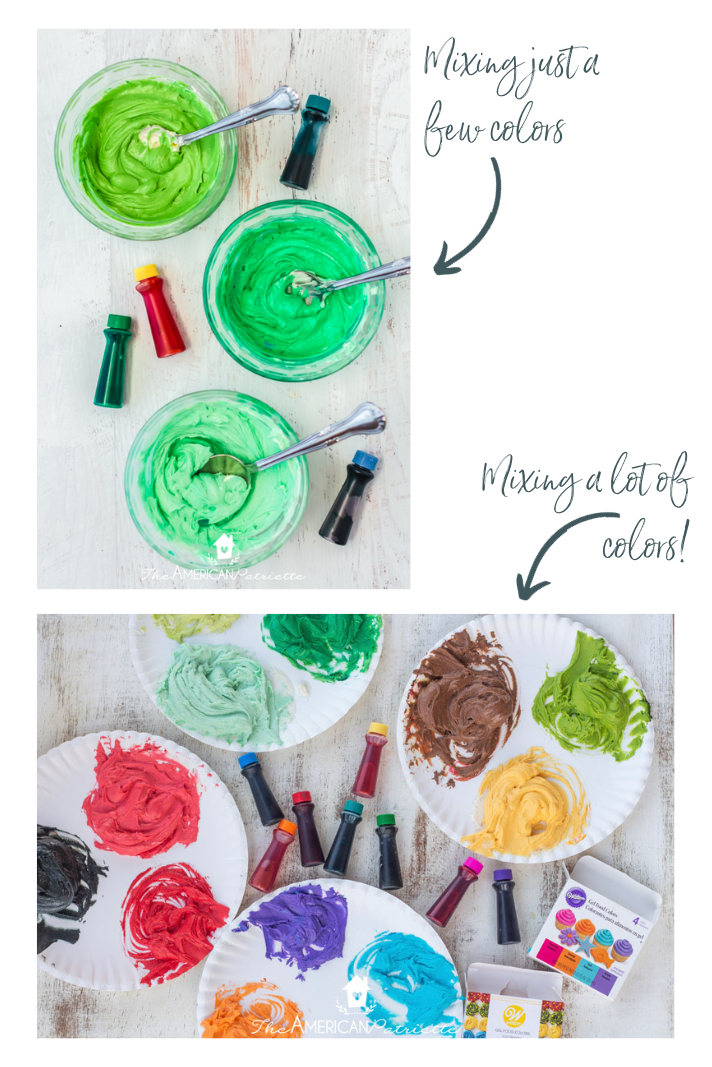
Regardless of what method you’re going to use for decorating cookies, you’ll need to mix up your frosting colors.
If you’re only making a few colors, using small bowls might be easiest. But, if you’re mixing up lots of colors, you might want to use paper plates. Up to you!
Regardless, here’s what you’ll do for mixing your colors:
Step 1: Set aside any icing you DON’T want to color
If you know you’re going to want to use white icing for decorating, make sure you set some aside before you start adding food coloring! 😉
And, be sure to cover that bowl with some plastic wrap while you’re busy mixing colors in other bowls. You don’t want it to develop a crust in the time that it takes you to mix up your other colors.
Ok, onto the colors!
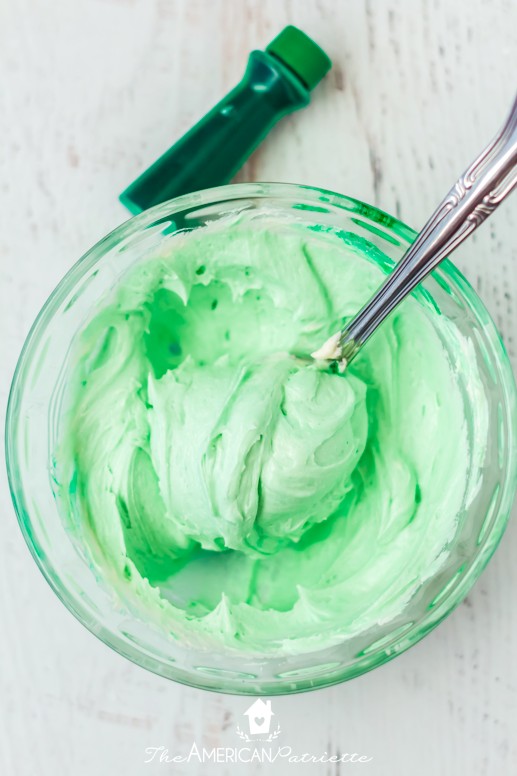
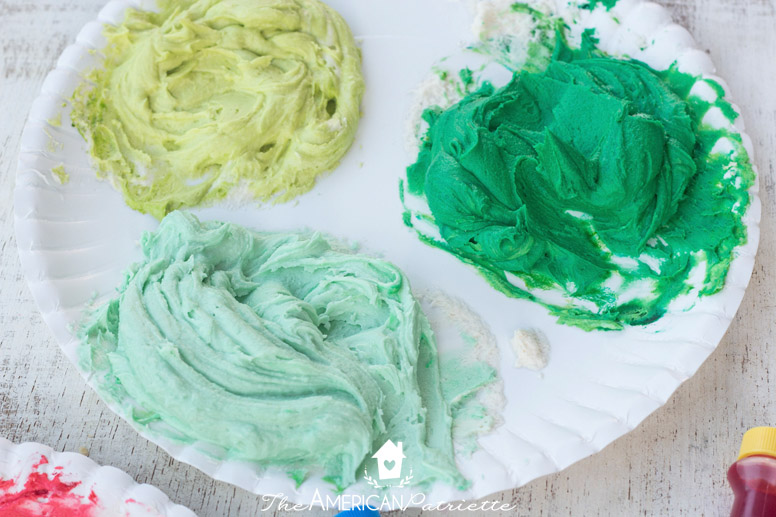
Step 2: Add gel coloring
Start with a drop or two of food coloring, stir well, and then determine if you need to add more.

Mix up your color until you like what you’ve got.
And then continue to color the rest of your icing.

IMPORTANT: if you’re going to spend a bit of time making colors, you’ll want to cover the other icing bowl(s) with plastic wrap, just to prevent a crust from forming.
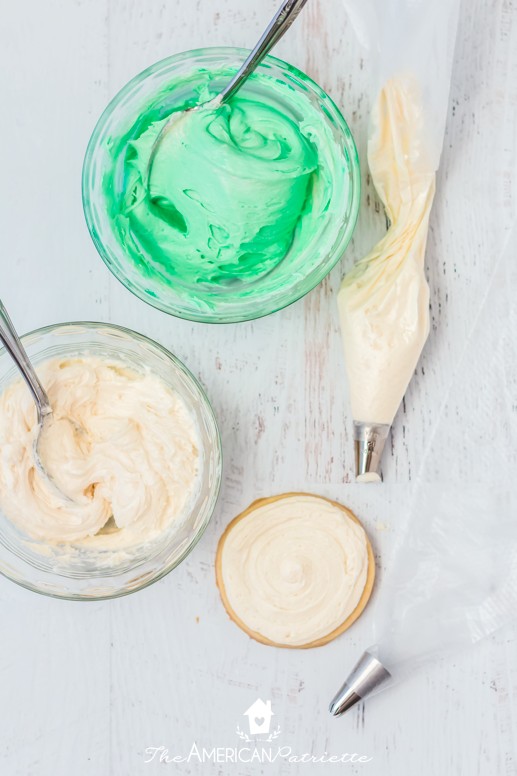
Step 3: Reserve some icing for the “base” color and add the rest to piping bags or sandwich bags
Unless you’re doing detailed icing designs that require small details, I’m going to suggest that piping bags will be much easier to use for decorating, but we’ll get to that in a sec!
Helpful tips about coloring the frosting:
- You don’t necessarily have to make all of the colors individually. Sometimes I’ll make a blue & a green frosting, but then I’ll take a little bit of each of those and mix them together to make a turquoise. All depends on how many colors you’re wanting to make and what kind of variation.
- To make black: Mix all the colors! Usually, it’s literally a mixture of red, blue, green, and yellow (all the colors you’d find in the primary color box of food coloring), but then I’ll keep adding different colors to get the right “shade” of black (i.e. if I want it a bluer black or a yellower black).
- Pro tip: if you’re going to be using quite a bit of black – say for snowman hats or Santa boots – you may want to buy black food coloring. It’ll probably be a lot easier to get a deep shade of black in a larger quantity.
- To make brown: I mix red & green together, and then will occasionally add a tiny bit of blue and/or yellow to, again, get the shade of brown I’m looking for.
- Keep your designs in mind: if you know you’re only going to need the slightest bit of some colors, just make sure you keep that in mind as you’re portioning out the frosting to color.
- What to do if your icings start to develop a slight crust as you’re mixing colors: stir them a bit before using, and that should help smooth it out well enough. (This is rarely ever a problem for me, but if it is something I have to deal with, stirring helps!)
Wahoo! Now for the fun part! Let’s start decorating!
How to decorate cookies with buttercream – 4 ways!
Ok, let’s walk through these four methods really quick in order of difficulty:
- METHOD 1: Spread a base coat & add sprinkles – the easiest method, but still produces beautiful & festive cookies!
- METHOD 2: Textured look – super easy to do with some basic piping bags & piping tips, and gives off a “boutique cookie” look.
- METHOD 3: Two-toned frosting – great for adding some dimension to your cookies, and is especially pretty if you’re wanting to make an assortment of Christmas trees!
- METHOD 4: Intricate frosting details – if you have a steady hand and are wanting cookies with detailed designs.
Ready?!
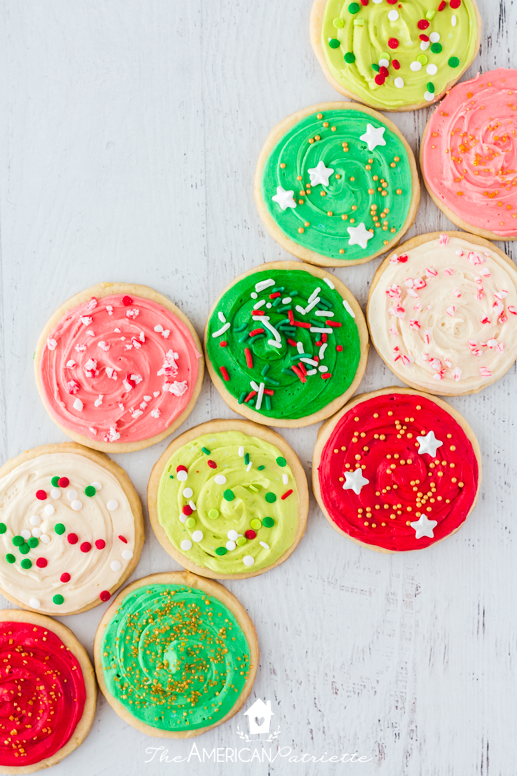
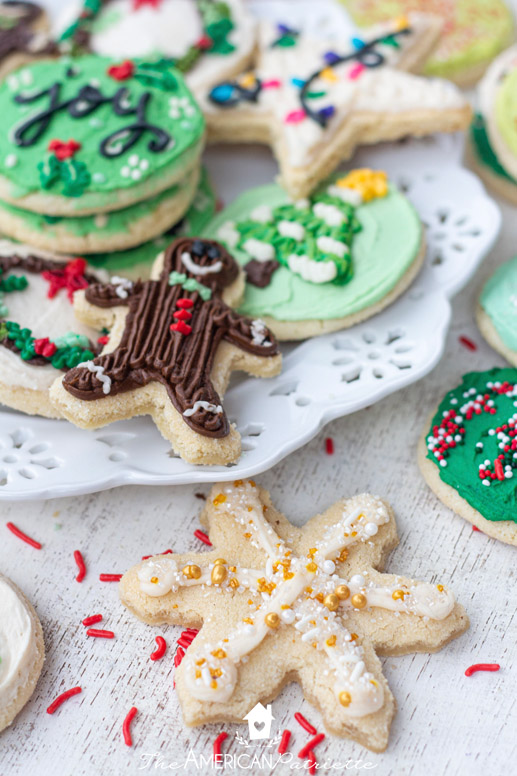
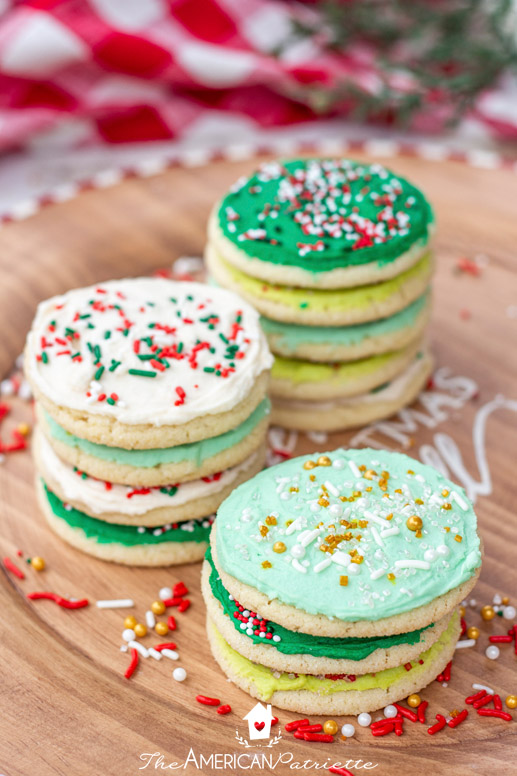
Method 1: Spread a base coat & add sprinkles
Does the idea of decorating sugar cookies sound intimidating? Or, just don’t have the time to spend on lots of detail work?
You can create some absolutely BEAUTIFUL cookies with some festive base coat colors + sprinkles!
Pros of this method:
- This is definitely the fastest & easiest way to decorate sugar cookies.
- You typically don’t need to mix as many colors when you’re decorating cookies this way
- These decorated cookies are definitely the easiest to transport/stack – you’re much less likely to smudge these (or for the smudges to be noticable) than on other decorated cookies
- You don’t necessarily need to worry about using cutout cookies (i.e. sugar cookies in shapes) – you can stick with regular ‘ole round cookies for this method!
- If you use my buttercream that hardens, you can even wrap up and send cookies decorated like this in the mail!

What you’ll need for decorating with this method:
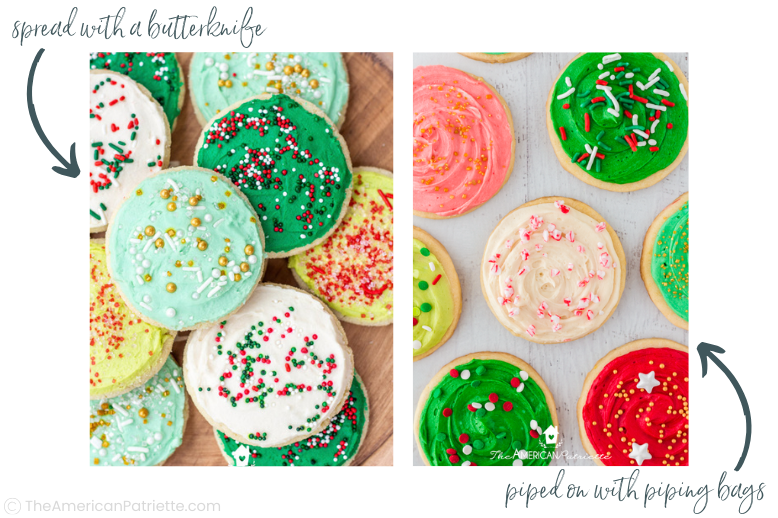
- Frosting: EITHER of my buttercream frosting recipes will work for this method, but if you want it to harden up for stacking/transporting, use this buttercream that hardens – you’ll spread it on with a butterknife. If you want a smoother/more polished look on these cookies, you might want to consider my creamier buttercream, and you’ll pipe that layer on with piping bags. (I’ll show you below what each one looks like)
- Butterknife OR piping bags for adding the base layer (See below!)
- A variety of sprinkles!
Let’s walk through the steps of how to decorate these cookies:
Step 1: Spread the Base layer of frosting
You can either do this with a butterknife or with piping bags.
When I want my cookies to be easy to transport and stack, I like to use the buttercream that hardens + spread it on with a butterknife. The icing layer is a little thinner (and thus less likely to smudge), but it still makes for a great cookie!
However, I also really love the polished/smoother look, so if I’m going for that, then I use my creamier buttercream & pipe it on with a piping bag.
If you decide to pipe it on with a piping bag, you CAN use a large round piping tip, but you really don’t have to. You can also just cut a larger tip out of the piping bag and forego the metal tips.
You just start in the middle of the cookie and then pipe in a circular motion until you’ve covered the whole thing.
Step 2: Add sprinkles after frosting every 2-4 cookies
Don’t wait until after you’ve frosted all of the cookies to add sprinkles. Because that buttercream begins to develop a light crust fairly quickly, you’ll want to add sprinkles after you’ve iced every 2-4 cookies, just to ensure the sprinkles actually stick.
>> Pro tips for adding sprinkles:
- If you’re using the buttercream that hardens, you’ll probably need to lightly press the sprinkles into the icing once you’ve sprinkled them on there. It’s a thicker icing, so they’re not going to stick as well initially. Just lightly press down with your fingers and it’ll be fine!
- Make sure you have rimmed cookie sheets below to catch the sprinkles. Especially if you’re using the buttercream that hardens, you’ll want a way to catch the runaway sprinkles!
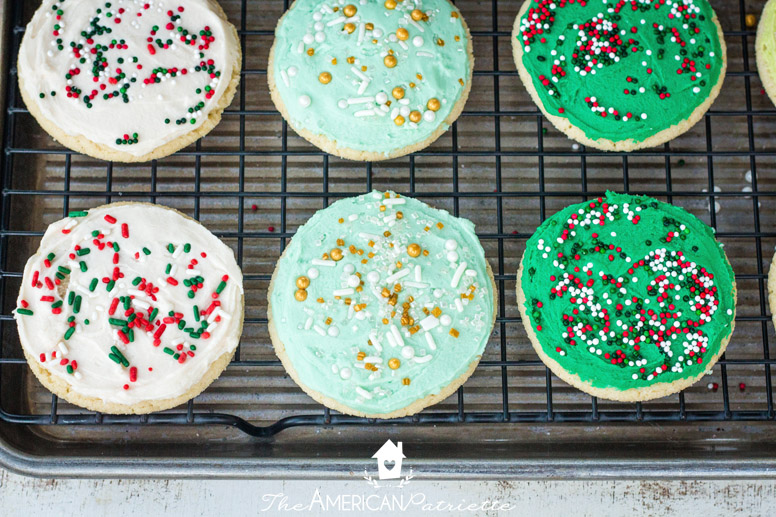
Step 3: Let the cookies set for a bit
If you’re going to transport or stack the cookies (the ones with the buttercream that hardens), let them set for a couple of hours. The icing should be sturdy enough after that.
The icing will develop a bit of a crust on the creamy buttercream, too, but it won’t stiffen up the same way, so you’ll want to be more careful about transporting those.
Either buttercream recipe makes a beautiful cookie!!
Storing & transporting these cookies:
- If you make them with the buttercream that hardens, once they’ve had a couple of hours to set (ideally overnight, but the icing usually hardens up pretty well within 2-3 hours), you can gently stack them and store them in an airtight container.
- If you make them with the creamy buttercream frosting recipe that does not harden up the same way, you’ll want to store them flat – not stacked on top of each other – in an airtight container.
- If you want to make and ship these cookies, check out this post for how to send cookies in the mail!
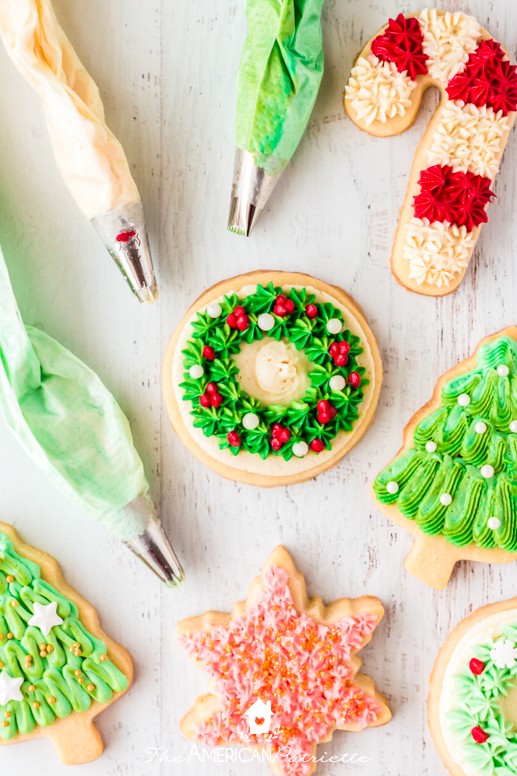
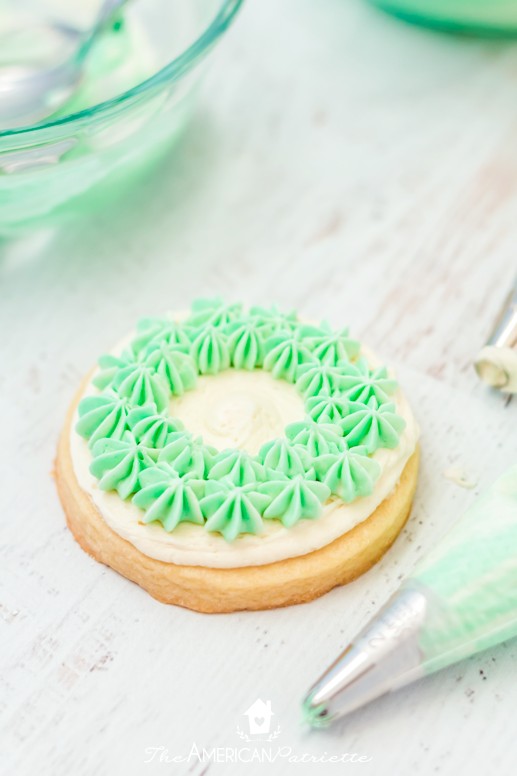
Method 2: Textured Look
This method is also very easy to accomplish, and it produces absolutely gorgeous, “boutique-style” cookies!
Pros of this method:
- This method will take you a bit longer than the first, but overall, it’s pretty quick since you don’t have to be overly precise with your decorating. Using the piping tips helps to mask imperfections pretty well.
- You can end up with some very unique, custom-looking cookies with little effort
What you’ll need for decorating with this method:
- Creamy buttercream recipe – you need this icing to be creamier/fluffier with doing so much piping, so my easy creamy buttercream would be the best frosting for this method.
- Cutout cookies! Cutouts are definitely the best sugar cookies for this one!
- Piping bags – you can use Wilton brand (or whatever your local craft store or Walmart carries), but these piping bags are my absolute favorite and you can get a bunch for quite a bit less than you’ll find elsewhere.
- Piping tips – I think I exclusively used my Wilton star tips – #18 & #21 – for these cookies. I like using a small star tip + a medium-large star tip.
- Sprinkles – they’re fun to add on some of the cookies!
Let’s get decorating!
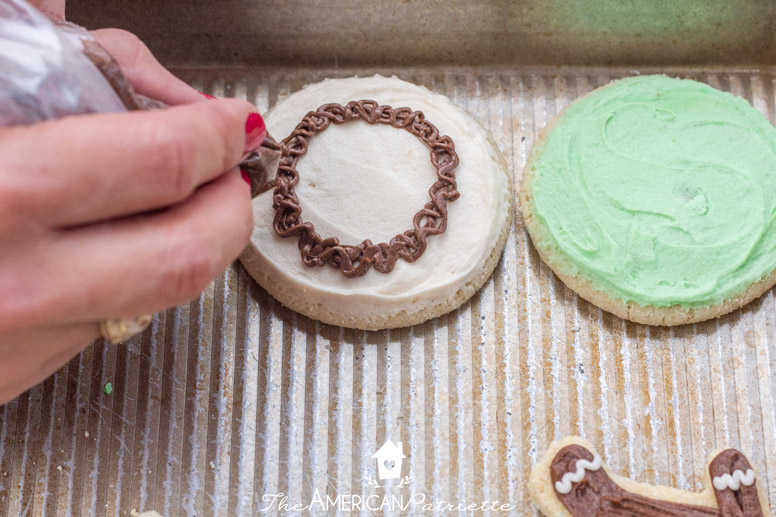
Step 1: Give your cookies a base coat of frosting (if they need it)
If you’re going to frost a wreath or another smaller design on a cookie (i.e. if you’re not going to pipe the entire thing using the star tip), you’ll want to give those cookies a base coat of icing.
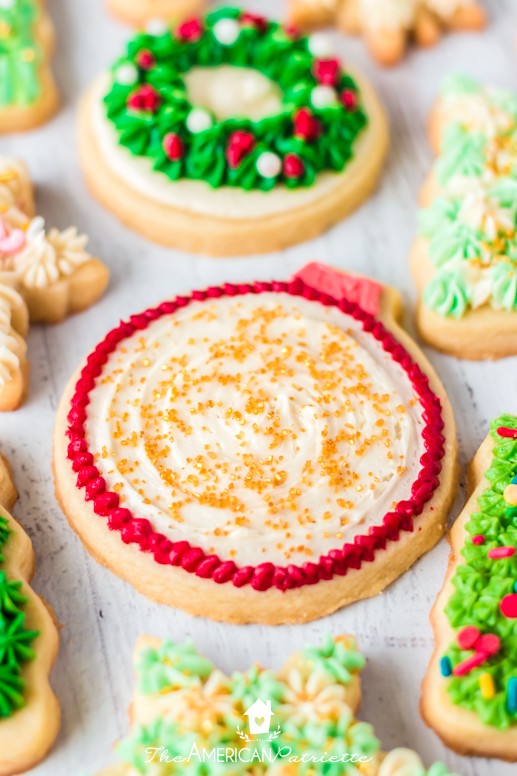
In the photo above, you can see that the ornament cookie & the wreath cookie don’t have the textured look throughout – just on part of it. I added a white base coat of frosting to each before piping on the details.
Step 2: Pipe your design onto the cookies
You might want to practice this a little bit first, just to see how much pressure (or not) you need to apply. But I usually pipe pretty quickly – I take my bag and just do quick bursts of icing.
Pro tip:If you want to practice, simply pipe the icing onto a plate and then you can scoop all of that icing back into the icing bag to use it on the cookies. Then you don’t waste any while you practice. 😉
You can pipe a few different ways:
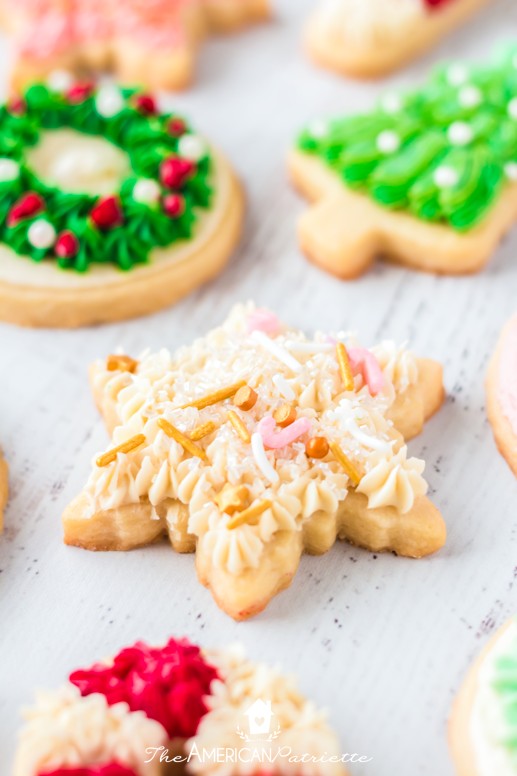
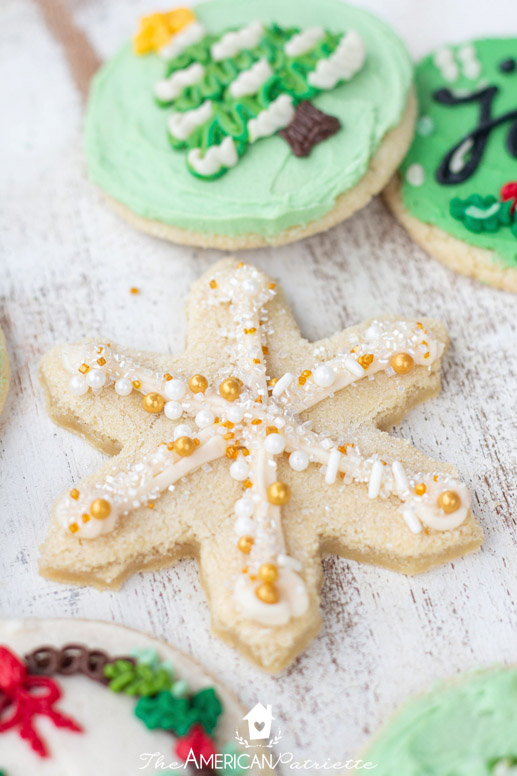
One solid color + sprinkles
Whoever said you can’t a pretty cookie with just some plain ‘ole white icing + sprinkles?!
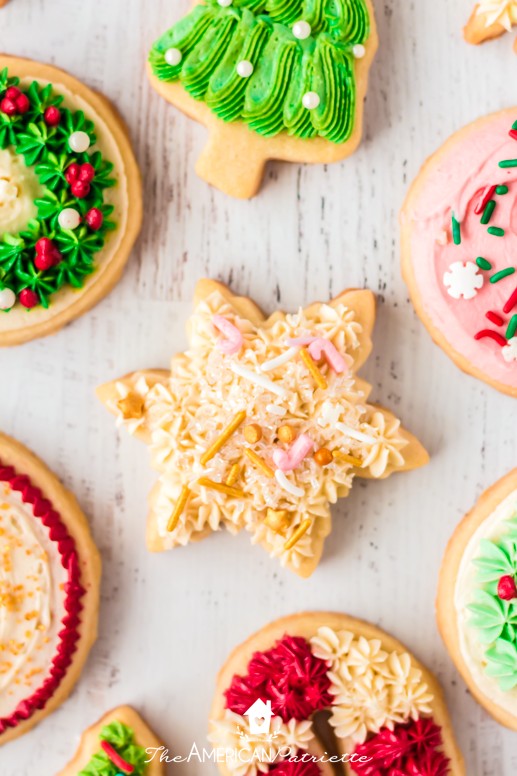
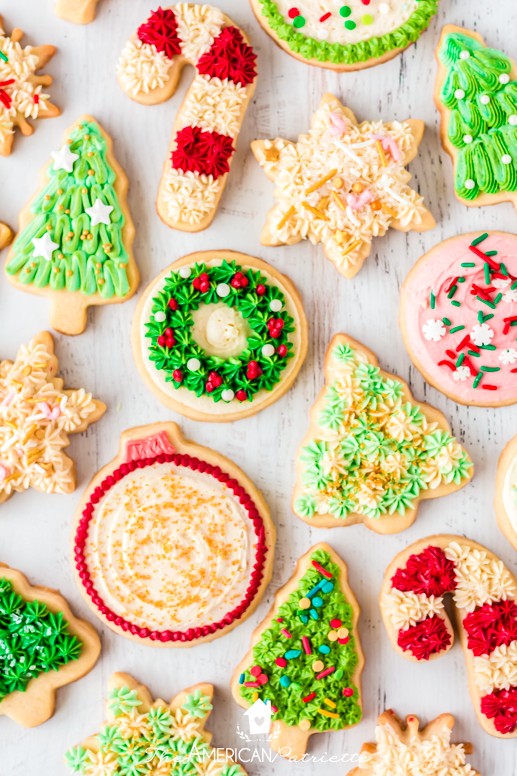
multi-colored piping
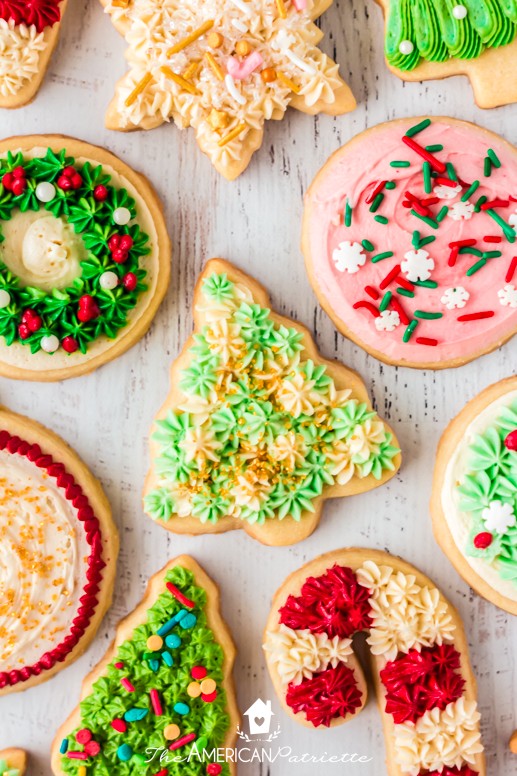
Alternate colors in a pattern & create a candy cane design…
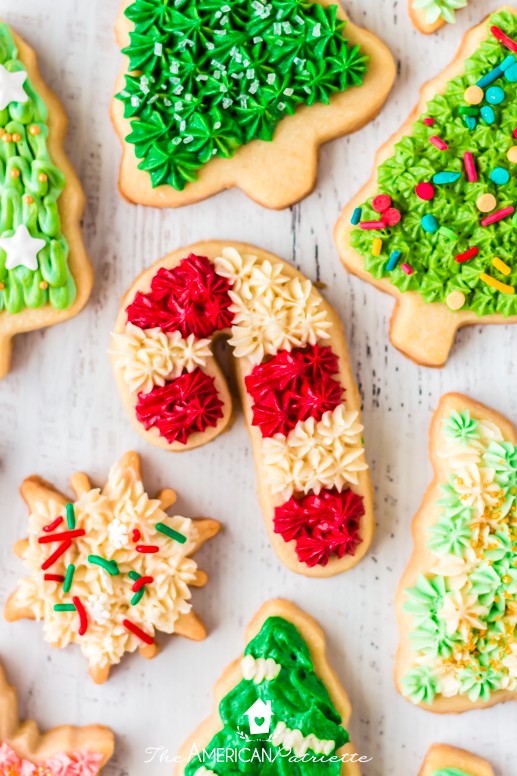
Or randomly alternate colors and create pretty Christmas trees…
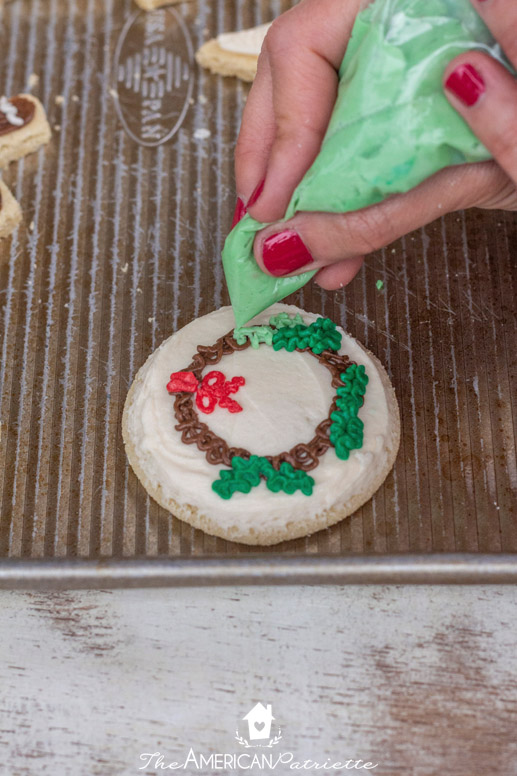
Or Christmas wreaths…
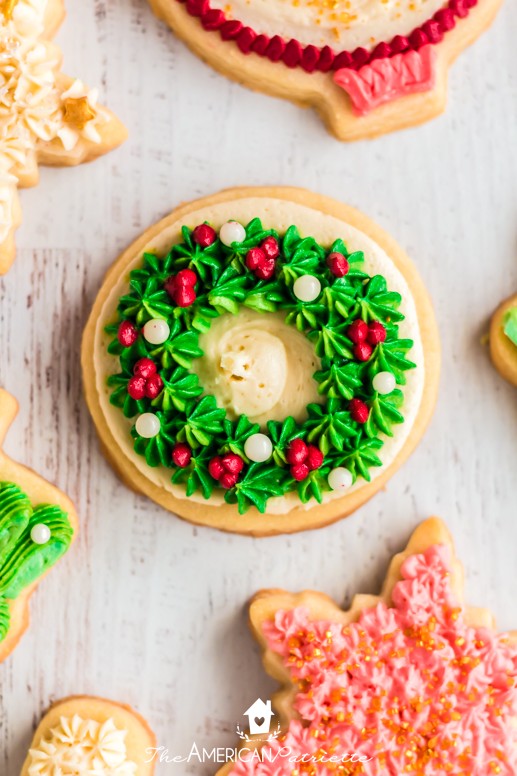
(For the wreath berries, I just cut out a small tip of the icing bag and piped the berries onto the wreath – I didn’t use any special metal piping tips.)
Pipe an outline
Spread frosting onto a cookie, add some sprinkles, and then pipe an outline to give it an ornament look…
Step 3: Add sprinkles if you wish!
Simply dust sprinkles over the top of whichever cookies you’d like.
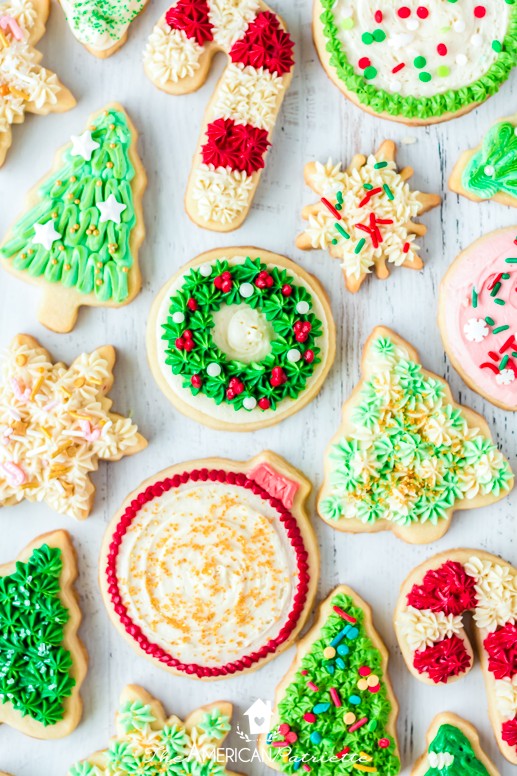
Look at what fun cookies you’ve created!!
STORING & TRANSPORTING THESE COOKIES:
- Let them set for just a bit – maybe an hour or two – and then transfer to an airtight container. Because this method produces a much thicker icing AND because I think this is better with the creamier buttercream, this icing isn’t going to harden up and thus stand up to friction very well, but the frosting will still develop a little bit of a crust, making it a little bit more resilient to bumping up into other cookies. So, IF you have time, I’d allow these cookies to set for a little while before laying them flat – still no stacking – in an airtight container.
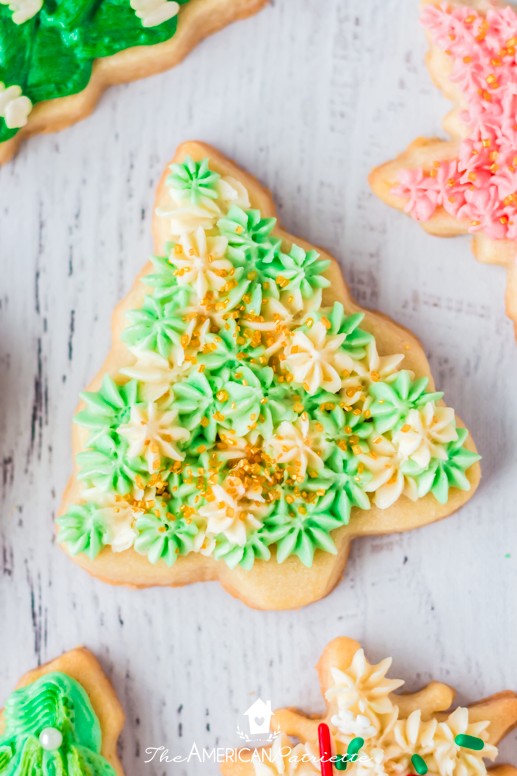
Method 3: Two-Toned frosting
I say I put these in order of difficulty…but I don’t know that this method is actually more challenging than the one before it.
This one is pretty easy, too. 🤷🏻♀️
I don’t think I’d see myself using this method much except to decorate a variety of Christmas trees. I think you could really have a lot of fun with it using various shades of green and various shapes of trees!
Pros of this method:
- It’s still relatively easy, but you get a unique spin on things with the dual-toned icing.
- You can produce a variety of cookies without much effort.
What you’ll need for this method:
- Creamy buttercream recipe – I think this would be easier with the creamier buttercream
- Cutout cookies– especially tree-shaped cookies
- Piping bags
- Sprinkles – to decorate your trees
(And no, I don’t think you need piping tips for this method! Now, you could do this dual-toned icing with the same star-textured method before, and that would produce a really fun, beautiful cookie! But, you don’t have to have tips for this if you don’t want to use them.)
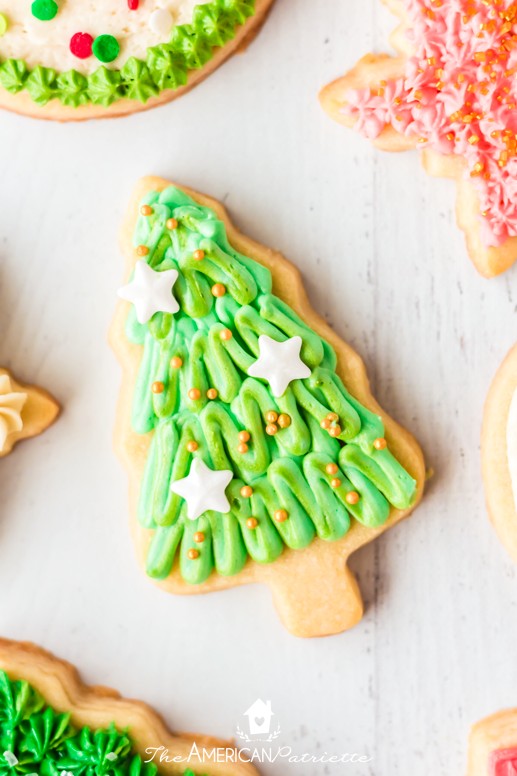
Step 1: Put 2 shades of green into a piping bag
To do this, I usually put one shade on the left and one on the right (this is not going to be exact – don’t fret!), and then I kind of squish the bag together a little bit just to slightly mix them so there’s not a stark contrast between the two colors.
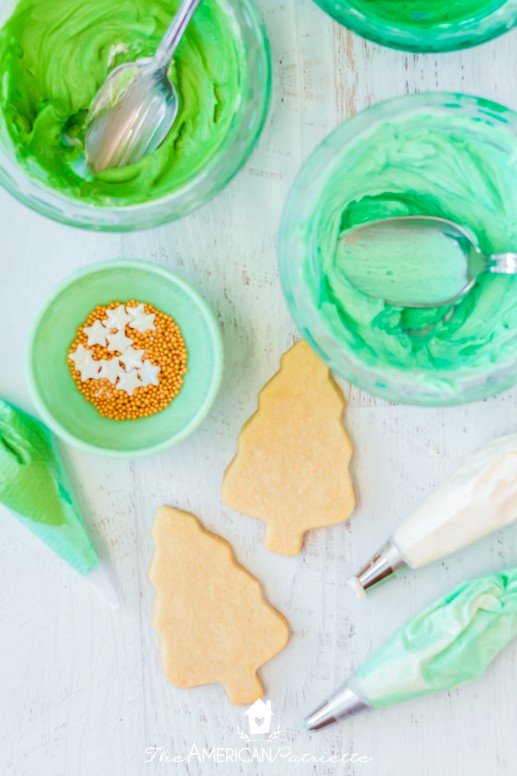
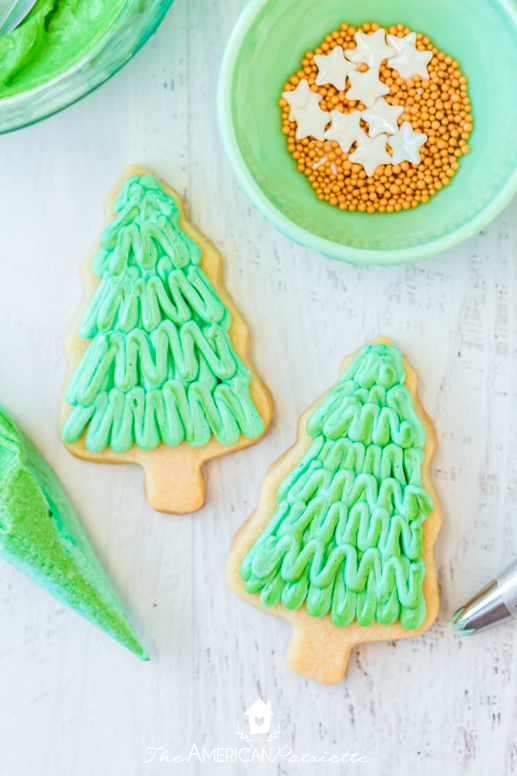
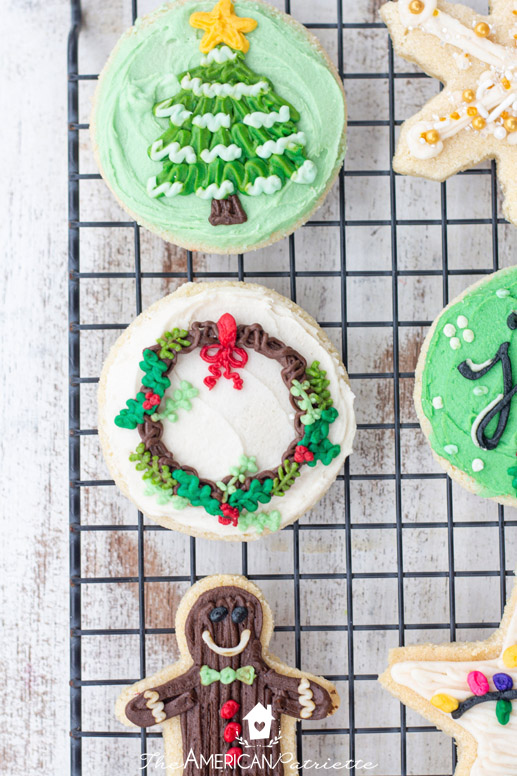
Step 2: Pipe the frosting onto the cookies in a zig-zag pattern
(And, if you need to practice, same goes as before – you can practice piping onto a plate, and then scoop up that icing and put it back into your piping bag.)
Step 3: Add sprinkles
You can do this randomly, or you can be a little more strategic with how you place them. Up to you and the look you’re going for.
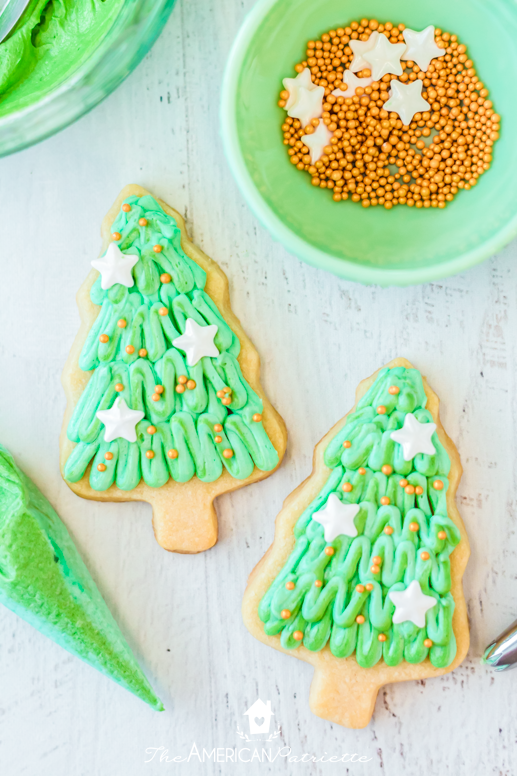
And now keep going with the rest of your cookies!
> Pro tip: once you’ve made some of these cookies with a couple shades of green, you can squeeze out the rest of the frosting from the piping bag and either add more white frosting to it to make the shade lighter, or add more green (or blue if you want kind of an evergreen color) and make the frosting darker. Then you can decorate more tree cookies with different shades of green.
STORING & TRANSPORTING THESE COOKIES:
- You know the drill at this point! Let them set for a bit – if you have time – before storing these flat (not stacked on top of each other) in an airtight container.
Method 4: Intricate Designs

Alright, friend…are you ready for this one?!
YOU CAN DO IT!
Pros of this method:
- You can create some stunningly gorgeous cookies with easy-to-work with frosting
- The sky’s the limit! You can make such a variety of designs!
What you’ll need for decorating with this method:
- Frosting: EITHER of my buttercream icing recipes will work for this method, but if you want it to harden up for stacking/transporting, use this buttercream that hardens. It won’t harden up the same way that royal icing will, BUT, it will stiffen up enough that you can transport your beautifully decorated cookies without fear of them getting totally messed up from Point A to Point B!
- Sugar cookies: if you want just round, chewy cookies (i.e. you don’t want shapes), my soft & chewy sugar cookie recipe will work just fine for these. But, if you want to make some shapes, use my easy cut-out sugar cookie recipe.
- Piping bags or sandwich bags – all of the photos of cookies in this section were decorated using sandwich baggies. They were always my go-to for detail decorating. Now that I’ve discovered these piping bags, I think I actually prefer them, BUT, sandwich bags will work just fine for the small detail decorating.
(And no, I don’t use piping tips for this process. If you’d prefer to have a completely uniform “flow,” then you can use a small, round icing tip – maybe a Wilton #3. But, you’d need to make sure to use piping tips with piping bags; they won’t work well with sandwich bags.)
Let’s get decorating!

Step 1: Make your colors
Unless you’re going to do the same design on all of your cookies, you’ll likely need several colors for this method, and you will likely just need a small amount since the designs are smaller.
That being said, I like to have a larger amount of frosting for base colors (usually white & a couple shades of lighter green) to spread on my round cookies…
…and then I start making lots of colors for the various designs I’m going to do.
> > Pro tip: I was pretty quick to make all of these colors and thus didn’t worry too much about the frosting hardening up, BUT, if you think it’ll take you a while to make the colors (more than about 10 minutes), I’d make a few colors, put them in baggies (or piping bags), and then continue, just so all of the frosting isn’t exposed to air for too long.
Step 2: Reserve the base coat icing & put the detail icing in Piping bags/sandwich baggies
If you haven’t already, set your base coat icings aside & put the detail icing in baggies or piping bags.
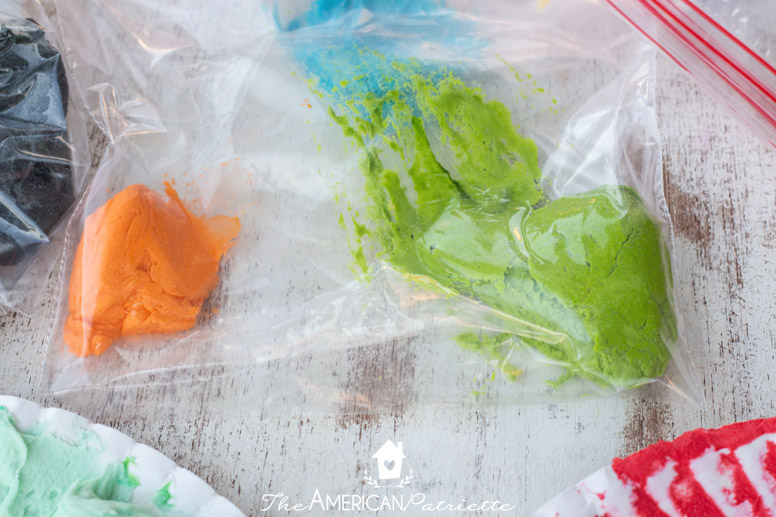
Pro tip: when I use sandwich bags, especially if I only have a little bit of various colors, I’ll often put 2 colors in the same bag – one on one end and one on the other. If there’s only a small amount of each, they won’t touch each other, and then it just reduces the number of baggies I have to use.
Make sure to keep any un-bagged icing covered with plastic wrap. You don’t want it exposed to the air for too long while you’re decorating.
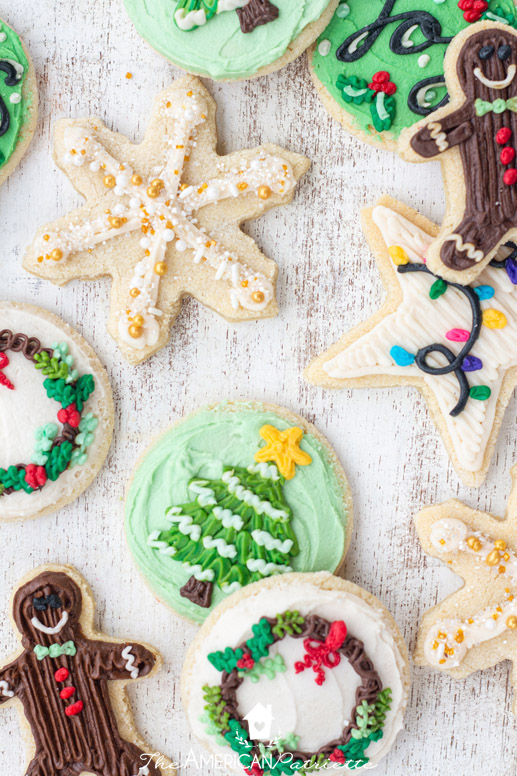
Step 3: Start decorating!
You’ll need to cut the tips out of the piping bags or sandwich bags first. Start small – you can always cut larger ones!
***IMPORTANT NOTE: If you’re going to decorate with the buttercream that hardens, know that this icing is a bit thicker & isn’t going to be as fluffy as other buttercream. I have decorated HUNDREDS of cookies with this recipe, so I KNOW it works, but for easier use & decorating, you can kind of “massage,” if you will, the icing once it’s in the piping bags or sandwich bags, and that’ll warm it up & loosen it up just a little bit and make it easier to work with.***
Ok, onto the decorating!
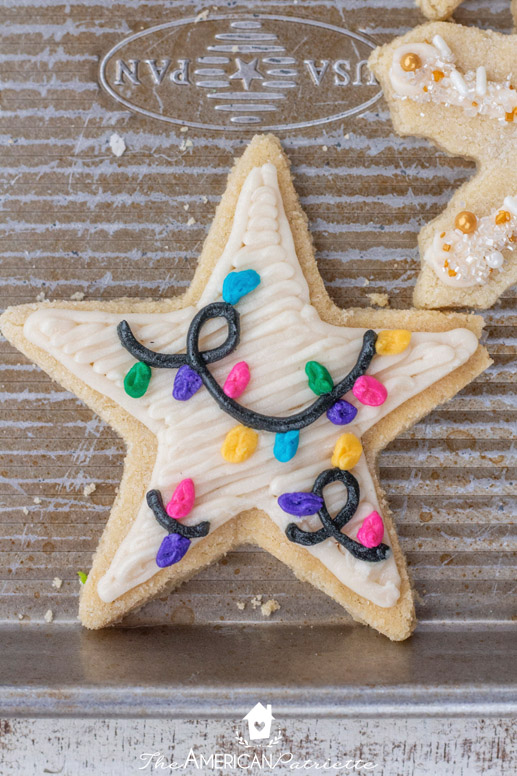
Tips for choosing your cookie designs:
- Do a Google or Pinterest search for “decorated Christmas cookies” and see what inspiration you get!
- If you want a calligraphy look, you can do a search for “Christmas word art” or “Christmas calligraphy” and get some inspiration from those images, too.
Once you’ve cut the tips out of the bags, you’ll start piping the icing onto the cookies.
Go on with your next layers…

And, just as with the other methods, if you need to practice, go for it! Practice on a plate, and then scoop that icing back into your bag to reuse on the cookies.
If you’re decorating shaped cookies…
Pipe the base color onto the cookie – outline it first, and then fill in the rest by going back and forth. Then you’ll add your detail work.

Add some sprinkles if you wish!
Step 4: Allow the icing to set
Just as with the others, you’ll want your buttercream to set for a bit on these before you stack or transport them. If you use the buttercream that hardens, especially if you’ve done some fairly detailed designs, I’d allow them to set overnight before stacking them.
(I do think they’ll probably be fine within a few hours, but overnight is best!)
STORING & TRANSPORTING THESE COOKIES:
- Once you’ve allowed them some time to set, you can then stack them (if you used the buttercream that hardens) or lay them flat – not stacked (if you used the creamy buttercream that doesn’t harden) in an airtight container.
Tips for decorating with this method:
- If you don’t have time to do all of the decorating in one day, it’s fine – you can do it in steps. On the day you make the icing, I’d then go ahead and make your “base color” icings (i.e. the colors you’re going to spread on the tops of the cookies) and spread those on the cookies, and then reserve the rest of the icing in either piping bags/sandwich bags or an airtight container. LEAVE IT AT ROOM TEMPERATURE. It’ll be really hard to work with if it’s cold, and it really doesn’t need refrigeration for the first few days.
- Decorate with the colored frosting within 24 hours. This isn’t a must, but, if you add food coloring today, store it in baggies, and then wait a few days to decorate, the color will start to separate from the icing. It’s best to go ahead and decorate with it within 24 hours of making/coloring the frosting.
- Remember to reserve some white frosting! Unless you know you’re not going to use any white, you’ll want to make sure you don’t get too carried away with coloring the frosting that you forget to leave some of the white behind.
ENJOY!!
FAQ for decorating with buttercream
Does the icing spoil?
The cookies + the icing taste just fine even a full week after frosting them. And no, you don’t need to store them in the fridge!
Can I Make the Frosting Ahead Of Time?
Yes, but you want to make sure you store it in airtight container(s) and/or piping bags (sealed with a clamp or rubber band) or sandwich bags. Regardless, just make sure your storing method is airtight. It would probably be best to decorate cookies within about 24 hours of making the frosting.
How Do You Store frosted cookies?
Once the icing has set (just depending on which recipe of mine you used), store the decorated cookies in an airtight container and leave them out at room temperature. If you use the buttercream that hardens, you can stack the cookies, but if you don’t, try to keep those cookies as flat as possible without stacking.
Do I Have To Refrigerate The Icing?
No, leave it out at room temperature for a few days. If you have leftover icing and don’t plan to use it within about 3 days, then go ahead and store that in an airtight container for up to a week and it’ll still taste good. If you plan to use it for decorating, though, let it come up to room temperature first. It’ll be much easier to use.
How long does it take for the icing to harden?
For the buttercream that hardens:
- Especially for the cookies that you’re frosting & then sprinkling (i.e. no detailed piping work), you can stack those pretty soon after you make them (within a couple of hours). But, just to be on the safe side, I’d wait overnight before stacking cookies on top of each other – particularly the ones with the detail. However, if you’re on a time crunch, you can pretty much stack and transport the cookies that you frost & sprinkle within a couple hours of making them.
For the creamy buttercream:
- This one won’t harden up. It’ll develop a very slight crust on the top (and then after a few days, it’ll be much stiffer, but I’d recommend eating them within about 2-3 days of making them!), but they won’t harden up like the other one will. But, if you’re not traveling long distances with them or if you don’t need to stack them on a platter at home, this creamy buttercream is just fine. AND IT IS SO TASTY.
How long will the Buttercream Icing last?
It’ll still taste great on the cookies for at least 3-4 days. The fresher the better, but they’re still quite tasty even a few days after making them.
Can I send cookies decorated with buttercream in the mail?
YES! But, for best results, I’d use Method #1 – spreading frosting + sprinkles (i.e. not detailed decorating). Go here for “best practice” tips: how to mail frosted sugar cookies.
Can You Freeze Cookies Decorated With Buttercream Frosting?
You can, but I would not do this on purpose. In other words, I wouldn’t intentionally make them ahead of time, freeze them, and then expect for them to look “gift worthy” or “platter worthy” coming out of the freezer.
Really, the only time I’d freeze them is if I had quite a few extra & wasn’t planning to give them out but wanted to save them to have a sweet treat for my fam.
If you really want to be able to freeze decorated cookies, try using my easy royal icing – it freezes and thaws really well! The cookies come out of the freezer looking just as pretty as they did when they went in. 😉
Have fun decorating!!
Related recipes for you:
- Soft & chewy sugar cookie recipe – for delightfully chewy & soft cookies! (And, no chilling required!)
- Cut-out sugar cookies – if you want cookies in fun shapes. This recipe is quite tasty.
- No-Chill Pumpkin Spice Cut-Out Cookies – these have a soft bite, don’t require chilling, and have a yummy spicy flavor for the winter months.
- Easy sugar cookie icing that hardens – this is more of a glaze-like frosting that comes together really easily. You won’t be able to decorate with as much detail, but it is a really tasty recipe, it’s not fussy to make, and it will completely harden if that’s what you’re needing!
- Easy royal icing recipe – if you want an icing that’s going to harden up 100%. It’s not buttercream (I mean, can anything compare?), but for royal icing, it’s a definite winner.
Be sure to snag your FREE holiday baking cheat sheets that you can print out & hang up in your kitchen cabinets with all sorts of tips and tricks for Christmas baking! 🙂
I need to use a chocolate buttercream recipe for a Little Bear shower. Is this recipe adjustable?
My brown bear colored frosting showed signs of the colors I mixed for brown-after drying on the cookies. Any help is appreciated!
Thanks!
So sorry I’m just now getting to this – that’s a good question. When you made your frosting, did you use gel colors or liquid colors? If you used liquid, that could be one problem. If you do add the cocoa, I would maybe start by taking out some of the powdered sugar – maybe take out 1/2 c powdered sugar and add in 1/4-1/3 c cocoa. (You can always add more) If you need to adjust the texture to make it creamier, I’d just add in a little bit of cream at a time. But, I definitely think this could work using cocoa powder! I should definitely try that!
I’m excited to try this — like you, I love the buttercream flavor AND I want to transport some of my cookies! Have you ever tried it with frosting bags and piping tips?I I’ve generally had an easier time in the past using those than using baggies, but then I’ve never tried your specific recipe! Thanks so much for all the work and experimentation that you put into solving this dilemma — it’s one I’ve had for a while!
Yay, Betsy! I hope you have so much fun trying it!
So, the only reason I don’t use frosting bags & piping tips is because I’m usually piping so many different colors and I don’t have that many small piping tips. And especially since sometimes I’ll only need a tiny bit of frosting in a few different colors (maybe I’ll only need a tiny bit of orange for a snowman’s nose, and a little bit of pink for part of a holly berry accent), it always seemed like a waste to me to buy so many frosting bags and have to wash so many piping tips when the sandwich bag method always worked just fine for me.
However, if you’re making these in bulk and are doing the same design on all of the cookies and don’t necessarily need to have 10-15 different colors, then using piping tips & frosting bags might make sense!
I tried uploading it again – I don’t know why it’s so finicky on playing! Hopefully it’s showing up for you now!
Do you think it would work to put this icing in the plastic squeeze bottles? I am having kids decorate and wondering if that would be easier than the plastic bags for them? I think they will definitely prefer this icing over royal icing but now I’m trying to figure out how to not have a huge mess on my hands! Thanks!
The icing is pretty thick, so unless you make a lot (I’d probably at least double the recipe), I don’t know that squeeze bottles will enable kids to get enough out at one time. Does that make sense? If the squeeze bottles are completely full and thus there’s more icing to put pressure on in the bottle, it might work, but I don’t know how well.
But, I also think sandwich bags would be fine! I have two munchkins who LOVE to decorate cookies with this icing, so when I finish up with my designs and have leftover icing, I usually just let them go to town making whatever designs they want on cookies, and it hasn’t been an issue. 🙂
Do you store these cookies room temp or in the fridge?
Room temp! No need to store in the fridge.
Could I use non-fat milk in the buttercream frosting recipe? I know that the consistency will not be the same as heavy whipping cream or even whole milk, but my family has a lot of allergies and we only use non-fat milk in our household. Is there any adaptations I could make to the rest of the recipe to make up for the use of non-fat milk? I can’t wait to try this recipe! Thanks for posting!
I don’t know that you’ll get the same hardening, but the consistency should be ok enough for actually spreading the frosting. 🙂
Hey there,
If u wanted to “flood” some parts of cookie how do you do so? Milk? Water? Or can you not flood with buttercream?
I’m so sorry it’s taken me so long to respond to your comment! The buttercream recipe I use for this method really isn’t made for flooding – I never flood cookies because I don’t like royal icing, so I take the little compromise on appearance in order to get buttercream. 🙂
So strange, something went wrong with the coding & it wasn’t displaying anymore. I just added it again!
When will I receive the free holiday baking cheat sheets? I clicked on the red box, completed the info, and verified on the email you sent. Did I miss a step somewhere?
Hi Susan, did you check your spam/junk folder? My emails often end up there. 🙁 If you don’t see them, send me an email mauri[at]theamericanpatriette.com and I’ll get ’em to you!
Hi Sue, you’ll find it directly on this post!