Easy Royal Icing Recipe (that actually tastes good!)
Looking for an easy royal icing recipe with meringue powder that actually tastes GOOD and is simple to make?! This icing recipe comes together so easily, hardens up but has a soft bite, has fantastic flavor & great texture, and makes GORGEOUS cookies! It’s the perfect icing for sugar cookie cutouts!

And YES, anyone can absolutely achieve beautiful Christmas cookies with this sugar cookie icing recipe – you just need a steady hand and a little bit of patience!
You know how people will look at a beautiful Christmas cookie and say, “Gosh, it’s just too pretty to eat!”…? Well, I think part of the reason is because many beautiful Christmas cookies are made with royal icing that just doesn’t taste good.
It really is too pretty to eat. I feel like royal icing is kind of like the “fondant” of cookie icing – it can make for beautiful designs, but the flavor, especially compared to buttercream, is just. not. good.
UNTIL NOW! I really do think this is the best royal icing out there.

My buttercream frosting that hardens is wildly popular – for that very reason: it’s deeelicious buttercream that hardens up a lot better than traditional buttercream – but some people are still in need for a cookie icing recipe that hardens completely and won’t smudge a bit.
And for that kind of icing, you really can’t have any kind of grease or fat (i.e. butter or cream) because grease and fat will prevent an icing from becoming completely solid.
But, I decided to do a ton of experimenting just to see if I could figure out a royal icing recipe that defies all of the odds and DOES actually taste…GOOD. And friend, I really, really think this is it! I can’t wait to share it with you!

Why you’ll love this easy royal icing recipe with meringue powder:
It actually TASTES GOOD.
This is the #1 reason. This is the biggest difference between this icing and traditional royal icing. I mean, there are zillions upon zillions of royal icing recipes out there. But you tell me: if you’re at a Christmas party or a baby shower or a wedding and the cookies look ABSOLUTELY perfect, doesn’t part of you think…it means they’re probably not going to taste very good? Royal icing is notorious for being hard, candy-like, and chalky. I wanted to see if I could try to make a version that didn’t automatically relegate itself to those three categories. And I have to say, I couldn’t be more thrilled to suggest that this one, as far as royal icings go, TAKES THE CAKE when it comes to flavor & texture!
It’s easy to make.
Again, a classic royal icing recipe is also notorious for being quite fussy to make & feels like hard work. I think you’ll find that to be quite different with this one. I’ve tested this recipe over and over again, and I’ve consistently come up with the same results. I think using meringue powder instead of egg whites helps a lot with the ease of the recipe! NOW, I know certain environments can offer different results (i.e. super humid climates vs. dry ones), but, if you follow the basic principles in this recipe, I think you’ll find it’s super simple to make and comes out beautifully!
It’s easy to use for decorating.
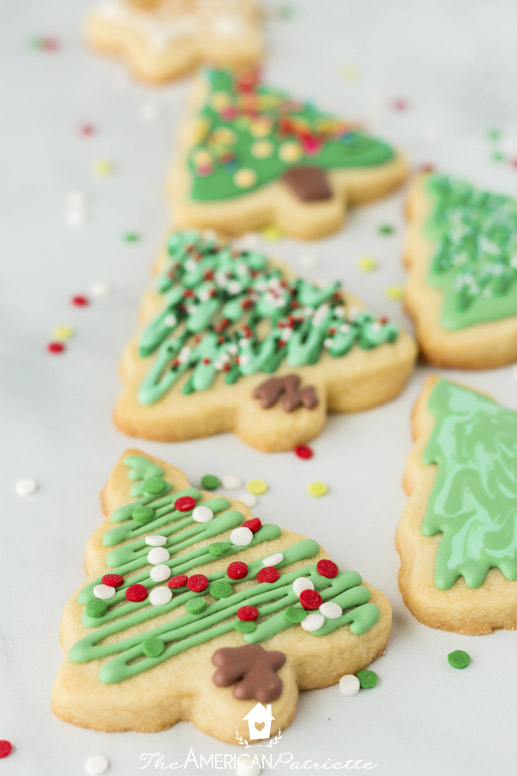
Not a professional cookie maker or gorgeous drawer? ME EITHER! This icing is FUN to work with, and you can make some beautiful designs! It produces a smooth, matte finish that’ll give off that professional-looking cookie appearance. You just need a slightly steady hand, some festive sprinkles, some gel food colors, and you’re well on your way to absolutely lovely cookies! (And don’t worry, I’ll show ya how to decorate sugar cookies with royal icing!)
This icing consistency is good for both piping and flooding.
Some royal icing recipes will suggest that you need to make a thicker icing (i.e. one version with less water) for piping consistency and a thinner icing (i.e. one version with more water) for flood consistency. I didn’t want to be that fussy with these cookies, especially since the detail isn’t outrageously intricate, so I really think you can get away with the same consistency for both piping and flooding. That’s how I decorated all of these cookies you see here, and that’s how I’ll continue to use it.
You can freeze decorated cookies!
YEP! I did a test run in the freezer with these, and they came out of the freezer just as beautifully as they went in! Check it out!
This post contains affiliate links for your convenience. You can read my full disclosure policy here.
Ingredients for this easy royal icing recipe:
Every royal icing recipe includes three basic ingredients: powdered sugar, raw egg whites or meringue powder, and water.
That’s it! But, that’s exactly what the icing always tastes like: pretty basic.
And the WHOLE REASON for me experimenting with royal icing recipes was to see if I could develop one that tastes WAY better than basic.
So, after tons of testing in my kitchen, here are the simple ingredients that made the final cut to create an icing with great texture and flavor AND still completely hardens so you can stack/transport/package without any hesitation:
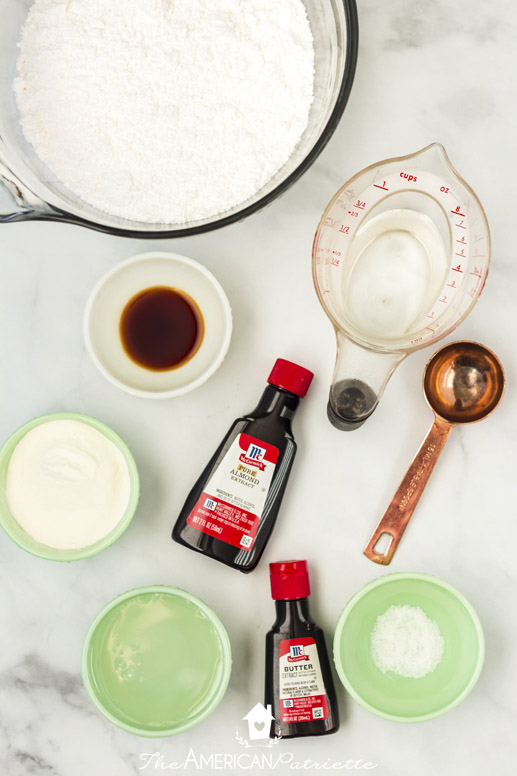
- Powdered sugar – the base of pretty much all sugar cookie frosting recipes (I just use my store brand powdered sugar). Also known as confectioners’ sugar.
- Meringue powder – meringue powder (or raw egg whites – whichever a royal icing recipe uses) is what makes royal icing…well, royal icing! However, to make things *way simpler* – I prefer merinThe meringue powder helps give the icing some structure for decorating and holding a shape, as well as helps the icing set. I use Wilton meringue powder – I’ve never had a problem finding it in the grocery store!
- Light corn syrup – This isn’t a traditional royal icing ingredient, but as with some of the other ingredients I include in this recipe, it makes a BIG difference. I experimented with and without it, but we definitely preferred the recipes when it was included. The corn syrup helps add a softer bite to the icing so it doesn’t have such a hard-candy-ish texture.
- Water – but not too much! I’ll talk you through that in a bit.
- Flavor extracts! These are the secret sauce to a DELICIOUS royal icing! (SERIOUSLY: Don’t skip these if you want flavorful icing!)
- Vanilla extract – I always use Mexican vanilla when I bake, but any good vanilla extract will do. (Some may prefer to use clear vanilla extract, but I’ve found that with whipping this icing in your mixer, the icing turns out a nice crisp white anyway, so I really don’t think the clear vanilla is necessary.)
- Almond extract – this adds a great pop of flavor. You can do without it if you don’t care for it, but I definitely think it’s worth the add!
- Butter extract – you know how you prefer the flavor of buttercream frosting because it tastes SO MUCH BETTER than royal icing? Well, butter extract is actually going to help dress up this royal icing and make it taste WAY better than normal royal icing and almost as good as the real deal of dreamy buttercream! A little goes a long way, though, so make sure you read my recipe notes.
- Pinch of salt – I can’t believe this isn’t in more royal icing recipes. It helps so much with flavor. Don’t skip it!
You know how royal icing can often have a chalky, bland flavor? I think the extracts in this recipe (especially the butter extract) plus the salt really help elevate this icing into something that you’ll actually enjoy eating. This icing isn’t just for looks. 😉

Equipment you’ll need:
- Electric mixer with the whisk attachment – you’ll need this for beating the icing and getting a lot of air into it. Using an electric mixer is crucial to creating the right structure and consistency of your royal icing. You can use a hand mixer if you need to, but I always prefer using my stand mixer.
- Small bowls – for mixing different colors.
- Gel food colors – I get Wilton gel colors (in the small bottles – 4 to a box) from my local grocery store. I usually have a box of the 4 standard colors (red, green, blue, and yellow), as well as a box with some “off” colors (turquoise, pink, purple, and orange). You probably don’t need both – just the standard box will be fine; you can do several variations of colors just using those 4! I just like having a wide variety of colors, so I keep both on hand.
- Piping bags or sandwich bags – I use sandwich bags at least half the time I decorate cookies. They often work just fine for me! However, if you’re wanting to put a lot of icing in one bag (i.e. especially if you’re not doing detail work and you’re only going to make a few colors), I’d recommend piping bags. They’re sturdier and hold up a lot better with gobs of icing. You can get them at Hobby Lobby, Michaels, Walmart, and often times on the baking aisle of the grocery store. I’ve always just used the standard Wilton ones, but my cousin, who is a fantastic cookie decorator, recently recommended these to me, and I LOVE them. The texture and consistency of them makes decorating even easier. I probably won’t go back to other piping bags now!
- Piping tips & couplers – completely optional. I didn’t bother with piping tips when I decorated any of these cookies you see in the photos. However, some people might prefer to use piping tips to ensure a consistent flow. If so, I’d suggest sticking with basic Wilton tips #2-5 (2 being the thinnest flow, 5 being thicker). If you don’t have multiple of each tip, you can use couplers that enable you to move your one tip from icing bag to icing bag.
- Sprinkles! I used a few different kinds of sprinkles on the cookies you see in these photos – the variety is so fun!

How to make this easy royal icing:
The full recipe is at the bottom of the post, but I’ll walk you through the basic steps here. Because you are wanting to achieve a certain structure for the icing to work properly (i.e. for easy decorating and for drying/hardening properly), I’m hopeful you’ll find all of these details super helpful so you can get the perfect icing the first time you make it! Ready to get started?!
First, add ALL of the ingredients to your electric mixer bowl, but START SMALL with the water.
I think it’s a lot easier to thin out the icing than it is to thicken it up, and a little water goes a long way.
Here are some tips for measuring & adding the ingredients:
- When measuring the powdered sugar: I scoop a 1 c measuring cup into a canister of powdered sugar, and then I level it off with a knife. But, here’s what I’ve found – if the icing is pretty packed in there (vs. a little looser), you’ll likely need to add a little bit more water once you’ve mixed everything together. I’ll tell you about that in just a minute! If it’s not super packed in there, then definitely don’t start out with more than 5 T of water like I suggest below.
- You’ll then add the powdered sugar, meringue powder, corn syrup, pinch of salt (a little less than 1/8 of a tsp), and the vanilla & almond extracts into your large mixing bowl.
- Then, here’s where you need to be particularly careful: with the water & with the butter extract. A little goes a long way of each. For the water: start out with 5 tablespoons. You can always add more later – trust me! For the butter extract: I’ve found that 16 drops is the perfect amount for flavor. Too much, and the icing is going to taste fake, so you’ll want to be careful with what you add. I’ve made this recipe many times, and 16 drops has always been perfect, but you can start with fewer and add more later, depending on your own taste.
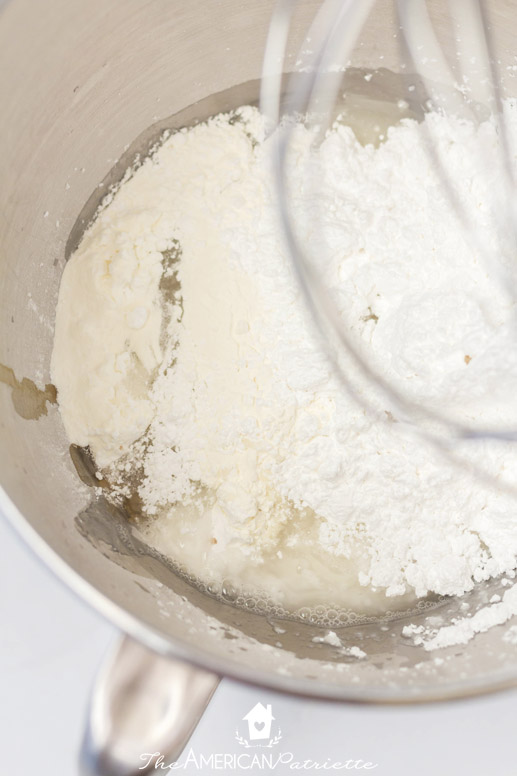
Then, whisk everything together, but start slow.
Using the whisk attachment, turn the mixer on low just until all of the ingredients are incorporated – about 20 seconds or so. Turn off the mixer, scrape the sides of the bowl, and then turn the mixer onto medium speed and allow to mix for 4 minutes. (I consider medium speed to be at the “4” mark on my KitchenAid stand mixer.)
Turn off the mixer and check the consistency of your icing. Because of the corn syrup, this royal icing isn’t going to form the same large, stiff peaks that you’d get when making other royal icing – that’s totally fine! This will work & taste great!! The icing consistency should feel kind of like runnier marshmallow cream.

When you lift the mixer and the icing drizzles down into the bowl, that drizzle should blend back into the icing within about 8-10 seconds.

Pro Tip: Sometimes it’s hard to determine the correct consistency of royal icing, especially since there are often other environmental variables (i.e. especially humidity vs. dry climate) that can affect how much water you need (or don’t need). When I made this during warmer, more humid weather, I rarely had to add more than 5 T of water. But, when the weather was colder, dryer, and our heater was on, I noticed the icing was thicker and I needed to add more than 5 T – at least another tablespoon or so.
The consistency of this recipe should be perfect for both piping AND flooding (i.e. not too runny, and yet not too thick) – if you have it there, you should be good to go!
However, you don’t have to play a big guessing game! You can easily test it before you start coloring the icing.
To do a quick consistency test: put a small amount of icing – maybe about a tablespoon – into a sandwich baggie, cut the tip at one end, and practice on a cookie. Can you outline the cookie without it running over the edges? If so, can you also nicely fill in the rest of the cookie where the icing has a smooth finish?
If it runs over the edges, you need to thicken up your batch of icing with a little bit of powdered sugar. (Start with just a tablespoon at a time, mixing between additions & checking the consistency.)
If it doesn’t cover the cookie well (i.e. if it goes onto the cookie way too thick), then you need to thin it out a little, starting with just a tiny bit of water. (Start with 1/2 tsp at a time, mixing well between additions.)

At this point, you’re ready to start decorating your cookies!
I have a whole blog post dedicated to how to decorate sugar cookies with royal icing – I cover all the details such as:
- How to color your icing
- How to flood the cookies with it
- Different ideas for decorating with the royal icing
- How to add icing details and/or sprinkles
- How long to let your cookies dry
- How to store them
And more! You’ll definitely want to check that out before you start to decorate, but, I’ll walk you through some of the basics here. (You can also get more details in the recipe at the bottom of this post!)
Tips for decorating with royal icing:
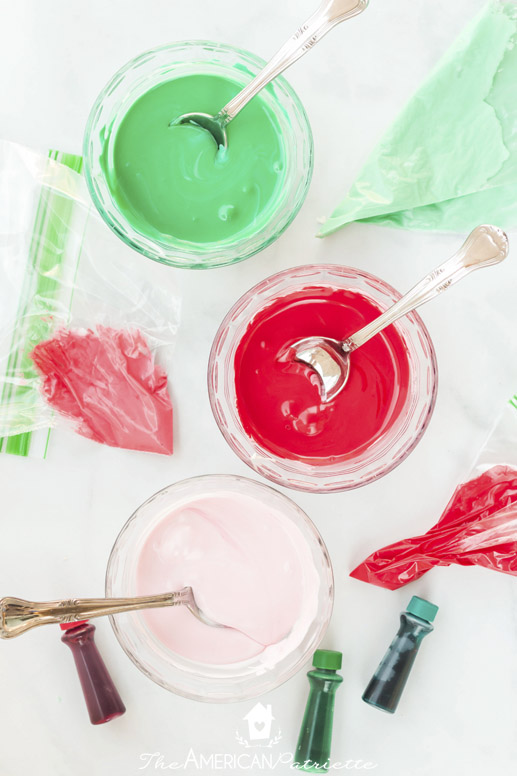
- Make sure to use GEL food coloring (not liquid food coloring) when coloring your frosting. A little bit goes a long way – start out with a drop or two, stir, and go from there.
- Keep a damp paper towel over the top of the bowl(s) with your icing in it as you’re mixing your colors. The icing will start to develop a film or a slight crust on the top if it’s exposed to air for too long, and sometimes mixing colors can take a little while!
- Use piping or sandwich bags to decorate your cookies. I actually used sandwich bags to decorate all of these cookies in the photos, so you really don’t have to get fancy with your decorating pieces. That being said, you can definitely use piping bags if you prefer, and you could also use squeeze bottles. (I talk a lot more about that in this post about decorating with royal icing.)
- Get fancy or keep it simple! You can make beautiful cookies with just icing + sprinkles if you want to, but it’s also so fun to add in some icing details! Learn how to do both here.
- Make sure to allow your cookies to dry overnight before stacking or transporting them. Depending on the thickness of the icing, you should be good to go after about 12 hours of dry time, but MAKE SURE to test a cookie or two by tapping the icing before you transport/pack them up.

>>> Check out the full post for how to decorate sugar cookies with this royal icing recipe <<<
Questions about this easy royal icing recipe:
What types of cookies would this recipe be good for?
Cut-out sugar cookies, gingerbread cookies, and gingerbread houses. Perfect for all of those! (For any other cookies and cakes, I’d use variations of buttercream or cream cheese icing!)
Where can I find the butter extract?
You should be able to find it at any average grocery stores. I found mine at our local grocery store next to all of the other extracts. It was about $3 for the bottle, and I’ve used the same bottle dozens of times when I’ve tested this recipe and my sugar cookie icing that hardens recipe.
Where can I find meringue powder?
You should also be able to find this on the baking aisle of your grocery store! You can also get some on Amazon. I think I got mine at our local grocery store for about $6 – it was located near the food coloring & store-bought icing containers. (And FYI, a container of meringue powder will be enough to make several batches of this icing!)

How long does it take for royal icing to dry on cookies?
If you’re going to do a bottom layer (i.e. if you’re going to flood the cookie to have a background), then it’ll dry enough within 30-60 minutes that you can start adding some icing details on top. However, for cookies to fully dry before transporting them/packing them, you’ll want to allow them to dry overnight on a baking sheet (in a single layer – not stacked).
If you ice them first thing in the morning, there’s a good chance your cookies will be completely dry and stackable by the evening. Do some taps on an iced cookie to test the hardness of the icing before stacking or packing!
Will the cookies dry out if I leave them out overnight?
Nope! They’ll be just fine. I always leave mine to dry – uncovered – overnight. Then in the morning, I transfer them to an airtight container. Before you store them, though, be sure to give some of the iced cookies a little tap to ensure your icing has completely set.
What are the best piping bags for royal icing?
You’ll manage just fine with the Wilton piping bags you can find at Hobby Lobby or Walmart, BUT, I think the absolute best piping bags for royal icing are these really flexible ones you can find on Amazon. My cousin – who is a master cookie decorator! – introduced them to me and I absolutely love them! I actually use them with both royal icing and buttercream – they’re strong enough to prevent rips and tears down the seam, but they’re also really flexible, which makes them very easy to work with!
Another thing about those bags: these are “tipless” bags, which means you can cut the tip however thin (or thick) you want it. Completely customizable to whatever you need, and that’s huge! (That being said, you can still use metal or plastic icing tips with these bags if you want to, but they’re not necessary! You can pipe beautifully without them!)
And, just one more note: icing consistency makes ALL the difference before you start adding it to the piping bags, so just make sure you read the post above where I talk all about how to ensure you’ve got the perfect consistency!
What is the best food coloring for royal icing?
GEL FOOD COLORING! Wilton (likely the brand that your grocery store carries) is completely fine. That’s what I always use! I really would stay away from using liquid – it’ll affect the consistency of the icing and the colors won’t be as bold. I always have a 4-pack of the basic colors (red, yellow, blue, green), but I also like to have a 4-pack of the “off” colors – (pink, purple, turquoise, and orange), just for variety.
How long do these cookies last?
They’re best to eat within the first 3 days, but as long as they’re stored in an airtight container, they should be tasty for about 5 days. The cookies will start to lose some moisture after that. If you need them to last longer than 5 days, I’d consider freezing them soon after making them. (However, if you individually package them, they should last longer.)

Can you freeze cookies with royal icing?
YES! I did a test run in my freezer, and mine came out beautifully – even after a couple of months in my freezer! Royal icing (already on decorated cookies) freezes much better than any other icing I’ve tried.
How do you freeze decorated cookies?
First, make sure the iced cookies are completely dry. Then, begin placing cookies in a single layer on the bottom of a large airtight container. Place a sheet of wax paper on top, add another layer of cookies, and repeat until you run out of room. To thaw, remove container from freezer and set on counter to come up to room temperature – you’ll want to make sure to take them out of the freezer at least a few hours ahead of time so they can thaw naturally and gradually. From everything I’ve read, you should be able to freeze them for up to 3 months. I haven’t yet tried it for that long, but it seems like that’s the standard limit.
How can I store royal icing with meringue powder?
If your icing is fresh from the mixer WITHOUT food coloring, you can put it in an airtight plastic container – with plastic wrap pressed on the icing surface + the container lid on top – and leave it out on the counter for a week or two with no issues. If it has food coloring, you can do the same, but the color will start to separate within a couple of days. With EITHER – icing with or without food coloring – you’ll want to make sure to give it a good stir before using it again.
How long can royal icing sit out?
It can sit out in an airtight container for up to a couple of weeks. (See above question!) No need to refrigerate. If you’ve added food coloring, the color will likely start to separate after a few days, but just re-stir and it’ll be fine.
What should I do with leftover royal icing?
If you’re going to use it again soon (within a week or two), you can leave it out on your counter in an airtight container. If not, you can freeze it for up to 4-6 months. Just beware of color separation – you’ll want to bring the icing back to room temperature and then give it some good stirring before using it again.
How long does royal icing last in the fridge?
It’ll still be good to use after a week or two, but if you’re going to use it within that time frame, I wouldn’t bother refrigerating it – I’d leave it out at room temperature. If not, I’d freeze it instead. In other words, I don’t know that I’d ever even put it in the fridge!
How do you freeze royal icing?
If you haven’t yet added food coloring, then store it the same way I suggested above – in an airtight container, but with a piece of plastic wrap laid directly on top of the icing and then the lid on the container – and then put it in the freezer. For icing with color & in piping bags – tie off the top of the bags. Push the icing away from the tip (if you’ve already cut out the tip) and bend it, just to prevent icing from leaking out the bottom. Then, place the piping bags into a large gallon baggie and put it in your freezer. You can freeze up to 4-6 months. Allow to thaw to room temperature before using, and make sure to stir (or mix well in the bags with your hands) before using!

Related recipes you might like:
- The BEST cut-out sugar cookie recipe – these cookies are delish!! They’re not too hard, not too flour-y, and just overall have a great flavor and texture. They’re a great option if you want to make cutout cookies.
- Soft & chewy sugar cookie recipe – for soft, round, super chewy sugar cookies! (These are our FAVE.) This isn’t the best recipe to use for cut-outs because they’ll puff up too much, but if you’re content with just a classic round sugar cookie, this recipe is out of this WORLD.
-
No-Chill Pumpkin Spice Cut-Out Cookies – for a fun, seasonal alternative to regular sugar cookies. These are SUPER soft, very flavorful, and soooo tasty!
- Easy sugar cookie icing that hardens – this recipe tastes very similar and comes together a little more easily if that’s what you’re needing. It doesn’t contain meringue powder, so you don’t need to mix it in the mixer; it comes together by hand. It won’t have the same structure as royal icing, but it’ll work well if you want a royal icing alternative that doesn’t contain meringue powder or raw eggs.
- Buttercream frosting that hardens – as yummy as this recipe is, some of us will always love buttercream above any other icing recipe! If you don’t need your icing to harden 100%, you might want to try my buttercream recipe. It still hardens up quite a bit and the flavor + texture are just unbeatable.

Have fun making these beautifully iced sugar cookies!

Easy Royal Icing Recipe with Meringue Powder (that actually tastes good!)
Equipment
Ingredients
- 4 c powdered sugar*
- 3 tbsp meringue powder
- 3 tbsp corn syrup
- 1 tsp vanilla
- ½ tsp almond extract**
- 16 drops of butter extract*** approximately a little less than 1/4 tsp
- 5 T water see instructions
- Pinch of salt about ⅛ tsp
- Gel food coloring
Instructions
- Add the powdered sugar, meringue powder, corn syrup, pinch of salt, vanilla, almond, and butter extracts (make sure to see my note on this!), and 5 tbsp of water in your mixing bowl.
- Turn your stand mixer on low just until all of the ingredients are incorporated - about 20 seconds.
- Turn off the mixer, scrape the sides of the bowl, and then turn the mixer onto medium speed and allow to mix for 4 minutes. (I consider medium speed to be at the “4” mark on my KitchenAid stand mixer.)
- Turn off the mixer and check the consistency of your icing. Because of the corn syrup, this royal icing isn’t going to form the same large, stiff peaks that you’d get when making other royal icing – that’s totally fine! This will work & taste great!! The icing consistency should feel kind of like runnier marshmallow cream. When you lift the mixer attachment and icing starts to drizzle back into the bowl, it should take about 8-10 seconds for that ribbon of icing to completely melt back into the bowl. This is where you might need to add a little bit more water - read the note on consistency below!
- Note on the amount of water: I've noticed that when I make this icing during warmer weather months (and it's more humid outside), I rarely have to use more than the original 5 T of water in the icing. However, when it's colder & dryer and our heater is running, the icing is thicker and I need to use more water to thin it out a bit. Still start with that 5 T of water, and then slowly add from there if you need to thin it out a little bit.
- Test the icing consistency: The icing should be thin enough to flow out of a piping bag, but not so thin that it'll run off the cookies. Testing is easy! Just take about a tablespoon of the icing, spoon it in a piping bag or Ziplock-type sandwich bag, cut a small tip out of the bag, and practice on a cookie. You should be able to outline the cookie without the icing running off, and you should be able to fill it in pretty easily. If the icing is too runny, you can add a little bit of powdered sugar - about a tablespoon at a time, mixing between additions - and repeat until it's thick enough. If it's too thick, you can add a little bit of water - about 1/2 tsp at a time, mixing between additions. (If you need to add additional powdered sugar or water, you just need to mix until everything is incorporated - just a few spins around the mixer. Then repeat that process if you need to add a little bit more of one or the other.)
- Note: The icing in the mixing bowl will likely have air bubbles in it. I don't worry about it - the air bubbles usually go away when you add the icing to the piping bags and frost the cookies. You can always use the tip of your piping bag/icing bag tip to pop any small air bubbles that come up as you're decorating.
- To color: use gel food coloring (I use Wilton brand), starting with just a small amount, in separate bowls & mixing with the desired amount of white icing. The icing starts to set pretty quickly, so you'll want to cover the main bowl with plastic wrap while you add color + smaller amounts of icing in the other bowls. Transfer to a piping bag soon after you mix in order to prevent the icing from getting too hard in the bowls (or just make sure to cover with plastic wrap).
- To decorate: Add icing to piping bags or Ziplock sandwich bags, cut the tip out (start out with cutting a smaller tip - you can easily make it larger if you need to), and then use it to pipe an outline around your cookie, and then fill in the inside. You can use the tip to spread the icing around a little bit as you gently squeeze out more icing to fill in the shape. Or, simply drizzle some icing on the cookie for a "scribbled" look. You'll want to add sprinkles right after you ice each cookie, just because the icing does start to set on top pretty quickly. Check out this post for complete decorating details.
- To dry: Allow cookies to set out overnight - just let them sit on a baking sheet on your counter. (Yes, they'll still taste great the next day!) Unless the icing is very thick, cookies should be dry enough to stack by the morning. If you plan to ship them or transport them in such a way that they'll shift around quite a bit, you may want to give them a few extra hours on top of that to set.
- To freeze: Make sure icing is completely dry, and then place cookies in airtight container with wax paper between layers. Remove container from the freezer and allow to sit on the counter to thaw & come up to room temperature.
How many cookies is this recipe for?
It’ll be enough for about 24 cookies!
Can this be made with actual egg whites instead of meringue powder? If so, how would I convert it?
I only developed this recipe with meringue powder – I didn’t want to mess with raw egg whites. There are lots of recipes out there that use egg whites, so I’d just search for one of those with good reviews!
You call for 16 drops of butter extract and in parenthesis, you say just under 1/4 tsp. Can you tell us which one? I don’t want to mess my batch up. Thanks, can’t wait to try this
I gave both because sometimes the butter extract doesn’t come with a dropper. Both measurements are the same – 16 drops should = about 1/4 tsp!
Thank you so much!
We just made this icing for some pumpkin spice sugar cookies and decorated them as Jack-o-lanterns. Not only are they pretty, they are soooo yummy. I usually don’t care for royal icing, but this recipe is tasty! Thank you for sharing!!
🎉🎉🎉
As Mauri says, these really are tasty – so good!