No-Chill Pumpkin Spice Cut-Out Cookies
These no-chill pumpkin spice cut-out cookies are so simple to make, hold their shape, and are absolutely delicious! They’re super soft, full of seasonal flavor, and a fun alternative to regular cut-out sugar cookies.

Want to spice things up this season?! These pumpkin spice cut-out cookies are SO good and bring a different flavor to the table than your typical sugar cookie with icing!
Here’s why you’ll love these cookies:
- They’re super easy to make. They just require a handful of common pantry ingredients and a simple recipe to follow!
- You don’t have to chill the dough! Pretty much any other cut-out sugar cookie recipe is going to require you to chill the dough in order to prevent the cut-outs from spreading while baking. If you’re not in a hurry, I’d recommend chilling the dough for the purposes of flavor and texture (i.e. ALL cookies are softer & have more flavor if the dough has been chilled), but if you don’t want to, you don’t have to! These cut-out cookies will hold their shape without being chilled beforehand.
- They’re soft & delicious! The bite in these is so soft, especially compared to traditional sugar cookies, and they’re SO flavorful with that pumpkin spice in them!
 This post contains affiliate links for your convenience. You can read my full disclosure policy here.
Ingredients for pumpkin spice cut-out cookies
You just need some basic pantry ingredients for this recipe.
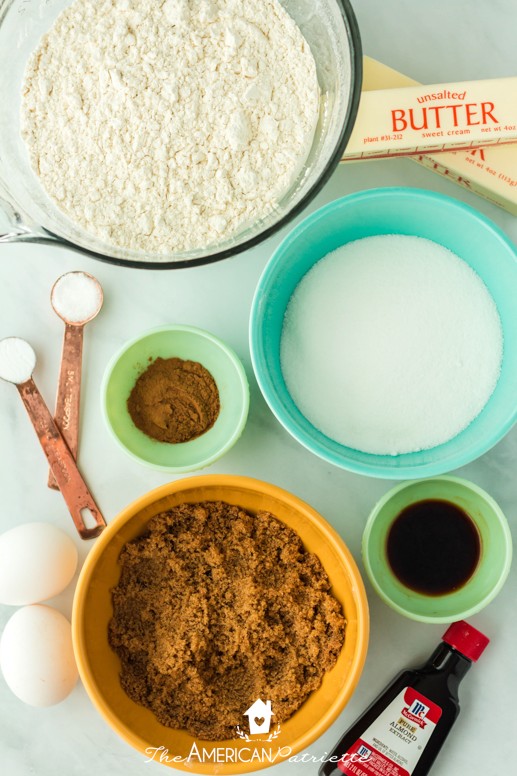
- 2 sticks of unsalted butter – room temp, or slightly softened in the microwave
- Dark brown sugar – this helps with flavor & with the softness of the cookie. You can use light brown sugar if you’d prefer, but dark brown sugar really helps drive home the warm, cozy flavor, and I think give these cookies an even softer bite.
- Granulated sugar – to bring in a little more sweetness to the cookie
- 2 eggs
- Vanilla extract – my preference is Mexican vanilla, but any good quality vanilla extract is fine.
- Almond extract – for even more flavor. If you don’t love almond extract, you can omit it in this recipe, but when I tested this recipe, we always preferred the cookies that had it in them!
- Pumpkin pie spice – the all-star ingredient! Just a couple of teaspoons of this spice makes these cookies SO GOOD! If you don’t have pumpkin pie spice on hand, you can use a combination of cinnamon, nutmeg, cloves, ginger, and all spice. Use more cinnamon, and then use pinches of the others.
- All-purpose flour – I always just use my store brand of flour, unbleached.
- Baking soda – just a little bit to give them some lift, but not as much as drop cookies. Too much leavening will make cut-out cookies puff up.
- Salt – for flavor!
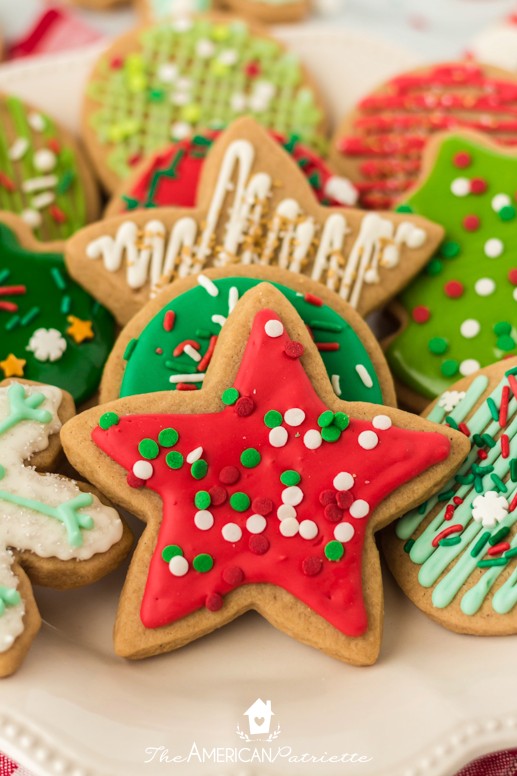
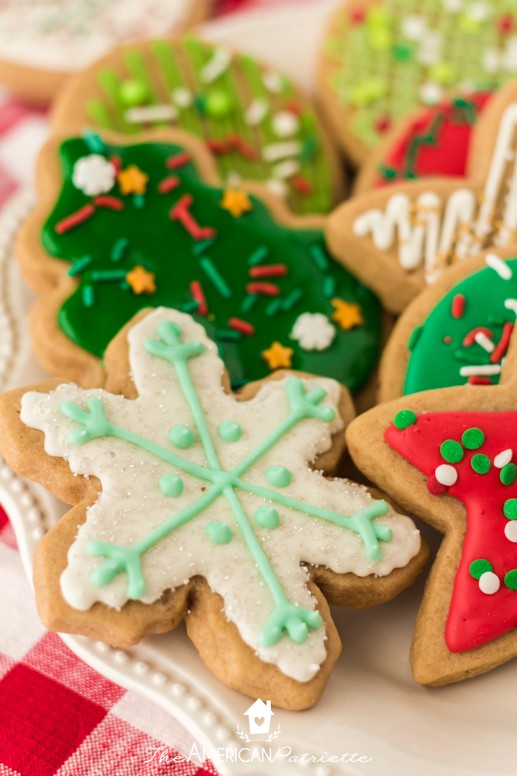
- Icing – these cookies are absolutely DELICIOUS when iced. In fact, I wouldn’t even recommend eating them on their own. Compared to drop cookies (i.e. most cookies you don’t roll out & then cut into shapes), cut-out cookies aren’t as sweet or as flavorful. They’re literally made for icing! Any yummy sugar cookie icing will do for these – this easy glossy sugar cookie icing that hardens, my favorite easy royal icing, or tasty buttercream frosting are all great options!
Let’s get started!
How to make pumpkin spice cut-out cookies
Cream the butter + the sugars
Add the softened/room temp butter + the dark brown & granulated sugars to your stand mixer. Using your paddle attachment, allow them to cream together on medium speed for 2-3 minutes.
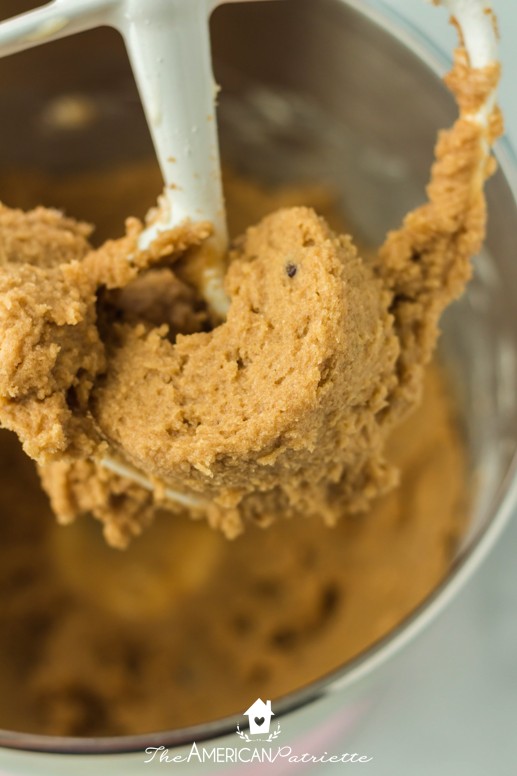
Add in vanilla, almond extract, and eggs
Just mix them in until they’re fully incorporated – about 15-20 seconds. Scrape the sides of the bowl.
Mix together dry ingredients
In a separate bowl, whisk together flour, baking soda, salt, and pumpkin pie spice.

Add it to the wet ingredients
With the mixer on low speed, slowly add in the dry ingredients and mix until everything is incorporated and dough is no longer crumbly. You don’t want to over-mix, but you do want the dough to be an even consistency for rolling.
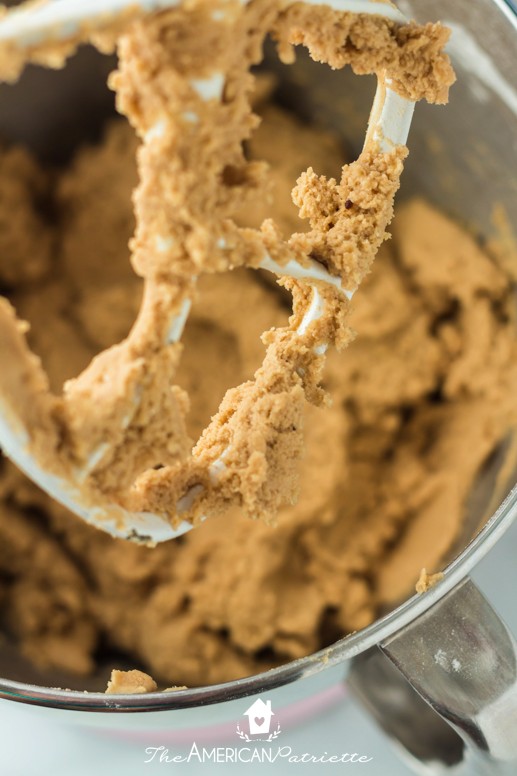
Your dough should look soft & smooth like this.

Time to roll!
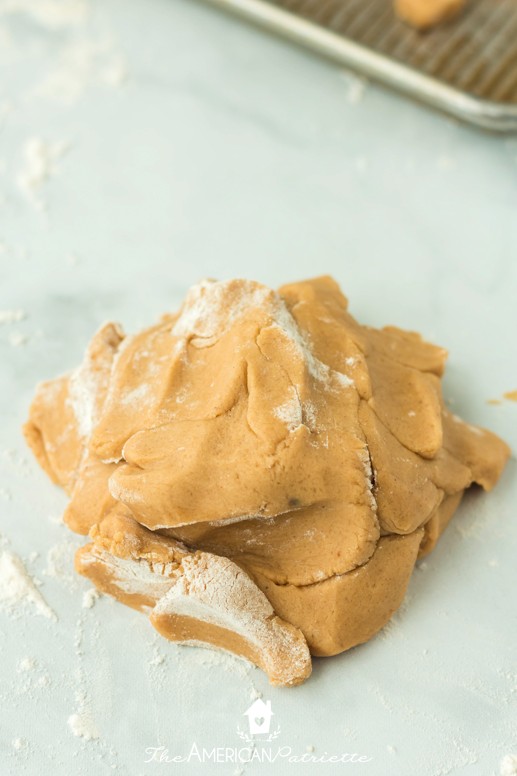
If you’d rather not chill the dough, then you can get started with rolling it out right away!
(If you have the time, chill the dough in the freezer for about 30 minutes or in the fridge for 1-2 hours. Again, this is NOT a necessary step for getting beautiful cut-outs, it would purely be to help with the flavor/texture of the cookie – chilling always makes for a softer, more flavorful cookie! If you do decide to chill, wrap the dough in plastic wrap, and flatten it out a bit so that it’s somewhat square-shape and chills more evenly. Then pull it out of the freezer/fridge, break off a chunk of it, work it with your hands to warm it up a little bit and make it more pliable for rolling, and then get going!)
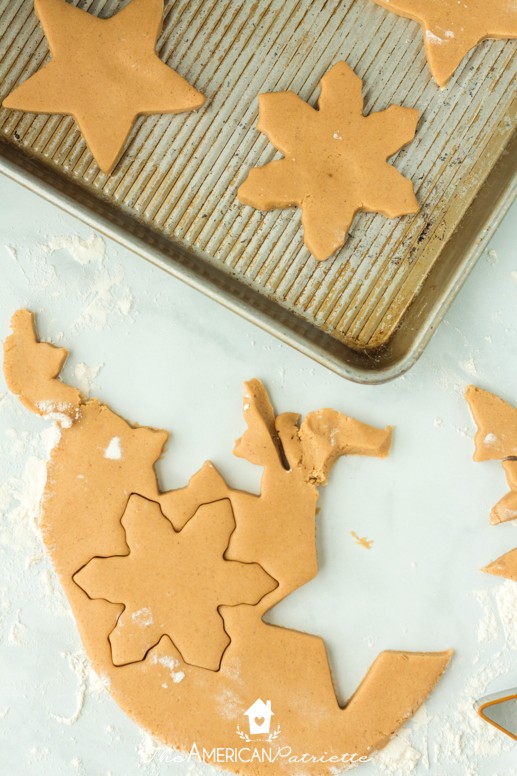
To start rolling the dough, break off a hunk of dough, work it with your hands a little bit to make sure it’s not crumbly at all and has a perfectly even consistency, roll it around on a floured surface to help coat it and make it less sticky…

And then begin to roll it out with a lightly floured rolling pin.
If the dough sticks to the surface or the rolling pin, just continue to add dustings of flour. You don’t want to use too much flour, but don’t be stingy, either. Basically, if the dough is sticky, keep adding a little bit of flour to the surface/rolling pin until it’s not.

You’ll want to roll it out to where it’s about 1/4 of an inch thick. This thickness helps the cookies to stay soft as they bake and helps prevent them from breaking.

Cut out your shapes
Use your favorite cookie cutters and start cutting out your shapes. If your dough is sticky and difficult to work with, and if the shapes don’t cleanly come out of the dough, sprinkle a little more flour on top, make sure your rolling pin has flour on it, and re-roll the dough. Your shapes should be really easy to cut & transport to a baking sheet.

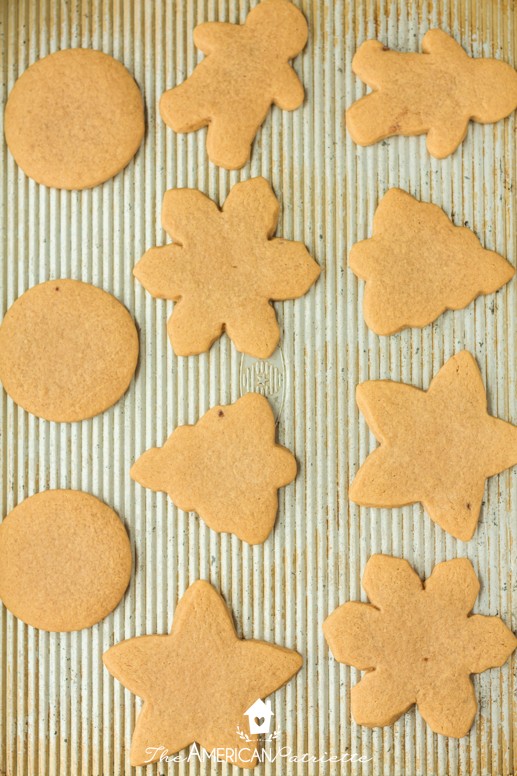
Those thick cookies are going to come out so soft!

Combine your scraps & re-roll
Collect your scraps together, work them a little with your hands again so that they all combine well back into one ball of dough, roll it around on your floured surface, and repeat the rolling & cutting process.
Bake cookies
Time for the oven! Put them in a 350 degree oven for 7 minutes. (If you used small cookie cutters, you might want to just bake the cookies for 6 minutes to prevent crisping up too much.)
A note on baking pans: These USA pans are the *only* pans I EVER use when I bake. I’ve had mine for over 11 years, and they’ve always been absolutely fantastic at baking cookies! They bake evenly, hardly ever stick, and produce the perfect texture. I’ve converted tons of people over to using USA Pans (they really are that awesome!), but if you’re not one of them & you’re using a different baking sheet/cookie pan, you may want to consider lining them with parchment paper to prevent sticking.

Remove from oven
Once they’re done baking, remove the pan from the oven and allow the cookies to sit on the pan for about 5 minutes before transferring to a cooling rack.
Use a thin spatula (I prefer a thin metal one) to gently transfer the cookies from the baking pan to the cooling rack.

Frost the cookies after they cool!
Once they’re completely cool, your cookies are ready for icing!

Icing for pumpkin spice cut-out cookies
A traditional sugar cookie icing is just fine for these delicious cookies! Here are some ideas for you:
- Glossy sugar cookie icing that hardens – this icing comes together easily & is simple to use. It produces a lovely glossy sheen and has a super soft bite, even though it hardens up!
- Easy royal icing recipe – finally, a royal icing recipe that ACTUALLY tastes good! If you’re looking for a traditional royal icing recipe that hardens up, decorates beautifully, AND is actually enjoyable to eat, you’ll love this recipe!! It completely hardens, but it’s still soft to the bite and it has a great flavor. It’s not your typical chalky, candy-like royal icing.
- Buttercream frosting for sugar cookies – the most popular recipe on my blog to date! (And for good reason – it’s SO GOOD and so fun to use, and it actually hardens up a lot better than other buttercream recipes.) Buttercream IS THE BEST!!

Questions about this cookie recipe
Have some questions about this recipe? I’ve got some answers for you! Let me try to help you make some AWESOME, crowd-pleasing cut-out cookies!
Do I have to frost these cookies?
Short answer: yes. They need the frosting. Cut out cookies are MADE to be paired with icing. On their own, they’re a bit bland…which is why they’re such a great base for rich, sweet icing! If you would rather make spiced cookies that don’t have icing on them, I’d give these orange & clove sugar cookies a try. They’re SO GOOD. They’re more of a traditional drop sugar cookie, but with the cozy flavors of orange and spice.
How thick should the cut-out cookies be?
I’d make them about 1/4 of an inch thick. These might feel kind of thick as you’re cutting them out and transferring the shapes to the baking sheet, but a thicker cookie will 1) hold up better, and 2) stay softer.
What happens if you don’t chill the dough?
These cookies are no-chill because they will bake just fine without spending time in the fridge or freezer. They’re not going to spread the same way other cookies do. (Part of that is due to the flour to butter ratio, and part of that is due to the fact that these are made with brown sugar and not just white sugar – cookies made with brown sugar spread less.) But, see my next note. 😉
I know this is a no-chill recipe, but SHOULD I chill the dough?
When I was testing this recipe, my goal was to come up with a recipe that does NOT require chilling, simply because so many people do want that option. However, once I did finally land on this recipe, I decided to just see if chilling it would make a difference. While the shapes of the cookies will come out great whether you chill the dough or not, when it comes to flavor and texture, the chilled version definitely came out softer and more flavorful. This is going to be the case for pretty much any cookie recipe, regardless of whether or not the recipe says you don’t have to chill the dough. When you chill the dough, it does some magic to the cookies and makes a difference not just in flavor, not just in texture (i.e. usually softer/chewier cookies), but also in length of time they’ll stay fresh. I’ve noticed that cookies made from chilled dough (and again, this spans the spectrum of cookies!) stay fresher for longer than ones where the dough was not chilled. SO, that being said, it’s up to you: you can definitely get away without chilling the dough, but if you have the time and the patience, chilling it – even for just 30 minutes in the freezer – will produce a softer & more flavorful cookie.

Do I need to use parchment paper or a Silpat mat when I bake these cookies?
If you’re not using USA Pans (the pans I always, always, always use when I bake cookies – seriously, best baking pans ever), then I’d recommend using either parchment or Silpat in order to prevent cookies from sticking to the pan, especially since you don’t want to break the cute shapes you cut out! However, if you use USA Pans to bake these cookies, you should be just fine to do without either. I do try to use a thinner spatula when removing these cookies from the baking pan, but they really don’t stick much.
How long will they stay fresh?
They’ll be super tasty for 3-5 days after baking them if you’ve stored them in an airtight container. If you individually package them up to send in the mail, though, I’m sure they’ll be tasty for at least 5 days, if not longer. (If you’re planning to send Christmas cookies, be sure to check out this post on how to package cookies to send in the mail!)
Can you freeze the baked cookies?
YES! They taste great out of the freezer! Freeze them in an airtight container, and then when you’re ready to use them, remove the container from the freezer and allow it to thaw on the kitchen counter. You can ice the cookies after you’ve frozen them, or if you use my easy royal icing recipe, you can actually ice them before you freeze them.
Do I have to use dark brown sugar?
I do think the dark brown sugar helps with the warm flavor, but if you only have regular brown sugar, it’ll be fine. (If you happen to have some molasses sitting around, though, you can make regular brown sugar into dark brown sugar – just add about a tablespoon of molasses to the brown sugar, give it a thorough stir, and you’ll have some dark brown sugar.)
How are these different than regular cut-out sugar cookies?
In two main ways: 1) flavor, and 2) the fact that they’re no-chill! It’s virtually impossible to find a good, reliable no-chill recipe for regular cut-out sugar cookies. The dough really, really does need to be chilled in order for regular sugar cookie shapes to survive in the oven and not come out as big blobs. And then the flavor, of course! These definitely don’t taste like traditional sugar cookies – they’re softer than regular sugar cookie cutouts, and then the pumpkin pie spice + the dark brown sugar gives them a deep flavor that regular sugar cookie cutouts don’t have.

Enjoy making these no-chill pumpkin spice cut-out cookies! You – and everyone you share them with! – will love them!

No-Chill Pumpkin Spice Cut-Out Cookies
Equipment
Ingredients
- 2 sticks unsalted butter softened
- 1 c packed dark brown sugar
- ⅔ c granulated sugar
- 4 tsp vanilla
- 1 tsp almond extract*
- 2 large eggs
- 4 c all-purpose unbleached flour (plus more for rolling)
- 1 tsp salt
- ½ tsp baking soda
- 2 tsp pumpkin pie spice
Instructions
- Add butter & both sugars to a stand mixer and cream together, using the paddle attachment, for 2-3 minutes on medium speed.
- Add vanilla, almond extract, and eggs one at a time, mixing between additions. Mix just until everything is combined.
- In a separate bowl, whisk together flour, baking soda, salt, and pumpkin pie spice.
- With your mixer on low, gradually add the dry ingredients to the wet. Mix together until everything is well-blended and dough has an even consistency. (About 20-30 seconds mixing on low speed.) Your dough should be fairly creamy and not dry or crumbly.
- If you're not going to chill the dough (you don't have to, but see the notes!), then preheat your oven to 350. Lightly flour the surface where you're going to roll your dough & cut the shapes.
- Take a chunk of dough and work it with your hands, just to ensure it has an even consistency. Then roll the dough into a ball, roll the ball in the flour on the surface to give it a light coating, rub some flour on your rolling pin, and begin to roll the dough. You'll want to roll it until it's about 1/4 inch thick. If the dough is sticking to the surface or to your rolling pin, continue to add a little bit of flour until it's not sticky anymore.
- Cut out your shapes, transfer them to your baking sheet (see notes on this, too!), and then re-roll the scrap dough into another ball, roll it out, cut shapes, etc. Continue until you've finished cutting all of the dough.
- Place one baking pan in the oven and bake for 7 minutes at 350. (If you cut small shapes, you may want to just bake them for 6 minutes.)
- Remove from oven and repeat with the other pan of cookie dough shapes.
- Allow cookies to cool on the pan for about 5-10 minutes before transferring them to a cooling rack. Use a thin or metal spatula to transfer the cookies to lessen your chance of breaking them as you move them.
- Once your cookies are fully cooled, it's time to ice them! See my notes for icing suggestions!
Notes
- Glossy sugar cookie icing that hardens – this icing comes together easily & is simple to use. It produces a lovely glossy sheen and has a super soft bite, even though it hardens up!
- Easy royal icing recipe – finally, a royal icing recipe that ACTUALLY tastes good! If you’re looking for a traditional royal icing recipe that hardens up, decorates beautifully, AND is actually enjoyable to eat, you’ll love this recipe!! It completely hardens, but it’s still soft to the bite and it has a great flavor. It’s not your typical chalky, candy-like royal icing.
- Buttercream frosting for sugar cookies – the most popular recipe on my blog to date! (And for good reason – it’s SO GOOD and so fun to use, and it actually hardens up a lot better than other buttercream recipes.) Buttercream IS THE BEST!!
These are so yummy! I made a batch this weekend in the shape of pumpkins & used the royal icing recipe to decorate them as Jack-o-lanterns. It was a fun activity to do with my 5-year-old! I love that these cookies are soft and chewy, unlike other cut-out cookies.
I’m so glad you enjoyed them & that you had a fun family baking day! 😍