Easy Buttercream Frosting for Cookies
This easy buttercream frosting for cookies is the simplest icing recipe to make and use for decorating cookies! It tastes AMAZING and makes absolutely GORGEOUS Christmas cookies!
This easy, delicious, and super fun-to-work-with buttercream frosting is a VERY simple recipe to prepare and it tastes AMAZING on sugar cookies!

Why THIS easy buttercream frosting?
My “buttercream frosting that hardens” recipe is, by far, the most popular post on my blog, so why in the world am I creating another buttercream frosting recipe?
Because if you’re just wanting to make regular ‘ole cookie frosting that tastes great and you don’t need your icing to harden up, then you can stick to an even simpler recipe that requires very few instructions or “rules” for how to make it.
And that, my friend, is this recipe!
Here’s what you’ll love about this recipe:
- It’s VERY simple to make. Seriously, such an easy homemade frosting. Only a couple of important suggestions for making this (i.e. like making sure the butter isn’t too soft), but other than that, the ingredients AND the steps are very simple.
- It tastes *AMAZING.* (Like, knock-your-socks-off, “this might just be the best cookie I’ve ever had” amazing.) It’s the perfect compliment to my very favorite cutout sugar cookie recipe or chewy sugar cookie recipe. Just prepare yourself: your cookies are going to be the hit of ANY Christmas gathering!
- The texture is DELISH. It’s a creamier, fluffy frosting, but it’s quite decadent. It’s got a wonderful bite to it!
- It’s really easy to work with. As long as your butter isn’t too warm (i.e. you don’t want it to be too soft), it’s very easy to make AND very easy to work with. It’s not runny, so you can easily spread it onto cookies or squeeze it out of piping bags without having to be very careful and worry about it running off of the cookie.
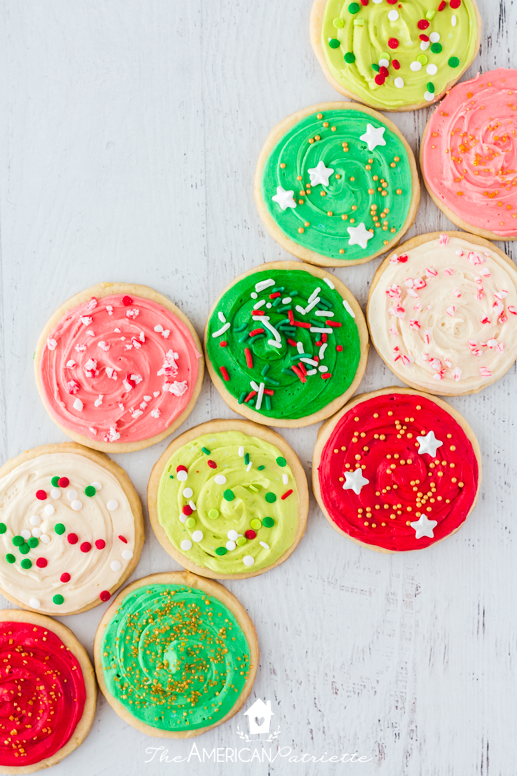
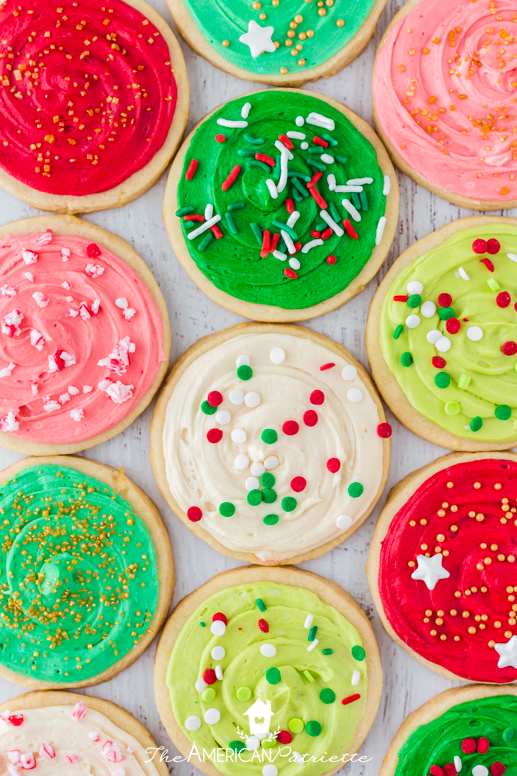
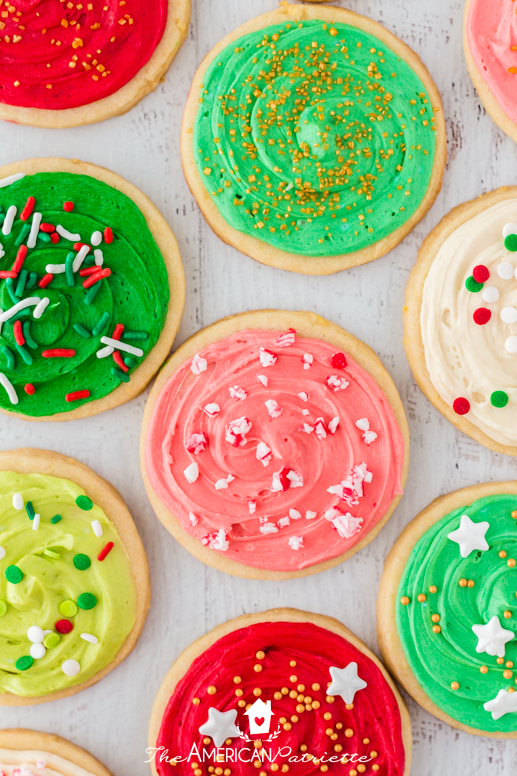
- It makes for very *simply* beautiful cookies. You can have fun with some piping tips to give your cookies some texture, or you can stick to swirling the icing right onto the cookie & adding sprinkles. Either way, you can use this icing to make cookies that look beautiful but take hardly any effort to decorate. (I walk you through everything you need to know about decorating cookies with buttercream here.)
- It’s the best frosting for cookie decorating parties. Because it’s so simple to make and to work with, AND because it tastes to good, it’s definitely a hit for a crowd! Easy for adults and kids to decorate with.

Really, just a variety in colors and sprinkles can help you achieve some gorgeous cookies!
Again, if you’re just looking for a frosting recipe that tastes amazing, doesn’t require any fuss to prepare, and you don’t need to worry about it hardening up, you’re going to love this recipe!
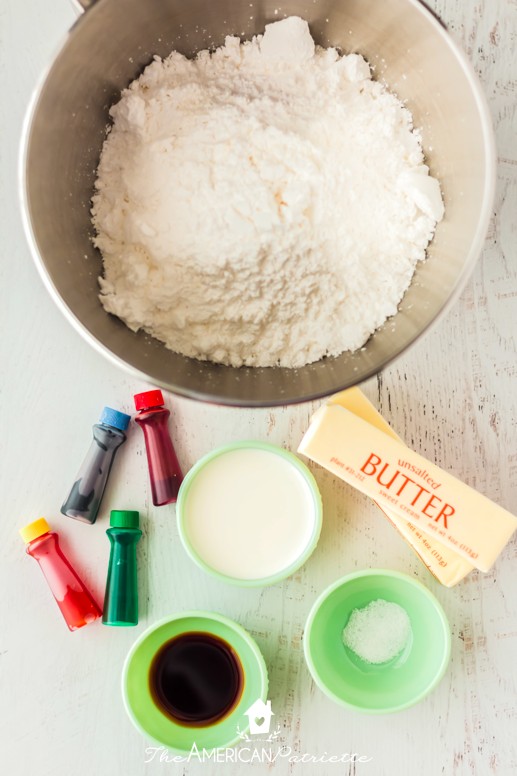
Ingredients you’ll need:
You just need a few simple ingredients and you’re well on your way to absolutely delicious buttercream.
- 2 sticks of unsalted, room temperature butter
- 4 c powdered sugar (also known as confectioners sugar)
- 2 tsp vanilla extract – for some flavor (some recipes call for clear vanilla extract so the white frosting is more crisp, but I’ve never bothered!)
- 2 tbsp heavy whipping cream – to help soften the icing and make it a little more malleable
- a pinch of salt – to enhance the flavor and balance the sweetness (you don’t need much, but don’t forget it!)
- gel food coloring – if you’re wanting to color any of the icing. Gel coloring is better than liquid colors for the overall color & texture of the icing. You should be able to easily find this on the baking aisle of your grocery store.
Ok, onto the recipe! This shouldn’t take more than about 5 minutes to prepare! 🎉
How to make this easy buttercream frosting for cookies:
The two biggest factors that will help you achieve the perfect buttercream are:
- Your butter texture (i.e. you don’t want it too soft)
- Creaming the butter & sugar well
That’s it! And both are super easy to handle! Let me walk you through the simple steps.
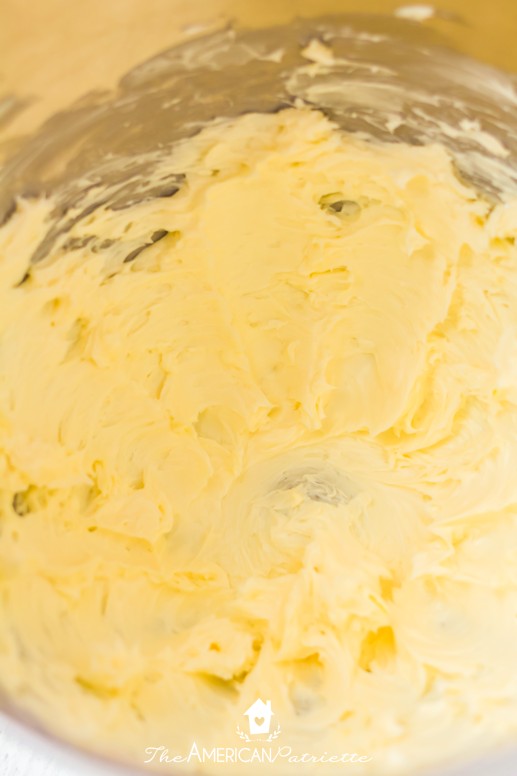
Cream the butter
You want to use room temperature butter. Not too warm, but maybe left out for 2-3 hours.
Basically, for the consistency: when you press into it, it should still be able to give you a little bit of resistance, but it shouldn’t be super soft.
So, using your paddle attachment in your electric mixer, you’ll cream the butter on medium speed for 2 minutes.
Cream the butter & sugar
Gradually add the sugar to the mixing bowl while the mixer is on low speed. Once you’ve added all of the sugar, turn the speed up to medium and allow the butter & sugar to cream together for about a minute.
Add vanilla, cream, and salt
Scrape the sides & bottom of the bowl with a spatula. Turn the mixer back to low & add in your vanilla, cream – a little at a time, and pinch of salt. Scrape the sides of the bowl again if you need to, and then allow everything to cream together on medium speed for another minute.
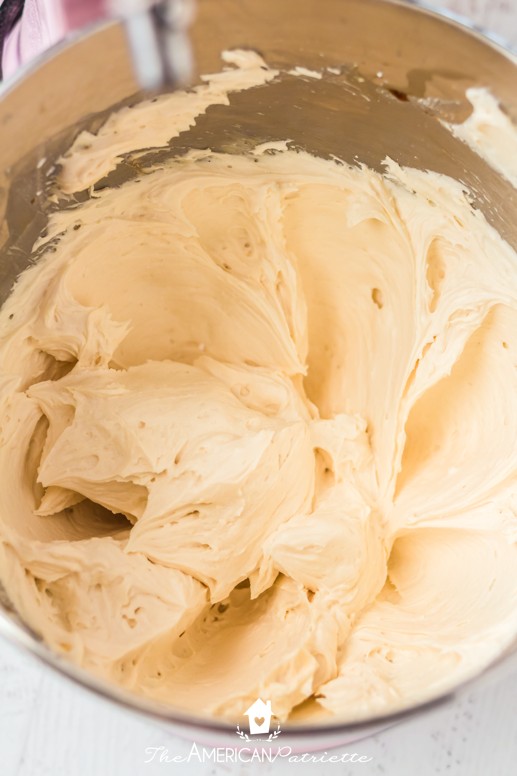
At this point, the right consistency is thick but creamy!
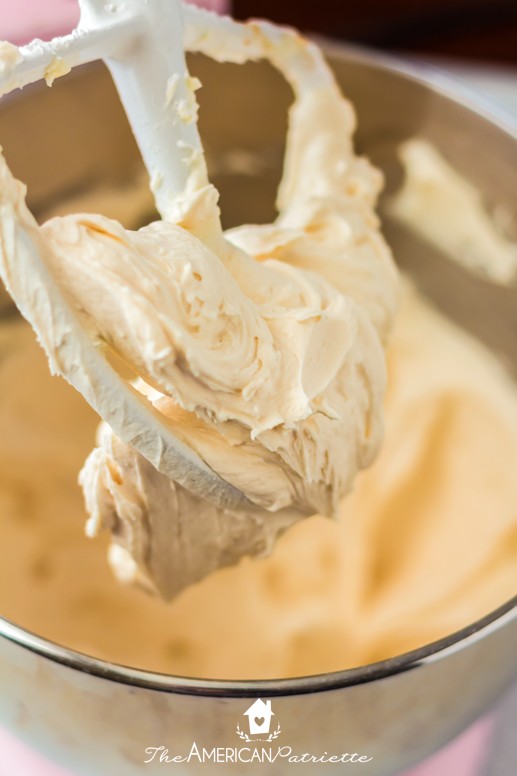
Check to see if you need to scrape the sides/bottom of the bowl any more in order to ensure everything is incorporated. If not, you’re good to go and you’re ready to start decorating!
SEE! I told you that was easy!!
Cover the icing until you’re ready to use it
If you’re not going to use it right away, make sure you cover the bowl of icing with some plastic wrap. It won’t get hard, but it will develop a slight crust and start to lose some of its creamy texture if it’s exposed to air too long.
Alright, let’s talk about decorating!
How to decorate cookies with this buttercream frosting:
>>> These steps are pretty simple, too! I’ll walk you through some basics, but you can go here to get a comprehensive tutorial on how to decorate cookies with buttercream! <<<
Here’s what you’ll need:
- Gel food coloring (which I already mentioned on the frosting ingredients list) – you should be able to get this on the baking aisle in your grocery store. I’ve used both Wilton and my store brand (HEB) and both work great! I haven’t used other store brands, so I can’t vouch for those.
- Piping bags – you should also be able to find these on the baking aisle, as well as at Walmart, Michaels, and Hobby Lobby. However, my amazingly-talented-cookie-decorator cousin introduced these piping bags to me, and I LOVE THEM. I doubt I’ll go back to anything else. I can buy them for cheap in bulk, and they’re a thinner bag with some texture to it, so I think it makes them easier to work with. (If you’re JUST spreading this icing on with a knife, though, then you don’t even need piping bags!)
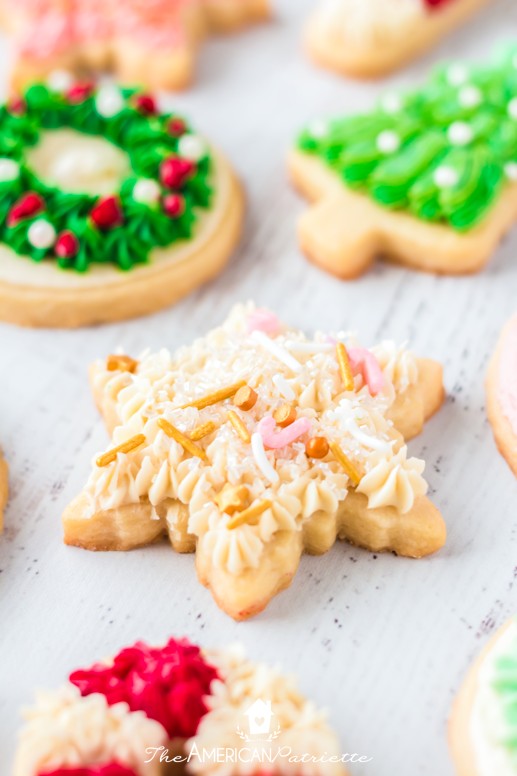
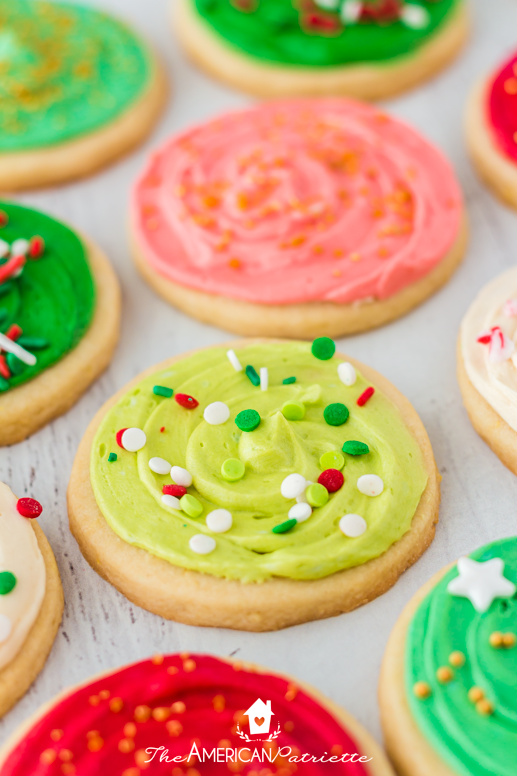
- Icing tips – if you aren’t wanting a textured look with the frosting on your cookies, these aren’t necessary. For the round cookies that just have a swirled icing on them in these photos in this post, I cut the end out of my piping bag and just swirled the icing onto the cookie. No metal tip required. But, if you love that textured look, you can get what you need from the icing tips in a basic cookie/cake decorating set.
- Small bowls & spoons – for mixing your colors
A quick note on the piping bags: When I talk about decorating with my buttercream frosting that hardens, I talk about how I use sandwich bags vs. piping bags. When I’m doing really fine detail work that doesn’t require the texture of a piping tip (like the star tip), then I still use sandwich bags. But, for this recipe, I’d recommend using piping bags if you’re going to pipe the frosting onto the cookies (vs. spread it with a knife), simply because the icing is thicker and I think if you add that much to the bag and pipe it out of the bag, the sandwich bag won’t be able to hold up.
Let’s get started!
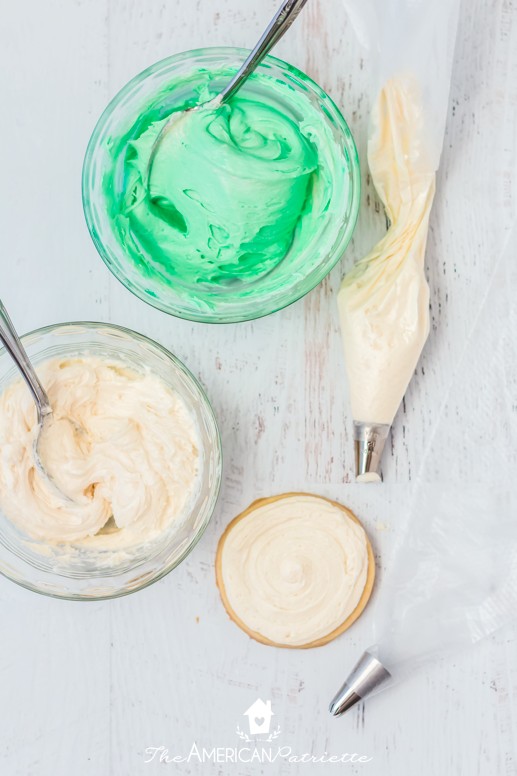
Add gel color to a portion of your icing
A little often goes a long way, so unless you know you want a very rich, dark color, just start with a drop or two and then you can always add more.

If you’re wanting to use white icing, make sure you set some aside so you don’t accidentally color all of your frosting!
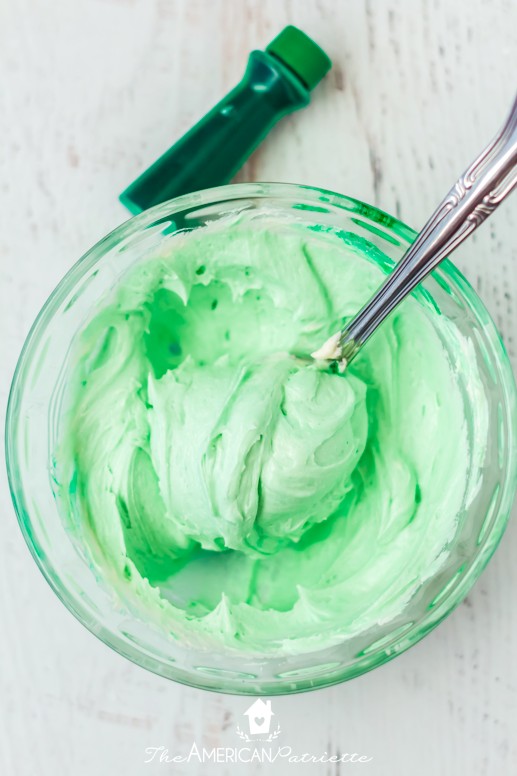
Mix up your color until you’re content with the hue…

And then create more colors as desired.
Add icing to piping bags
If you’re going to pipe the icing (either to get texture or to swirl it on), then add a bit to your icing bag and get going!
I personally think it’s MUCH easier on my hand to have less icing in the bag (i.e. I would not completely fill up the piping bag). I think it’s a lot easier to decorate when you don’t have as much to hold onto, so I’ll put a few large spoonfuls in the piping bag and then just refill it 4-5 cookies later.
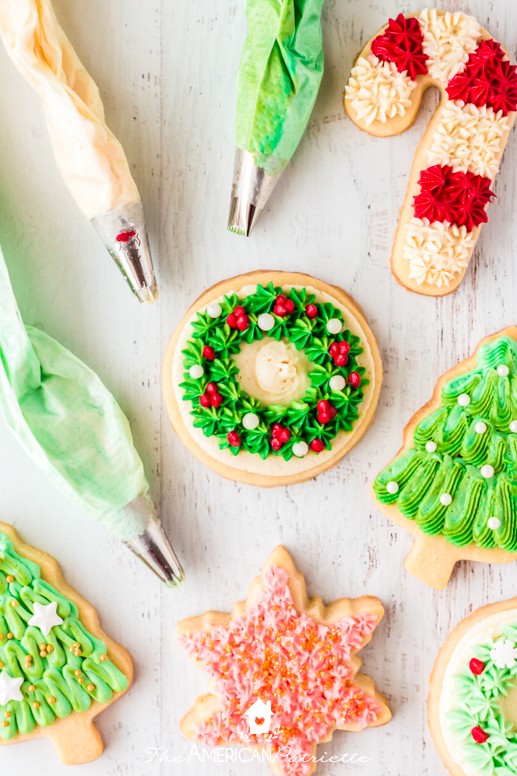
Pipe onto cookies
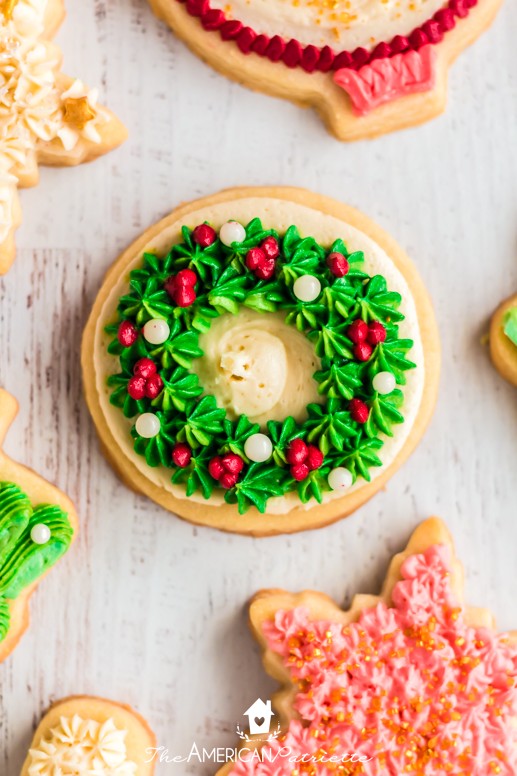
Make the base color first – either by swirling on with a piping bag or just gently spreading on with a butter knife.
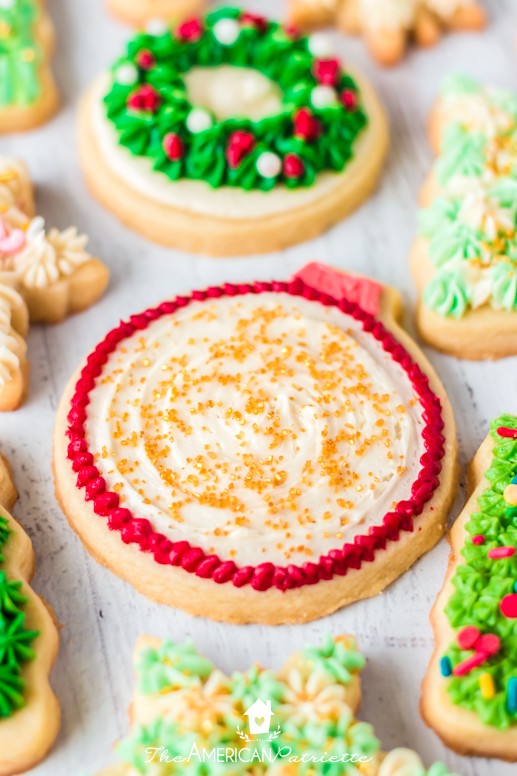
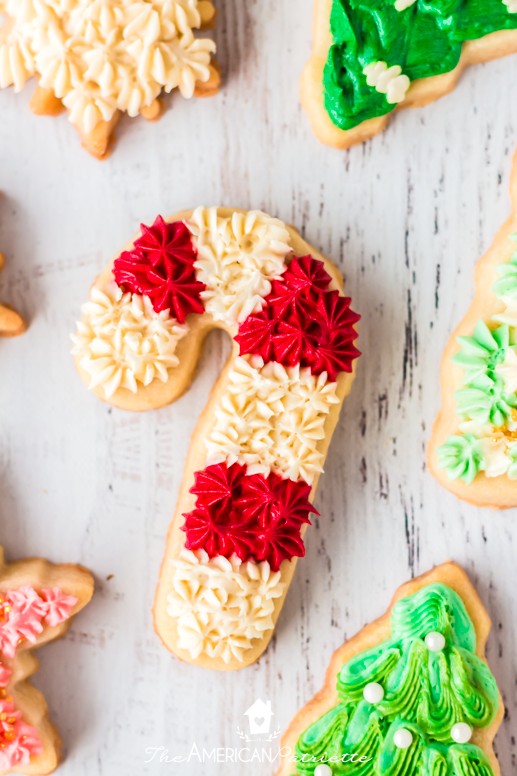
To make the wreath (and then some of the other textured cookies in here), I used my Wilton star tips – I think #18 & #21. I have a few different sizes.
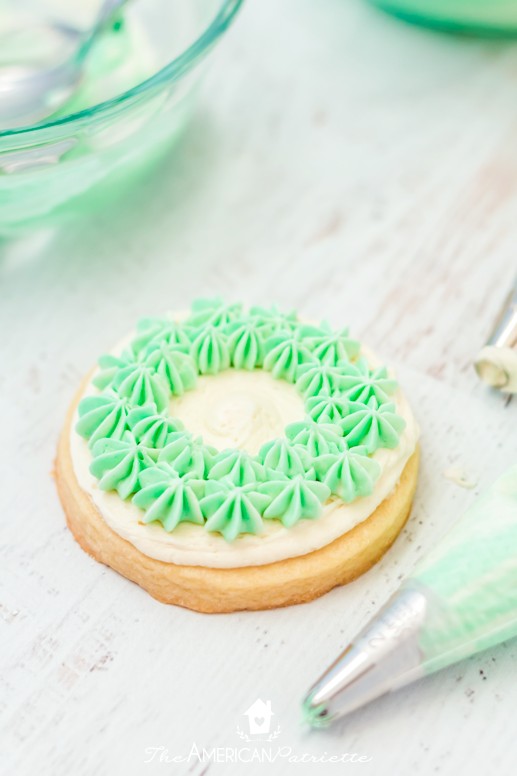
Just squeeze the star and then move onto the next.
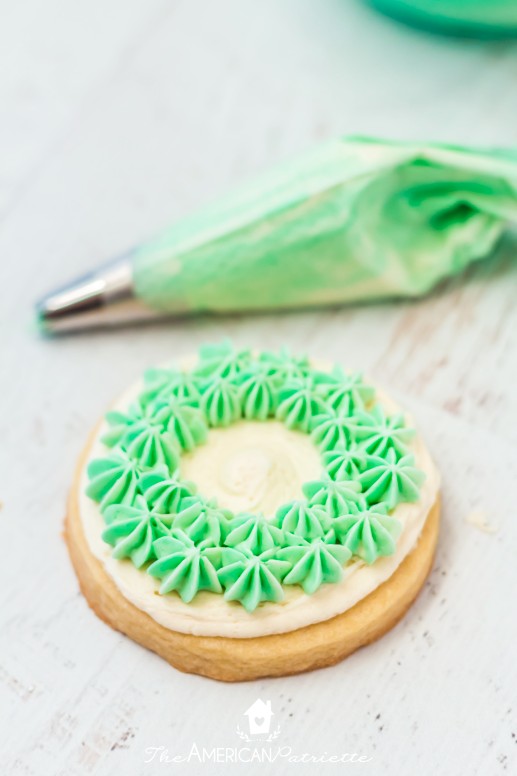
And then just keep going with additional + different designs!
For a comprehensive tutorial, check out my post on how to decorate cookies with buttercream frosting – I’ll walk you through EVERYTHING you need to know!
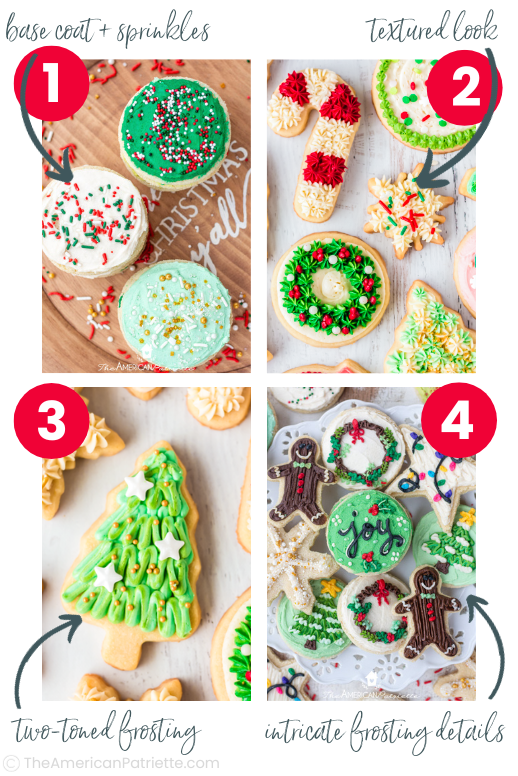
Sometimes decorating cookies can feel a bit intimidating, but I think you’ll walk away feeling so excited to decorate cookies once you read this comprehensive guide on decorating cookies with buttercream!
In that post, I walk you through how to decorate several different ways to decorate – from the very easy way of spreading a base coat + sprinkles, to how to create intricate designs with your frosting.
Questions about making this frosting
Let me answer some of your most common questions!
How should I store the Buttercream icing?
If you have leftover icing, store it in an airtight container – if you’re going to use it again within the next couple of days, don’t worry about refrigerating it. If you’re not going to use it again for several days, store it in the fridge.
Can I Make This Frosting Ahead Of Time?
Yep! Just follow the storing instructions I shared above. It would probably be best to decorate cookies within about 24 hours of making the icing, but you could go up to 48 and it’ll be fine. Again, just as long as it’s stored properly!
Do I have to store buttercream in the refrigerator?
You can keep it at room temperature for the first few days, but after that, store it in the refrigerator. If you plan to use it again for decorating, make sure it comes back up to room temperature first. Cold buttercream is very hard to work with!
How long will the icing last on the cookies?
It’ll taste great on the cookies for at least 3-4 days after you make the cookies. After 4 days or so, though, both the cookie and the icing will start to lose their luster. The fresher, the better, but they do last a few days.
What should i do with leftover buttercream icing?
You can save it to decorate more cookies OR you can enjoy the leftovers with pretzels or saltines. 😉 One of my husband’s family’s favorite nostalgic snacks!
While I really do think it’s best to decorate with it within about 48 hours of making it, I have used my buttercream to decorate cookies up to about a week later. I had stored the frosting in the fridge, and then I allowed it to come up to room temp before using it.
What Is The Best Food Coloring For Buttercream Icing?
Gel food coloring FOR SURE. This is the kind of gel food coloring I use. You should also be able to find it on the baking aisle of your grocery store, and definitely at Hobby Lobby, Michaels, or Walmart.
What is the best butter for buttercream frosting?
I actually did a test run of this recently, and I didn’t notice a difference AT ALL! I tried a few different butters – my store brand butter, Kelly Gold, and another “nice” brand of butter, and after a blind taste test, we couldn’t tell the difference between cookies. So, your store brand will probably be just fine!
(I do make sure to use unsalted, though, that way I can control the salt content!)
Can You Freeze Cookies Decorated With Buttercream Frosting?
I haven’t tried it with this exact recipe, but I have tried freezing cookies with my buttercream that hardens, and I wouldn’t really recommend it. The cookies + frosting still taste ok, but they definitely don’t come out of the freezer looking as fresh.
If you really want to be able to freeze decorated cookies, try using my easy royal icing – it freezes and thaws really well! The cookies come out of the freezer looking just as pretty as they did when they went in. 😉
Will the icing harden at all?
Nope, it’ll just develop a very slight crust on the top, but the icing itself will stay pretty soft. So, you won’t want to plan to stack these cookies, and if you are going to transport them, you’ll want to avoid them shifting around in the container. If you want to make cookies that you can stack and/or transport easily, then I’d definitely recommend my buttercream frosting that hardens. The ingredients are basically the same, but the ratios are different and the process in which you make the frosting is different, so that icing will harden up a lot more. This recipe is for keeping it SUPER simple!
How do I thicken buttercream?
If you follow this recipe, you really shouldn’t need to thicken it. But, if you started out with butter that was way too soft or if you accidentally added too much heavy cream, then you could try two things:
- Add a bit more powdered sugar – maybe 1/4-1/2 c at a time – mixing between additions.
- Put the icing in the fridge for a bit – at least 30 minutes – and see if that helps.

Feel free to comment and leave any other questions you may have! HAPPY DECORATING!
I hope you enjoy making this super simple frosting recipe!
Other recipes you might like:
- The BEST cut-out sugar cookie recipe – these cookies are delish!! They’re not too hard, not too flour-y, and just overall have a great flavor and texture. They’re a great option if you want to make cutout cookies.
- Soft & chewy sugar cookie recipe – for soft, round, super chewy sugar cookies! (These are my favorite sugar cookie recipe!) This isn’t the best recipe to use for cut-outs because they’ll puff up too much, but if you’re content with just a classic round sugar cookie, this recipe is out of this WORLD. (Way chewier than cut-out cookies; cutouts can’t be as chewy or soft because they’ll spread. So if you’re ok with just traditional round cookies, you should totally make this recipe!)
-
No-Chill Pumpkin Spice Cut-Out Cookies – for a fun, seasonal alternative to regular sugar cookies. These are SUPER soft, very flavorful, and soooo tasty!
- Easy sugar cookie icing that hardens – this recipe tastes very similar and comes together a little more easily if that’s what you’re needing. It doesn’t contain meringue powder, so you don’t need to mix it in the mixer; it comes together by hand. It won’t have the same structure as royal icing, but it’ll work well if you want a royal icing alternative that doesn’t contain meringue powder or raw eggs.
- Buttercream frosting that hardens – as yummy as this recipe is, some of us will always love buttercream above any other icing recipe! If you don’t need your icing to harden 100%, you might want to try my buttercream recipe. It still hardens up quite a bit and the flavor + texture are just unbeatable.
- Easy royal icing recipe – this is a great recipe if you’re wanting to do more detailed decorating and want more structure to your icing. It only varies a little bit from this icing, but it does hold up to intricate details, and it also freezes nicely on decorated cookies.

Easy Buttercream Frosting for Cookies
Equipment
Ingredients
- 2 sticks unsalted butter slightly softened (see notes)
- 4 c powdered sugar
- 2 tsp vanilla extract
- 2 tbsp heavy cream
- pinch of salt
Instructions
- Using your paddle attachment in your stand mixer, cream the butter on medium speed for 2 minutes.
- Turn the mixer back down to low & gradually add the sugar. Once you’ve added all of the sugar and it's fairly mixed in, turn the speed up to medium and allow the butter & sugar to cream together for about 1 minute.
- Turn off the mixer & scrape the sides & bottom of the bowl with a spatula. Turn the mixer back to low & add in vanilla, cream – a little at a time, and pinch of salt. Scrape the sides of the bowl again if you need to, and then allow everything to cream together on medium speed for another minute.
- Once your icing is nice and creamy, double check that you don't need to scrape the sides/bottom of the bowl anymore. If the icing is creamy & you've got an even consistency, you're ready to start decorating! (If you're not going to use your frosting right away, be sure to cover the bowl with plastic wrap to prevent a crust from forming.)
- See post for LOTS of detailed decorating tips so you can make perfectly decorated cookies the first time!
- Store leftover frosting in an airtight container. See notes for more details!
Notes
Question: Does it make a big difference to add the extracts and salt after or before adding the powdered sugar? I’ve seen both ways and wondered if there’s a science. Thanks.
I just do it afterwards, but I don’t think it matters too much!
I was very happy with this frosting recipe — easy and delicious! Perfect for Christmas cookies.
Wahoo! I’m so glad!!