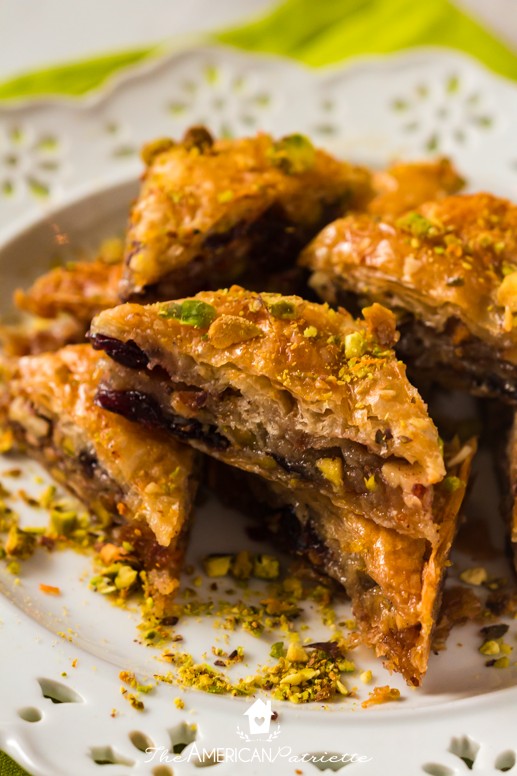
Cranberry Pistachio Baklava (step-by-step photos!)
This cranberry pistachio baklava recipe is a delicious dessert recipe perfect for Christmas parties, holiday potlucks, and large Christmas gatherings! And, it’s easy to make with my step-by-step instructions!
My cousin, who also loves all-things baking and is an incredibly talented cookie decorator, introduced me to this Magnolia baklava recipe a while back after she discovered it to be a real hit!
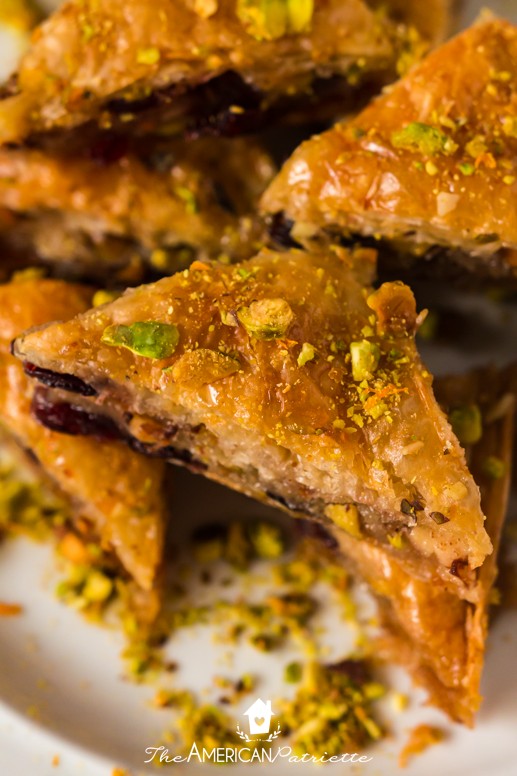
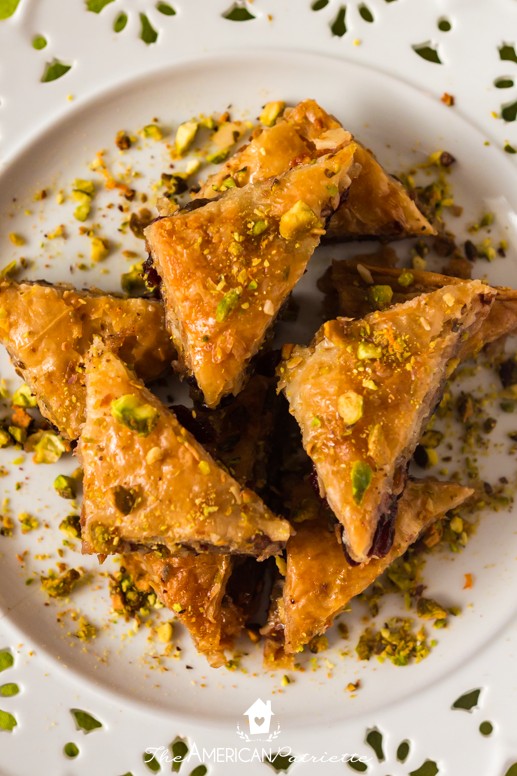
I was skeptical at first, simply because the few times I had previously eaten baklava, it was dry and just not very flavorful. But golley, when I tried my cousin’s homemade baklava, I was sold! She gave me the idea to add cranberries to it, and then I tried it with adding chocolate chips to it, and my oh my…deeeelicious!
Knowing me and my lack of desire to follow recipes exactly, I played around with some recipe tweaks and landed on this seasonal version that I can’t wait to share with you!
This easy baklava recipe is perfect for special occasions during the holiday season. It’s a great make-ahead dessert for a Christmas potluck, or just a sweet treat to enjoy for your family Christmas gatherings. Either way, everyone will love this classic baklava recipe with a holiday twist!
Here’s why you’ll love this cranberry pistachio baklava:
- Even though it’s detailed, it’s overall pretty simple to make if you follow my instructions. I tried to be as detailed as possible for every single step, just so you know exactly what to do the FIRST time and it comes out perfectly the FIRST time!
- It’s got CHOCOLATE. Or maybe you don’t love that. If you don’t, you can omit the chocolate chips. Seriously – take ’em or leave ’em; it won’t affect how the recipe comes out. But if you love chocolate, TAKE ‘EM! Or, you can do BOTH like I do – make half of the pan with chocolate chips, and half of the pan without. It’s a great compromise. 😉
- You can easily customize it with different nuts. Prefer to use chopped walnuts? Chopped pecans? Totally fine! Just make sure you end up with 3 cups’ worth of nuts + cranberries, and you’re good to go!
- It feeds a crowd. This thing makes *a lot.* Even though you make it in a cake pan, the serving amount seems much more generous for this. You can easily provide treats for 15-20 people with this.
- You can store it for a while. It’s still good the next day…and the day after that…and after that! It tastes great for 7-10 days after you make it! You’ll want to store it in the fridge, but as long as it’s refrigerated in an airtight container, it’ll keep well.
- You can make it ahead of time! I suppose that naturally makes sense if it keeps well for so long, but truly, this is the perfect make-ahead dessert. Some desserts still taste decently after a few days, but this lasts so long that you can intentionally make it ahead of time to enjoy several days later.
Ingredients for the Cranberry Pistachio Baklava:
Baklava ingredients:
- 1 1/4 c + 2 tbsp unsalted butter (a little more than 2.5 sticks), divided – you’ll need some for toasting the nuts, and the rest – plenty of butter – for brushing on all the layers of phyllo dough
- 1 c slivered almonds – whole almonds are fine; you’re going to chop them in the food processor anyway
- 1 c shelled pistachios
- 1 c dried cranberries – try to get smaller ones vs. larger ones. I always buy Craisins (or the store brand version) vs. the ones that I’d find in the dried fruit section of the produce area of my grocery store. The larger ones overpower the other flavors in the baklava.
- 1/4 c granulated sugar
- 1 tsp cinnamon
- 1/4 tsp nutmeg
- 1/4 tsp salt
- 1/2 c mini semisweet chocolate chips – these are definitely optional if you want to keep your baklava a little more…pure? I really prefer the baklava with chocolate chips in it, but my husband likes it without. So, I make half the pan with and half the pan without, then people can take their choice. If you don’t want any chocolate, you can simply just omit this ingredient. However, if you want to use it in the entire recipe (i.e. not just half the pan), then you’ll want to use 1 c, not 1/2 c, of mini chips.
- 16oz package of phyllo dough (you’ll find it in the frozen section) – I store mine in the freezer and then take it out to thaw for a few hours before I use it. You do want it completely thawed by the time you’re ready to make the recipe. Also, you want to make sure you’re getting phyllo dough, NOT puff pastry. Puff pastry is thick; phyllo dough comes in paper-thin sheets of dough.
Syrup ingredients:
- 2/3 c granulated sugar
- 1 c honey – I just used storebrand honey; I’m sure a lovely local one would taste even better!
- 1 tsp vanilla extract
- orange zest (about 1/2 tsp) – a little bit of orange zest goes a long way. You can always add more later if you want to increase the flavor – just zest an orange over the top of the baklava after you bake/pour the syrup on it if you want more orange flavor
- 1 c water – this will reduce a little in the saucepan when you simmer the syrup
Alright, who’s ready to make some Christmas baklava?!
How to make this Cranberry Pistachio Baklava
I’ve got a step-by-step tutorial to show you how to work with the phyllo dough and make all of your layers. This should help make sure you make the perfect baklava recipe the very first time!
>>> Quick overview: because this has several layers – 3 cranberry/nut layers and 4 phyllo dough layers – I figured I’d just give you a quick bulleted list of them before we get into all the details:
- Bottom layer: 6 sheets of phyllo dough with melted butter between each of them
- Second layer: 1/3 of the nut/cranberry mixture (plus chocolate chips if you are using them)
- Third layer: 6 sheets of phyllo dough with melted butter between each of them
- Fourth layer: 1/3 of the nut/cranberry mixture (plus chocolate chips if you’re using them)
- Fifth layer: 6 sheets of phyllo dough with melted butter between each of them
- Sixth layer: Remaining 1/3 of nut/cranberry mixture (plus chocolate chips if you’re using them)
- Seventh/top layer: 10 sheets of phyllo dough with melted butter between each of them
- Then you’ll pour the homemade syrup on all of that (AFTER baking)
Ok, onto the specific details of making this recipe!
First steps: basic prep
I don’t have photos of toasting the nuts, but hopefully that part is easy enough to follow with written directions. 😉
- Preheat oven to 350.
- Toast nuts: In a skillet over medium heat, melt 2 tbsp butter and add nuts. Stir regularly with spatula until nuts are slightly toasted – about 7-8 minutes – and then remove from heat.
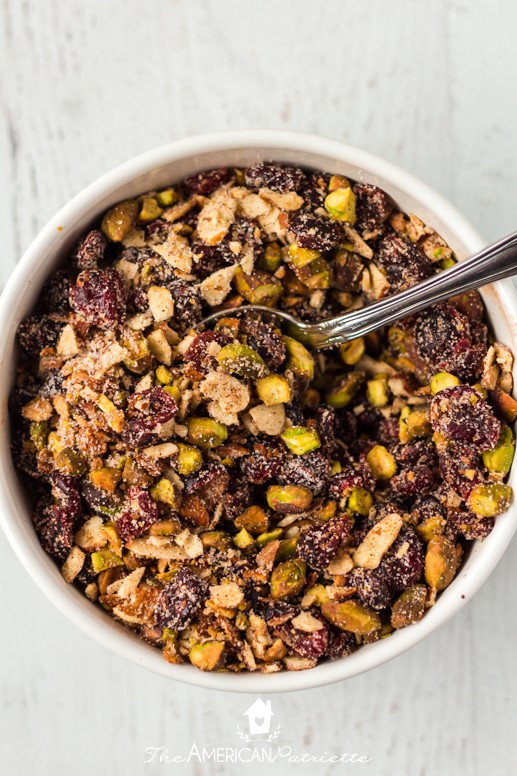
- Chop nuts: Add nuts, spices, sugar, and salt to a food processor and pulse a few times – just until nuts are in small pieces. (You don’t want them to be too finely-chopped, so start slow with the pulses!) Pour mixture into a bowl with the dried cranberries and set aside.
Alright, now that we’ve got the initial prep finished, let’s get started!
Melt butter & prep phyllo sheets
Melt the remaining 1 1/4 c of butter. Set aside.
Open one of the phyllo sheet packages (my 16oz box comes with 2 packs of phyllo sheets), and trim the sheets to fit the pan. (Cut all the sheets at once with 1 cut – removing about an inch from the length – with a pair of kitchen shears.) You can tell where I trimmed the sheets at the bottom of this photo:
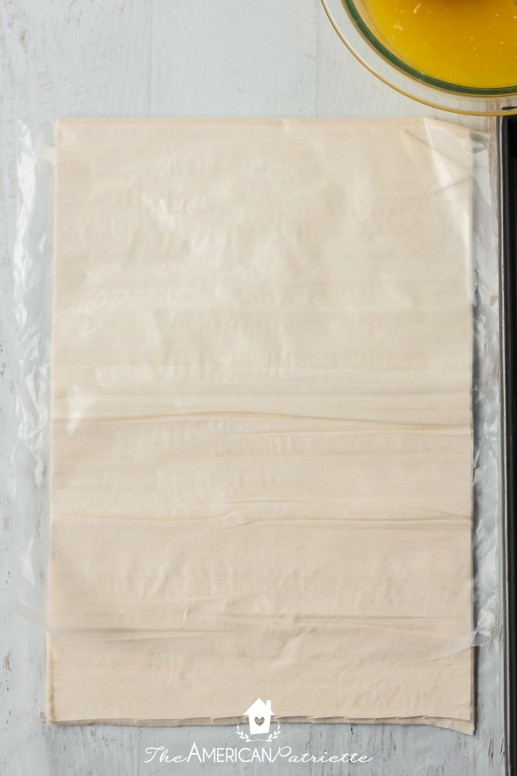
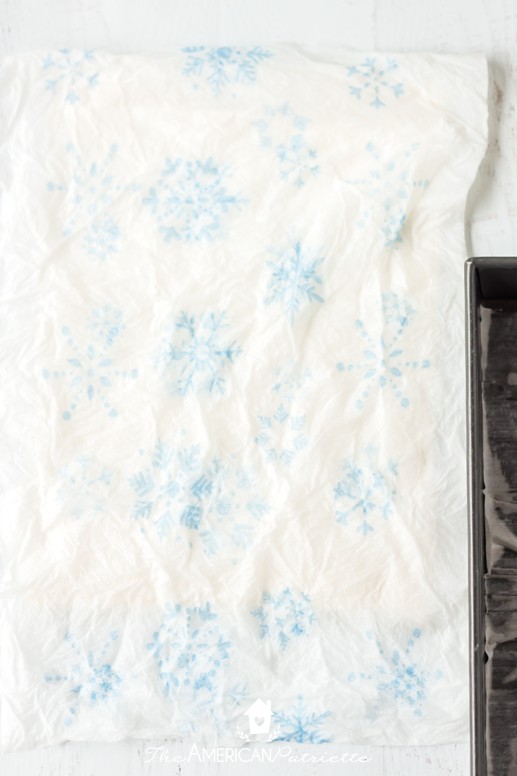
Spread the phyllo dough out on the plastic it’s wrapped in (if yours, for whatever reason, doesn’t come in plastic, then use plastic wrap to lay it on and then fold over it), fold the plastic over to cover it, and then place a couple of damp paper towels over the top. You’ll want to keep it covered as much as you’re able to keep it from drying out and becoming brittle while you make the layers.
Time to start making layers!
Add the first layer of phyllo sheets
Begin with brushing melted butter over bottom and sides of 9×13″ baking pan. Then take one sheet of phyllo dough and spread it out across the bottom of the pan.
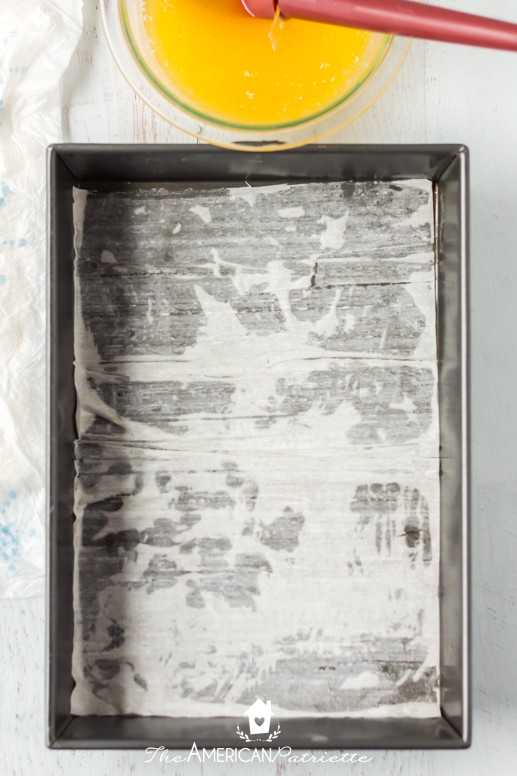
Pro tip: I find it easiest to take the phyllo sheet from the top of the pile of sheets, and then kind of drape it into the pan from the bottom of the pan. The bottom rim of the pan keeps the entire sheet supported as I’m pulling the top of the sheet to the top of the pan. Doing this prevents me from having to make a lot of adjustments to the sheet once it’s in the pan.
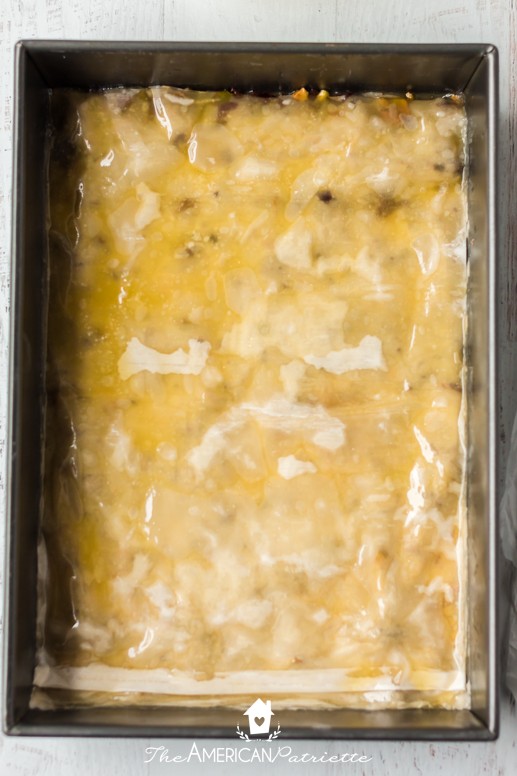
Using a pastry brush, brush the phyllo sheet generously with melted butter, and repeat with 5 more sheets of phyllo, brushing/dabbing butter on each sheet after you add it to the pan (so you’ll now have a layer of 6 buttered sheets).
Add 1/3 of the nut & cranberry mixture and another layer of 6 phyllo sheets
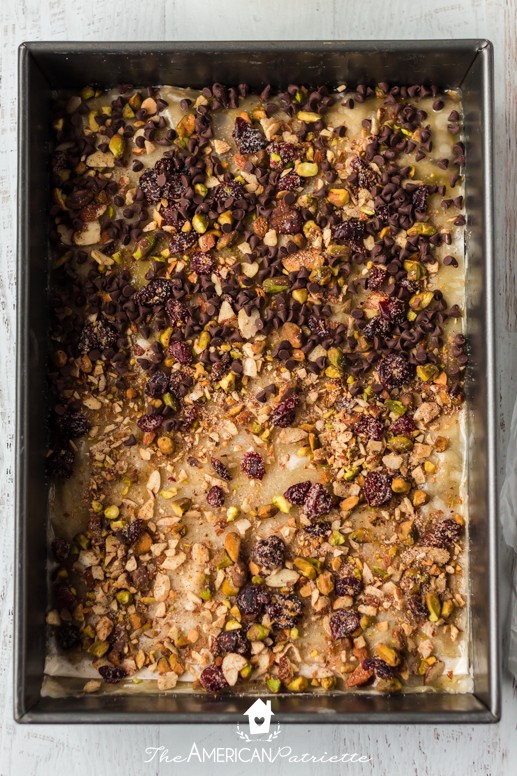
You’ll have about 3 c of nut/cranberry mixture. You’re going to split it up into 3 layers.
If you’re going to use chocolate chips (this is purely based on taste preferences – I prefer it with chocolate, my husband prefers without; you can take it or leave it!), go ahead and get those ready, too.
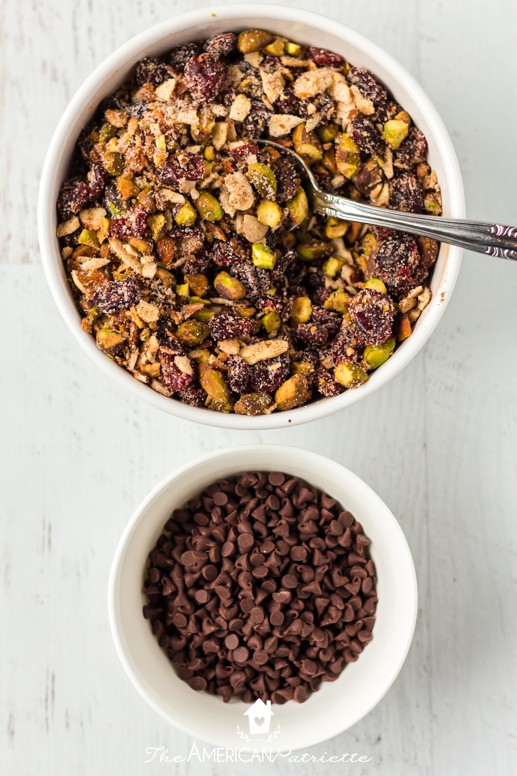
You’re going to sprinkle about 1/3 of the nut & cranberry mixture evenly across the top of the first layer of phyllo sheets.
If you’re going to use chocolate, you can either evenly sprinkle the chips across the entire pan, or you can reserve them to one side so you have one chocolate side and one non-chocolate side. You can see here that I’m making the top half with chocolate and leaving the bottom half without.
And then you’re going to add another layer of 6 sheets of phyllo dough, dabbing/brushing on melted butter on each sheet after you lay it down.
The first sheet is always the hardest to butter because it doesn’t have anything to stick to – it wants to shift around on the nuts & cranberries. You can gently use your fingers to keep it in place as you butter it. The other 5 are easier to place because they immediately stick to the buttered layer below it.
Ok, so far you have: 1 bottom layer of 6 buttered phyllo sheets, 1 layer of about 1 c of nuts/cranberries and possibly some chocolate chips, and then a 2nd layer of 6 buttered phyllo sheets.
Repeat!
Add another cup of the nut mixture (and chocolate chips) over the 2nd layer of phyllo sheets…
And then layer again with 6 more buttered phyllo sheets, just like last time.
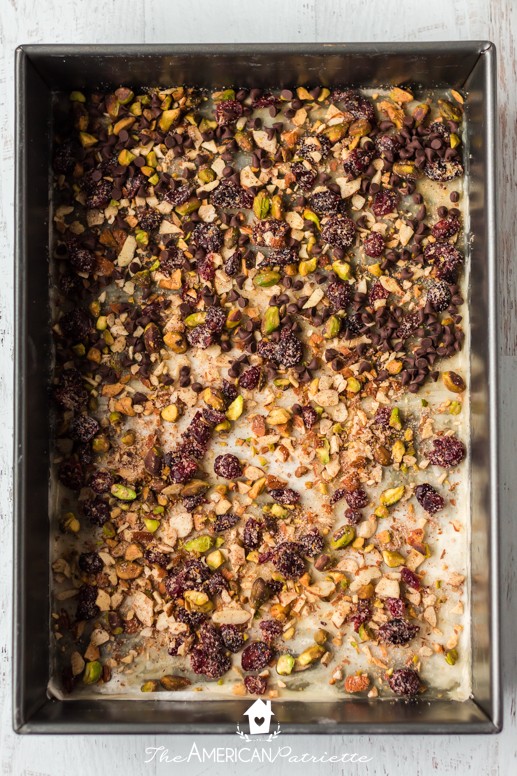
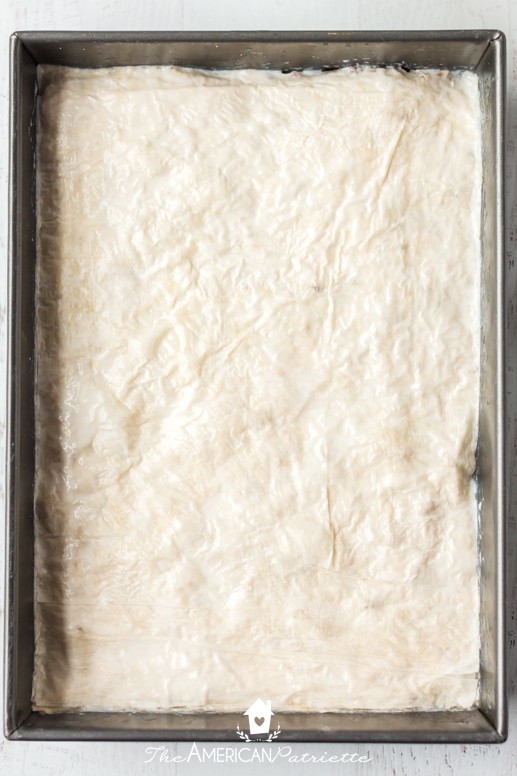
Add remaining nut mixture & 10 phyllo sheets
You’re going to add the last of the nut mixture – the last cup – and the remaining chocolate chips if you’re using them, and then this time, you’re going to make a top layer of 10 phyllo sheets – making sure to add melted butter between layers of phyllo dough – instead of 6.
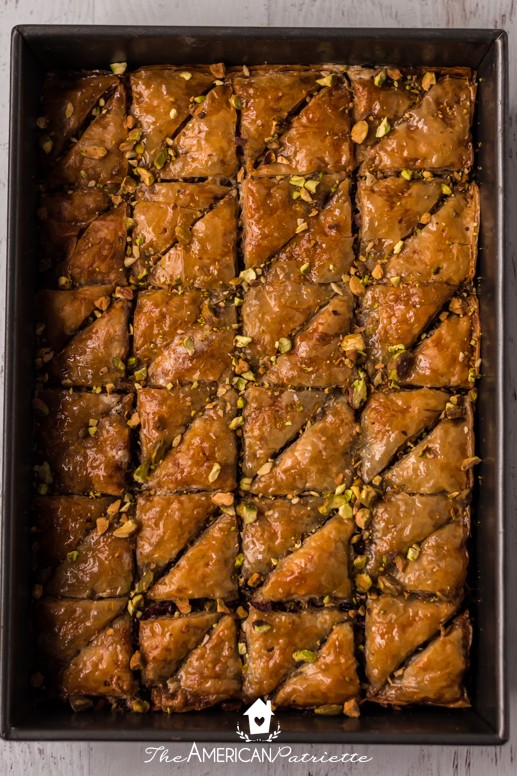
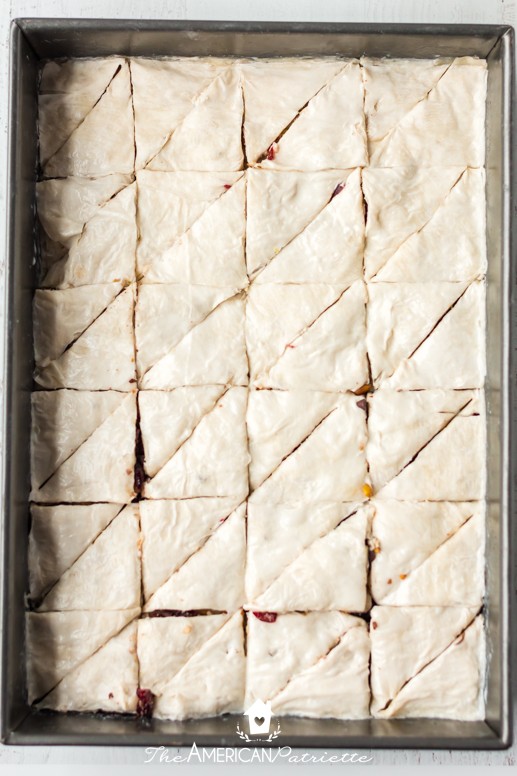
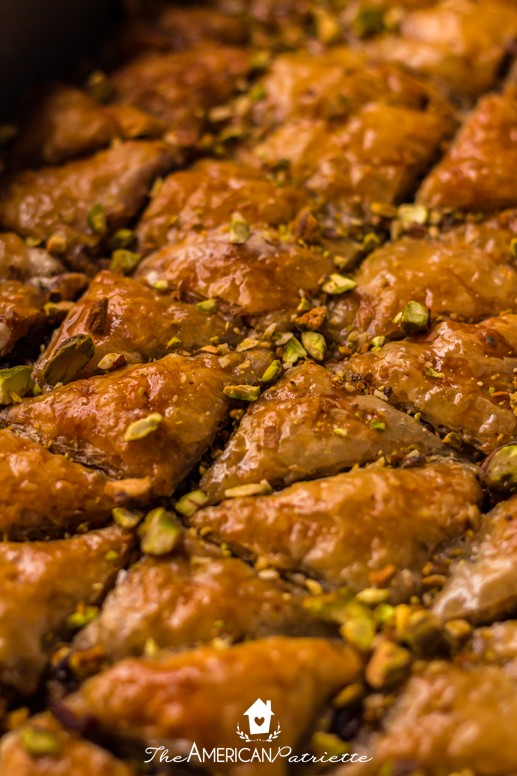
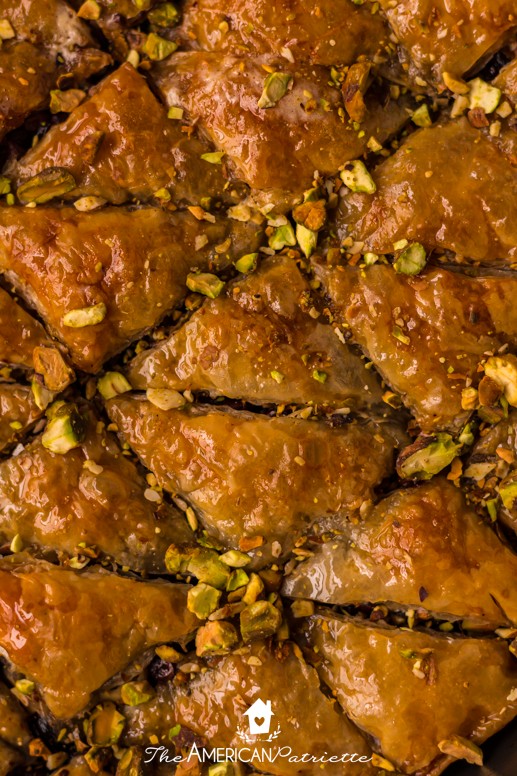
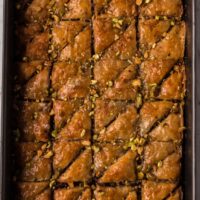
Cut into triangles
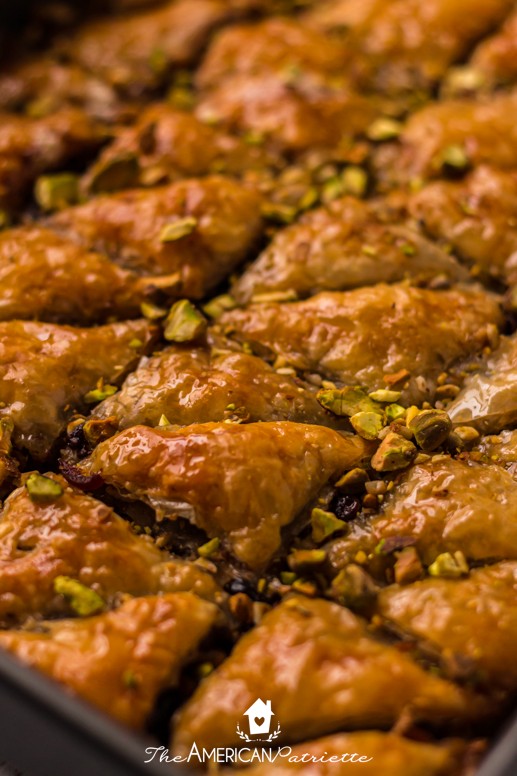
You want to cut BEFORE you bake. You’ll want to use a very sharp knife or sharp metal spatula to make one cut down the middle, then two more cuts on either side, making 6 equal rows. Then cut down the middle in the other direction and make one cut on either side, turning this into 24 equal squares. Then cut the squares in half diagonally to make triangles – kind of in a diamond pattern.
Bake at 350 for 35-40 minutes
You want these to come out golden brown, but you don’t want to overbake. Check at 35 minutes, and if the dough looks completely cooked and evenly golden, go ahead and remove it from the oven. If it’s still a little pale, leave it in for another 5 minutes.
Prepare the sweet honey syrup
You’ll want to prep the syrup while the baklava bakes so that it’s ready to pour onto the baklava as soon as it comes out of the oven.
All of the prep for the syrup is done in one saucepan. You’ll add all of the ingredients – the honey, sugar, water, vanilla extract, and orange zest – to a medium saucepan over medium heat. Bring to a simmer, stirring regularly, and then reduce heat and allow it to simmer – stirring occasionally – for 8-10 minutes until the sugar dissolves and the syrup reduces a little/thickens a bit. Set aside until the baklava comes out of the oven.
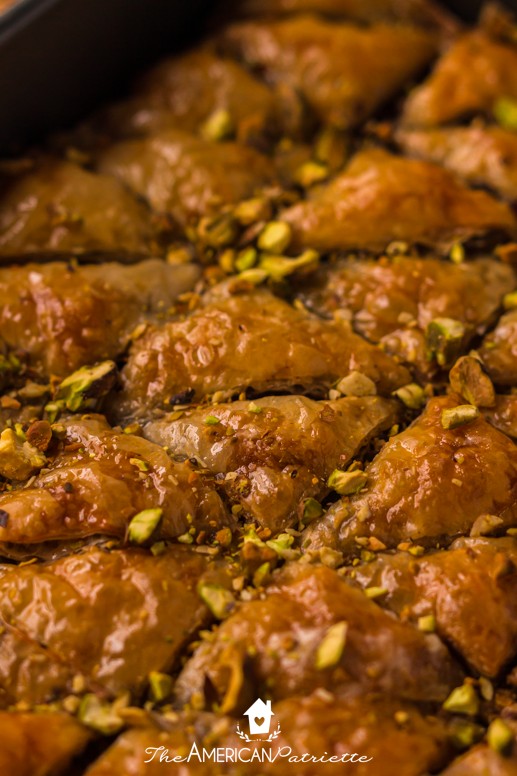
Remove baklava from oven & pour on the syrup
Place the pan on a wire rack and then pour syrup all over the hot baklava. Yep – when it’s still hot! It’ll seep into all the nooks and crannies and make the baklava wonderfully sweet and moist!
Top with some extra chopped nuts if you desire, and then allow to sit out at room temperature for at least a couple of hours before you store it.
If you want to dig in sooner, you can definitely do so, it’s just likely to fall apart more easily if it hasn’t had a chance to rest yet.
Storing the baklava
Once it sets, transfer it to an airtight container – you can either leave it out at room temp for a few days, or you can store it in the fridge for 7-10 days.
If you know you’re going to eat it within a couple of days of making it, I’d suggest leaving it at room temperature in the airtight container. But if you know you want this to last (or you know it won’t all get eaten within 2-3 days), I’d put it in the fridge soon after it sets, just to keep it fresh longer and to prevent it from molding. Especially with the syrup, it’s a very moist dessert!
Tips for working with the phyllo sheets:
- You want to keep them from drying out while you’re working – hence the damp paper towels – but I didn’t find that I needed to cover them with the plastic & the damp paper towels every single time I was getting a new sheet to butter and place in the pan. I probably covered mine every 3rd time I was adding a new sheet. If they dry out, they’ll get brittle and break a lot more easily.
- Buttering the first sheet of every layer is the trickiest, but I just found that if I dab gently and use my fingers to keep the sheet in place, it worked fine. The subsequent layers stick well because of the butter on the bottom layer, so those aren’t quite as tricky to work with.
- If you split or tear your sheets while you’re working, you can easily fix it with some melted butter once you lay the sheet down in the pan. No need to toss a sheet out if you tear it as you’re getting one for a new layer. Just place it on top of the sheet below it, and it’ll conform right to the buttered layer below.
Happy baking!! Enjoy this recipe!

Other Christmas dessert recipes for a crowd:
- Easiest EVER Moist Red Velvet Cake
- Super Moist Caramel Mocha Poke Cake
- Christmas Red Velvet Chocolate Poke Cake
Cranberry Pistachio Baklava
Ingredients
For the baklava:
- 1 1/4 c + 2 tbsp unsalted butter a little more than 2.5 sticks, divided
- 1 c slivered almonds
- 1 c shelled pistachios
- 1 c dried cranberries
- 1/4 c granulated sugar
- 1 tsp cinnamon
- 1/4 tsp nutmeg
- 1/4 tsp salt
- 1/2 c mini semisweet chocolate chips*
- 16 oz package frozen phyllo dough thawed (you'll use a little more than half of it)
For the syrup:
- 2/3 c granulated sugar
- 1 c honey
- 1 tsp vanilla extract
- orange zest about 1/2 tsp**
- 1 c water
Instructions
- Preheat the oven to 350.
- In a skillet on medium heat, melt 2 tbsp butter and add nuts. Stir regularly with spatula until nuts are slightly toasted - about 7-8 minutes - and then remove from heat.
- Add nuts, spices, sugar, and salt to a food processor and pulse a few times - just until nuts are in small pieces. (You don't want them to be too finely-chopped, so start slow with the pulses!)
- Pour mixture into a bowl with the dried cranberries and set aside.
- Melt the remaining butter, and then brush some on to coat the bottom and sides of a 9x13 baking pan.
- Open one of the phyllo sheet packages (my 16oz box comes with 2 packs of phyllo sheets), and trim the sheets to fit the pan. (Cut all the sheets at once with 1 cut - removing about an inch from the length - with a pair of kitchen shears.)
- Spread the phyllo dough out on the plastic it's wrapped in, fold the plastic over to cover it, and then place a couple of damp paper towels over the top. You'll want to keep it covered as much as you're able to keep it from drying out and becoming brittle.
- Place one sheet of the phyllo dough on the bottom of the buttered pan, brush generously with melted butter, and repeat with 5 more sheets of phyllo (so you'll now have a layer of 6 sheets).
- Sprinkle 1/3 of the nut & cranberry mixture (about 1 cup) evenly across the top. If you're adding chocolate chips, sprinkle about 1/3 of those on, too - on either one half of the pan or across the whole thing (see notes).
- Top the nut mixture with another phyllo sheet, brush with butter, and repeat with 5 more phyllo sheets (so you'll now have another layer of 6 buttered phyllo sheets).
- Sprinkle another 1/3 of the nut & cranberry mixture + chocolate chips and 6 phyllo sheets, continuing to brush each one with butter.
- Sprinkle the remaining nut & cranberry mixture + chocolate chips, and then top with 10 phyllo sheets, one at a time, brushing each one with butter before adding the next sheet.
- Using a sharp knife or a thin metal spatula, cut the layers into 24 squares, and then cut each square in half to make a triangle.
- Place in preheated oven for 35-40 minutes, or until golden brown.
- While the pan is in the oven, prepare your syrup. Add syrup ingredients to a saucepan over medium heat and bring them to a slow boil, stirring regularly. Reduce heat and allow to simmer for about 8-10 minutes, or until the syrup has reduced a little. Set aside.
- Once you remove the baklava from the oven after it's been fully baked, set the pan on a wire cooling rack, and then pour syrup all over the top of the hot baklava. Sprinkle with some chopped almonds or pistachios for a finished look.
- Allow to set at room temperature - it'll take a few hours to cool. If you're impatient, you can dig in before then 😉, but the pieces will come out of the pan much more cleanly once the baklava has set and you're able to cut them out with a spatula.
- Store in an airtight container at room temperature for a few days, or store in the fridge for 7-10 days. (If you know you're going to want this to last more than a few days, go ahead and store it in the fridge, just to prevent it from molding. The syrup adds a lot of moisture.)
- ENJOY!
Notes
- You do want to keep them from drying out while you're working, but I didn't find that I needed to cover them with the plastic & the damp paper towels every single time I was getting a new sheet to butter and place in the pan. I probably covered mine every 3rd time I was adding a new sheet.
- Buttering the first sheet of every layer is the trickiest, but I just found that if I dab gently and use my fingers to keep the sheet in place, it worked fine. The subsequent layers stick well because of the butter on the bottom layer, so those aren't quite as tricky to work with.
- If you split or tear your sheets while you're working, you can easily fix it with some melted butter once you lay the sheet down in the pan. No need to toss a sheet out if you tear it as you're getting one for a new layer. Just place it on top of the sheet below it, and it'll conform right to the buttered layer below.