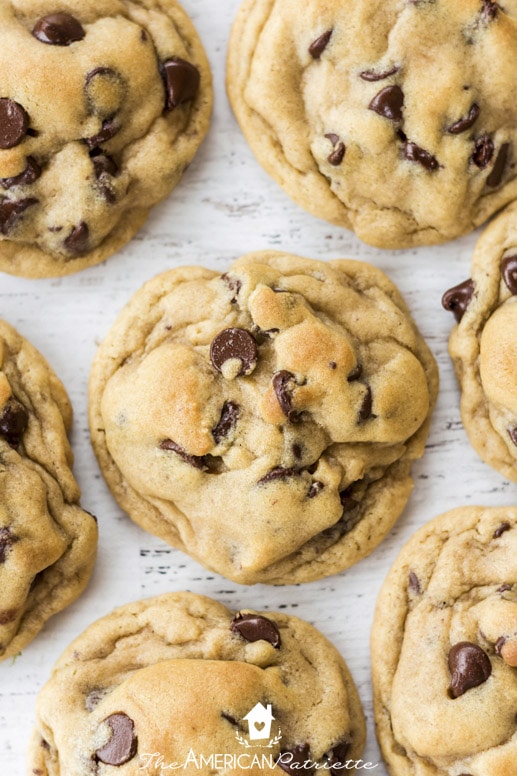
Easy Soft & Chewy Chocolate Chip Cookie Recipe
Want a delicious, soft and chewy chocolate chip cookie recipe that you DON’T have to chill before baking (and you don’t have to wait on butter to soften)?! This just might be your dream recipe!
Are you looking for the perfect cookie recipe that comes out perfectly the first time AND every time?!
Part of me wants to tell you, “This is the BEST chocolate chip cookie recipe you will EVER find for soft, chewy chocolate chip cookies.”
But, another part of me is really reluctant to say that, because I’ve realized that we all have our preferences on how we love our chocolate chip cookies.
But, if you’re one of those people who loves soft, chewy, melt-in-your-mouth, sliiiiightly crisp-ish on the outside but oh-so-soft on the inside chocolate chip cookies, then maybe, just maybe, this is the best chocolate chip cookie recipe.
Here’s why I know you’ll love these perfect chocolate chip cookies:
- SUCH an easy recipe. It’s a classic chocolate chip cookie recipe the easy way. No fuss, and they come out perfectly soft, baked, and delicious every time.
- No chill time. No need to wait for butter to get to room temp. When you want chocolate chip cookies, you want chocolate chip cookies, right?!
- The recipe purposely helps you avoid flat cookies. I’ve tested, tested, and tested this recipe dozens of times. Just follow the simple directions & you’ll get a perfectly thick, soft cookie every time.
- Love a chewier cookie vs. puffy or crunchy? THIS IS YOUR RECIPE, FRIEND!
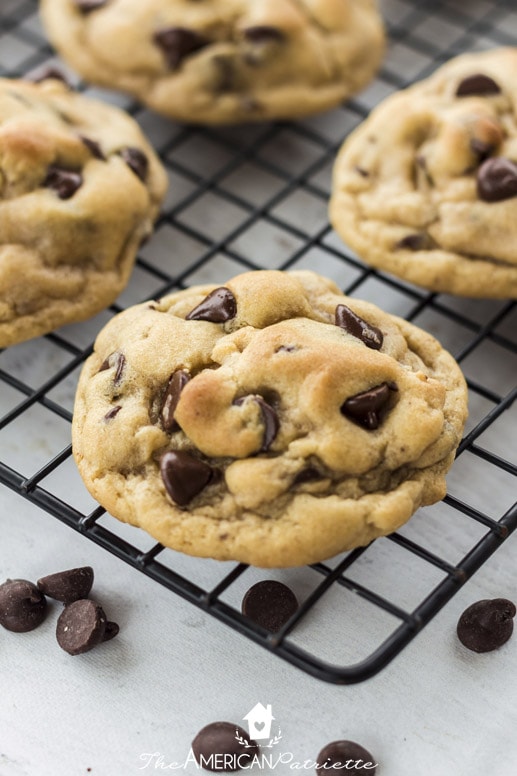
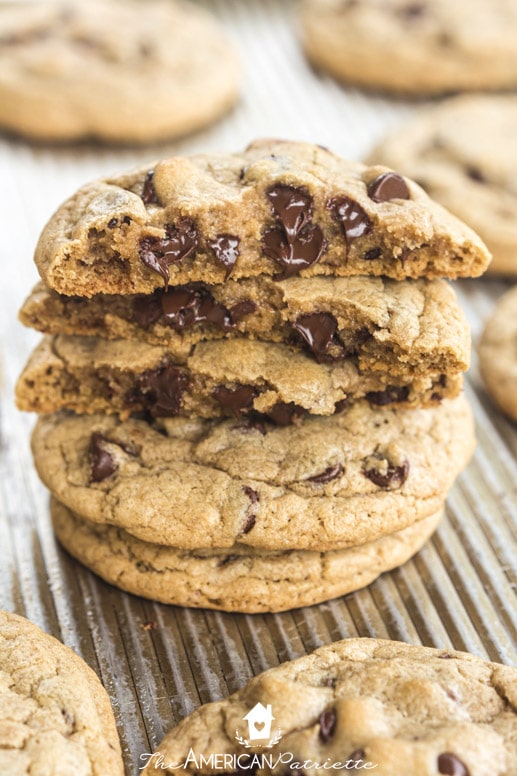
- Slightly crisp edges with an oh-so-soft, chewy, and melty middle.
The search for the perfect recipe for homemade chocolate chip cookies:
Why in the world does the internet need yet another recipe for soft and chewy chocolate chip cookies? There are already a million (really good!) recipes out there!
Well, I have a couple of reasons:
1) It drives me bonkers when cookies spread in the oven, so I wanted to figure out how to develop a recipe where the cookies stay thick & pillow-y,
2) I’m so impatient, and I don’t want to have to wait for butter to soften to room temp OR have to chill the dough before baking the cookies. (But again, I don’t want them to get flat in the oven, and that’s usually why you have to chill the dough!)
I mean, when you’ve got a hankering for chocolate chip cookies, the last thing you want to do is have to wait 2 hours for dough to chill in the fridge before you can bake it, ya know?
Since chocolate chip cookies are one of those quintessential, everyday treats…the kind you want to whip up because you’ve got last-minute company coming, because you want to cheer up a neighbor, or because you just want to have something easy to enjoy during a family game night, I really wanted an easy, go-to recipe that I could refer to over and over again.
And this recipe is what I landed on.
When I set out to figure out the best cookies, I made at least 30 batches of chocolate chip cookies to test out different variables.
What happened when I changed up the ratio of brown sugar and white sugar? If cookies are made with cornstarch added to the dough, does it really make them softer? Can you tell if you use both baking soda and baking powder, or can you get away with just using baking soda? Melted butter vs. room temperature butter vs. cool butter?
Testing so many cookies was just terrible, as you can imagine. My family suffered greatly.
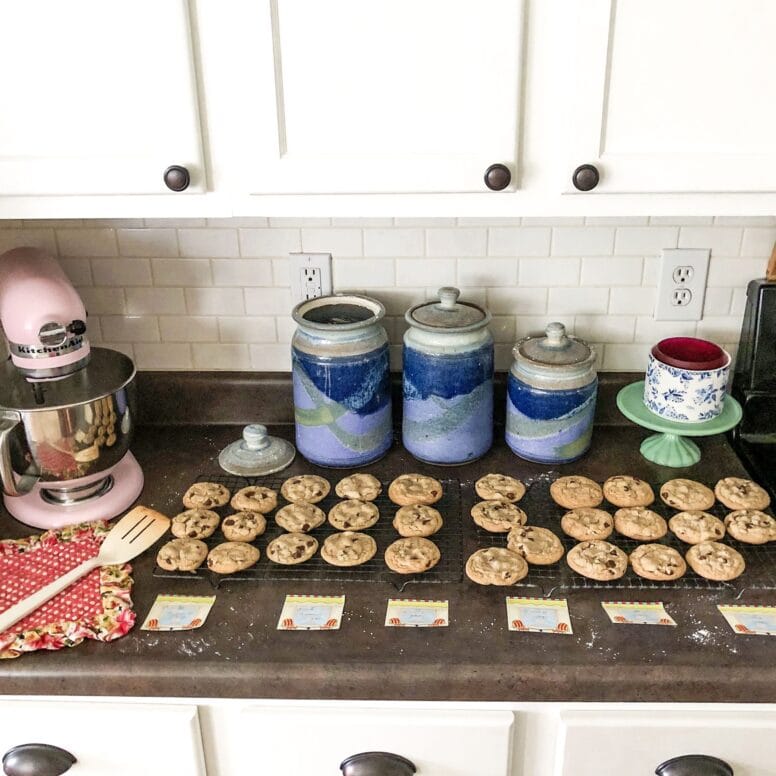
You can see some of the grueling experimentation that happened here…
And more strenuous chocolate chip cookie recipe testing here…
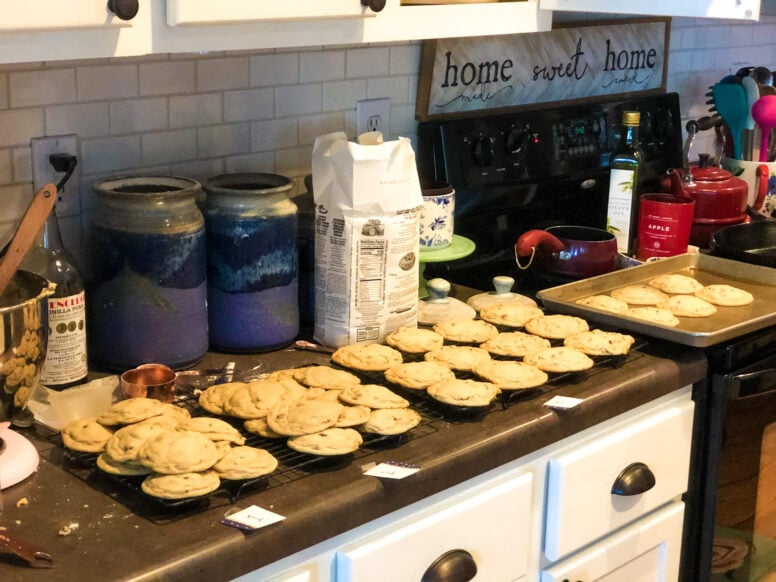
Complete with sticky notes that identify all of the variables between each cookie. My husband and I would take turns helping each other do blind taste tests.
And then, once I finally landed on my favorite version, I tested my own recipe against other recipes about a dozen times, just to make sure I really knew which version I thought was best.
All that suffering to try to nail down the perfect chocolate chip recipe was not done in vain.
Now, I have a recipe I am SUPER excited to share with you. I’ll be so honored if this recipe ends up becoming YOUR go-to chocolate chip cookie recipe, too!
As you can tell, I was quite diligent with figuring out this recipe, so I’m going to share some things with you along the way so you can be sure that your cookies turn out perfectly!
This post contains affiliate links for your convenience. You can read my full disclosure policy here.
Ingredients for no-chill, soft and chewy chocolate chip cookies:
No funny ingredients in here, friends – just the basics. It’s just the ratio of ingredients and the way you mix ’em together that matters in this recipe.
Believe me, I tested over, and over, and over again, and I found that it really didn’t make that much of a difference when I played around with different less-than-common chocolate chip cookie ingredients to give the cookies more texture and flavor.
Here are some ingredients I tested that didn’t make the cut:
- Cornstarch – a lot of chocolate chip cookie recipes out there use cornstarch in an attempt to help with the softness. I made at least 8-10 batches using cornstarch, and in side-by-side comparisons, my husband and I really couldn’t tell the difference. Sometimes my husband said the cookies almost tasted chemical-y with the cornstarch in them.
- Baking powder – pretty much every chocolate chip cookie calls for baking soda, but only some call for baking powder. From what I found, sometimes people recommend both because the baking powder helps give a nice little “puff up” in the middle of the cookie + give it the slightest crisp on the outside. But, like with the cornstarch, we didn’t notice much of a difference when I did side-by-side comparisons.
- Maple syrup – this one isn’t as common, but I found some recipes that included it for making the cookies softer, but again, didn’t notice much of a difference.
So, if those ingredients don’t really make a difference, why bother?!

Here are the basic ingredients in these delicious cookies:
- Sticks of REAL unsalted butter. Not margarine. And, again, after LOTS of playing around with butter temps, I’m going to tell you that a combo of partially melted (BUT NOT HOT) butter + solid-but-soft butter is perfect for both flavor & texture. I’ll tell ya the easy way for doing this in just a bit!
- Brown sugar. More brown sugar than white sugar helps the cookies stay softer & helps keep them from spreading in the oven.
- White sugar. Adds some sweetness & texture.
- Vanilla extract. I use more vanilla than most recipes I found. Vanilla adds some great flavor!
- Room temperature egg. If you’re like me and always forget to take your egg out ahead of time, just grab it when you start prepping the oven & your other ingredients and plop it in a bowl of hot tap water. It’ll be warm enough by the time you’re ready for it!
- All-purpose flour. Gives the cookie structure + you use a little more at the very end to keep them from spreading. Most bakers would probably cringe at the way I measure my flour, but as long as you do it consistently with the recipe, then it doesn’t matter! I put my measuring cup (dry ingredient measuring cup) into the flour canister, get a big scoop, and then level it off with a knife. If you do it this way, you’ll end up using the amount of flour that this recipe calls for. No sifting, no spooning, no fluffing of flour.
- Baking soda. Gives them lift & a chewy texture!
- Salt. Helps bring out the flavor! Don’t skimp on this! (I usually use sea salt, but when I run out of it and just have regular table salt, it works fine.)
- Semisweet chocolate chips. And lots of ’em! (Who loves a chocolate chip cookie that doesn’t have tons of chips in it?!) As much as I’m a milk chocolate fan, semisweet chips are a must. Maybe it’s personal preference? Maybe it’s science? I don’t know, but they’re definitely the best for chocolate chip cookies.
A note on baking pans/cookie sheets: Also, I always, always, always (yep, ALWAYS) bake cookies using my USA Pans. I’ve been using these same baking sheets for over 8 years, and I’m telling you, they are AMAZING. I use them to cook/bake so many different things every week.
My cookies never, ever stick to my baking sheets, and they also bake really evenly. I’d almost consider my cookie sheet to be an essential ingredient, just because they work so well to produce awesome cookies! If you don’t have these in your kitchen, you NEED THEM. Believe me, I’ve recommended these to hundreds of people, and I hear from so many after they’ve started using USA Pans that they’ll never go back to anything else!
And, when you use the USA Pans, you don’t need parchment paper OR silpat baking mats. I’m telling you, the cookies bake perfectly evenly and pop RIGHT off the pan. They’re magical!

Tips for how to make soft and chewy chocolate chip cookies:
- Use REAL butter (not margarine!), and the temperature matters! Believe me, I tested different temperatures a lot. The temperature matters if you don’t want to have to chill the dough, if you don’t want your cookies to spread in the oven, and if you want your cookies to have a lot of flavor.
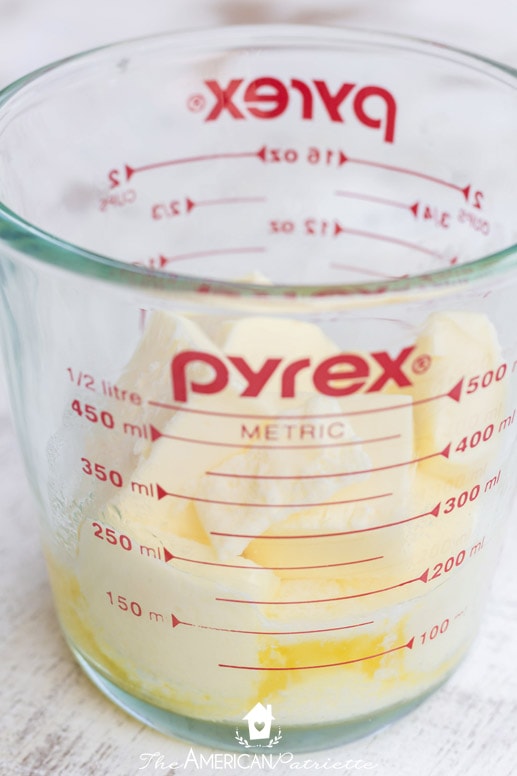
Here’s what I do for this recipe (and yes, I’m going to put my bossy pants on and tell you that you really need to do it this way!): A) Cut 2 sticks of COLD butter into large cubes – (about 5 cubes per stick), B) Put those cubes of butter in a microwaveable glass bowl – I always use my Pyrex measuring cup because it heats up evenly and works like charm, C) Depending on the power of your microwave, you’re going to microwave the butter for about 30 seconds, OR until your butter is only partially melted but not hot.
Here’s what it should look like after you microwave it:
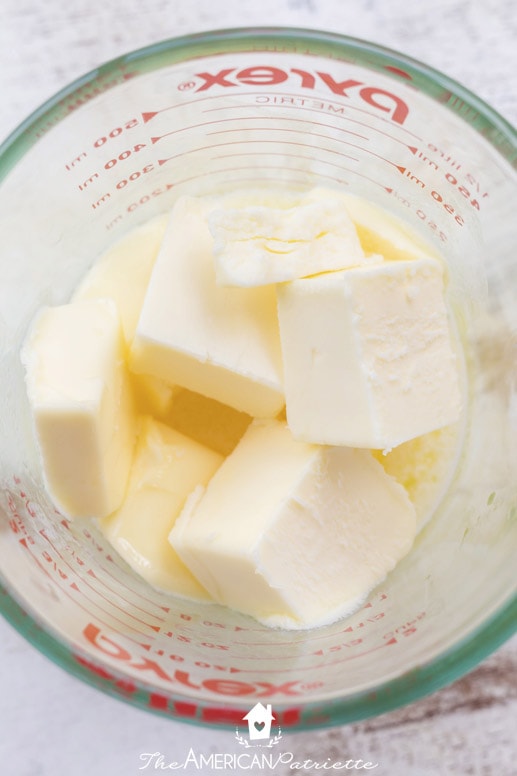
See how you still have some large solid chunks of butter, but part of it is melted? The melted part isn’t very hot.
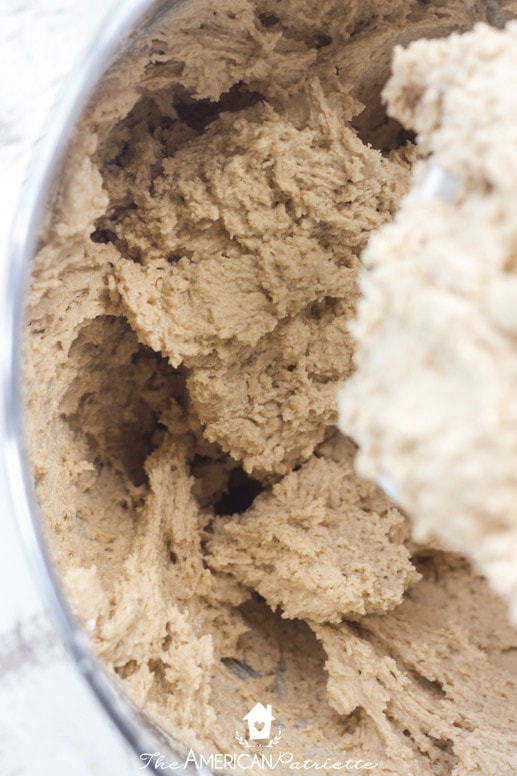
Using melted-but-not-hot butter will enable all of the ingredients to blend together well & make the cookies more flavorful (without the dough spreading in the oven), but the chunks of butter will help keep the cookies soft and chewy because of the way it’s creamed with the sugar. I’ll talk about that in a sec.
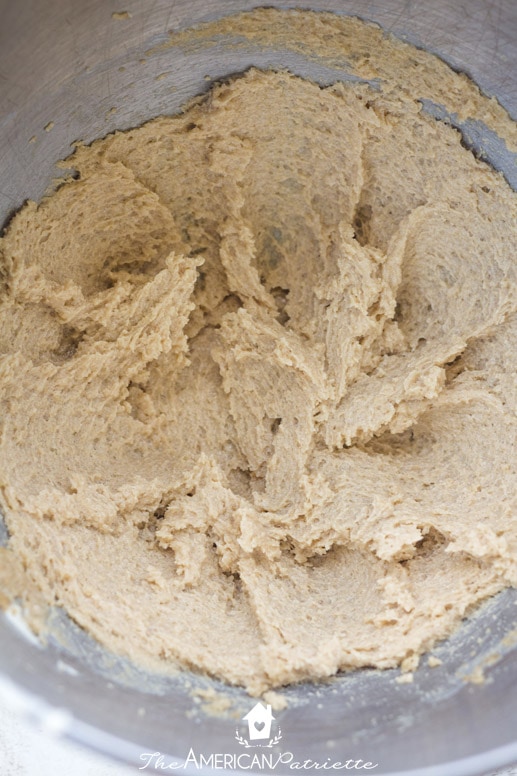
2. Creaming the butter with the brown & white sugars will help make the cookies thicker and chewier.
With a stand or a hand mixer, creaming the butter & sugars together for 2-3 minutes (using the paddle attachment on your mixer) helps the melted butter mix in with the sugars and start to dissolve them (cookie flavor!), and helps bring air into the dough with the still-solid-but-not-hard butter (cookie softness!).
3. Mixing the flour + salt + baking soda in a large bowl and gently mixing it in AFTER you’ve creamed the butter & sugar, and added in the egg & vanilla, will also contribute to the softness of the cookies.
Don’t be like old me and add in the flour, baking powder, and salt one at a time into the wet ingredients and then over-mix the batter. Over-mixing it produces tough chocolate chip cookies.
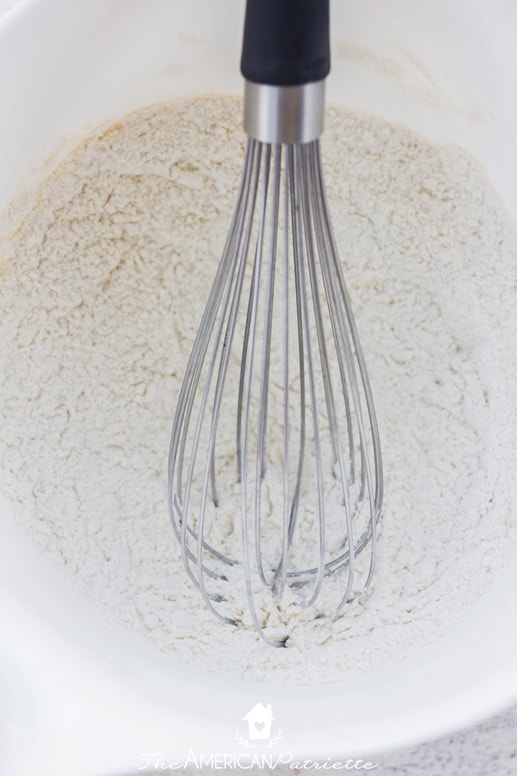
Instead, mix the dry ingredients in a different bowl, gently whisk them together, and then add that flour mixture to the creamed ingredients until just combined.
Just a few spins around the mixer will do.
You’re going to stir in the chocolate chips, and then this next step is a super easy trick that I now do every time I make chocolate chip cookies!
4. Add in a couple of extra tablespoons of flour JUST before you form the dough into balls. Right after you’ve folded in the chocolate chips, you’re going to add just slightly more flour – about 2 tablespoons – while very briefly mixing on medium speed.
Don’t skip this step! This is one of the keys to making cookies that don’t spread in the oven! It’s a little trick up my sleeve, and it works like a charm!
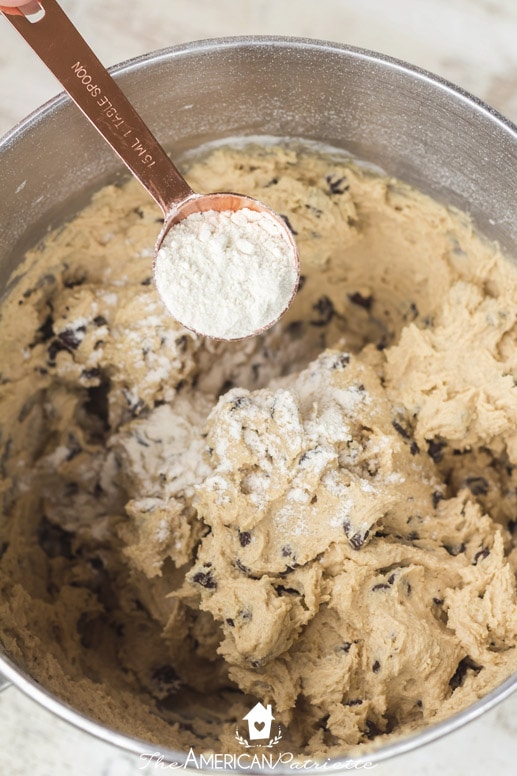
When you sprinkle it in, you’re going to give the dough a tiny bit of a stir, just so the flour combines into the dough.

Then, once you’ve slightly stirred in the flour, you’re ready to form the dough into cookie balls.
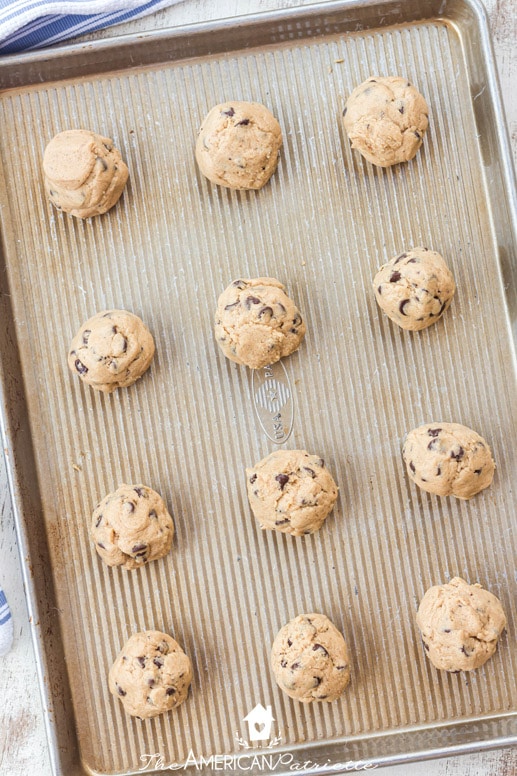
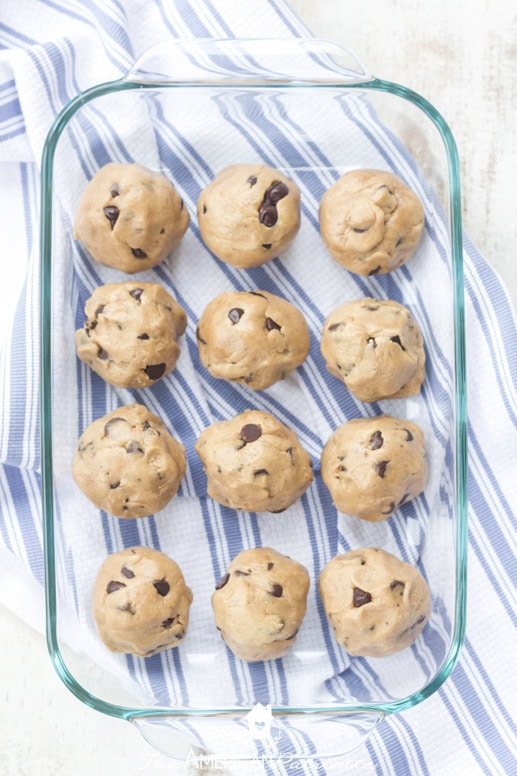
5. Make your chocolate chip cookie dough balls about 2-inches in diameter. I don’t really want to suggest that you make them any smaller than this, just because I think the amount of dough in each ball also helps to keep them from spreading in the oven.
Ya don’t need a cookie scoop for this! When I make them, I just form them with my hands, and I always get exactly 24 cookies out of this batter. Every single time.
If you find you have dough left over after you’ve formed 24 dough balls, just start adding a little dough to each formed cookie dough ball until you run out. Easy peasy!
(If I try making smaller cookies sometime, I’ll update the recipe and letcha know how they turn out!)
6. Bake ONE PAN at a time for 9 minutes at 375. Once again, that temperature matters! (I tested this several times, too!) When you bake at 375 vs. 350 or 325, your cookies bake more quickly, which means they don’t have as much time to spread in the oven.
Also, I only bake one sheet at a time. Doing so helps make sure the temperature in the oven stays consistent.
7. While your first batch of cookies is in the oven, roll out your second batch, and then store it in the fridge for a few minutes until your first batch comes out of the oven.
I know, I know, I said no chilling. Which is true. Unlike the vast majority of chocolate chip cookie recipes out there, you don’t have to chill these cookies for 2+ hours before you can bake them. But, because my kitchen tends to get pretty warm while my oven is on, once I’ve rolled out my second batch, putting that pan of cookie dough balls in the fridge for a few minutes helps keep them from getting too warm before they make their journey into the oven.
Just a tip. 😉
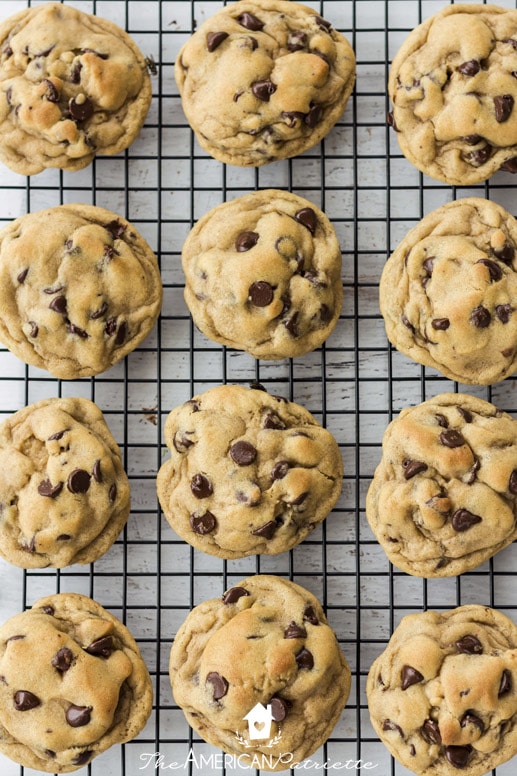
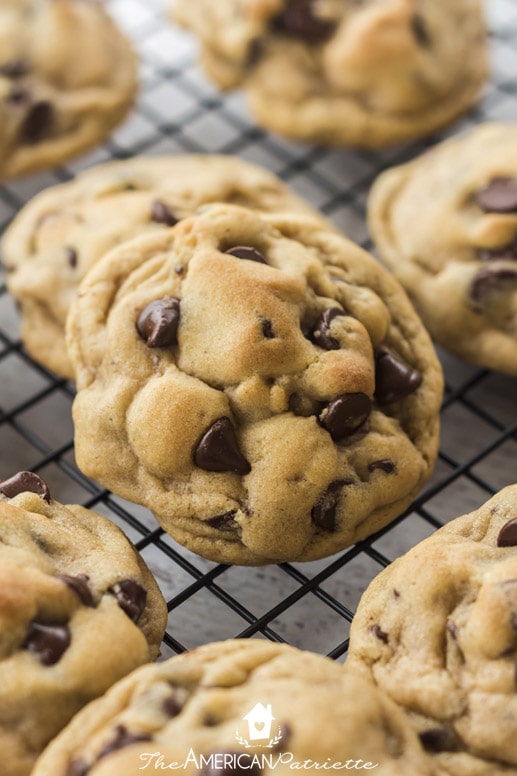
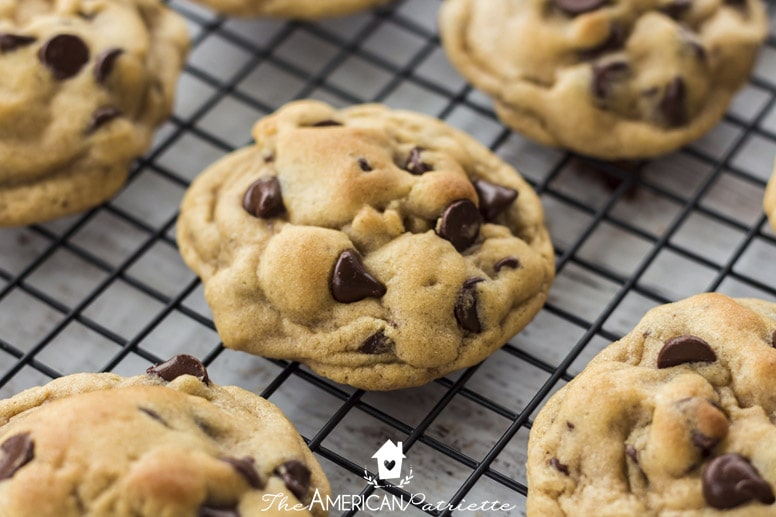
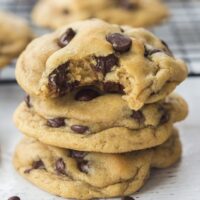
Once they’re out of the oven, let ’em cool on the baking sheet for about 10 minutes or so and then move them over to a wire rack.
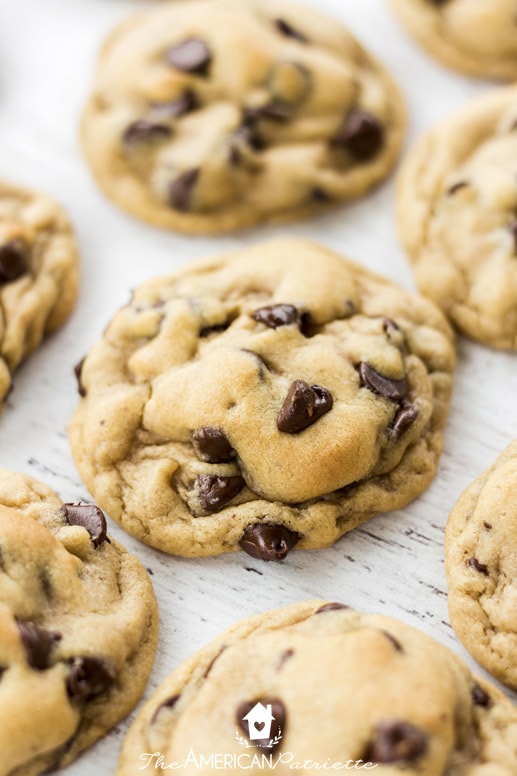
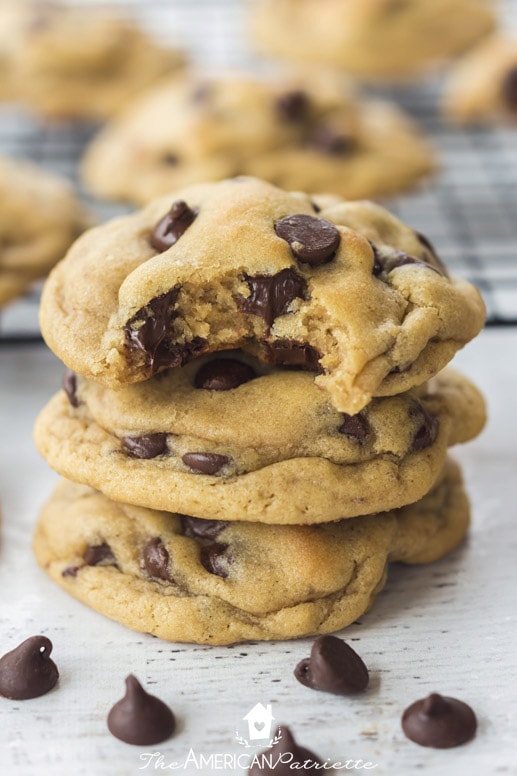
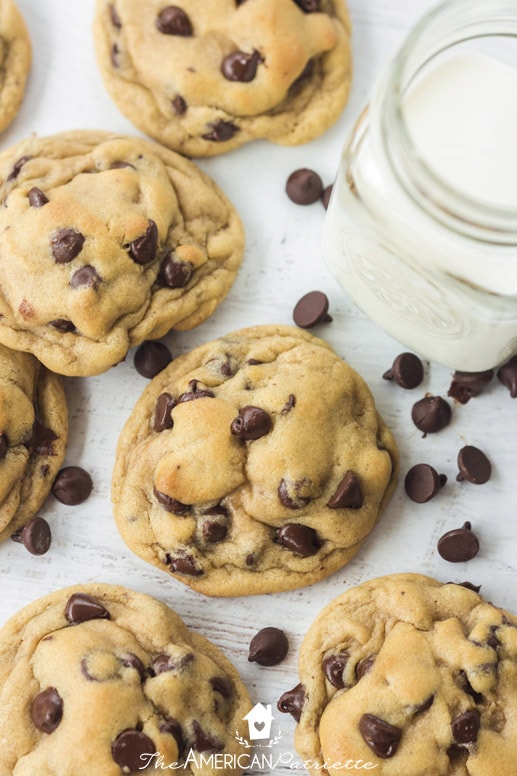
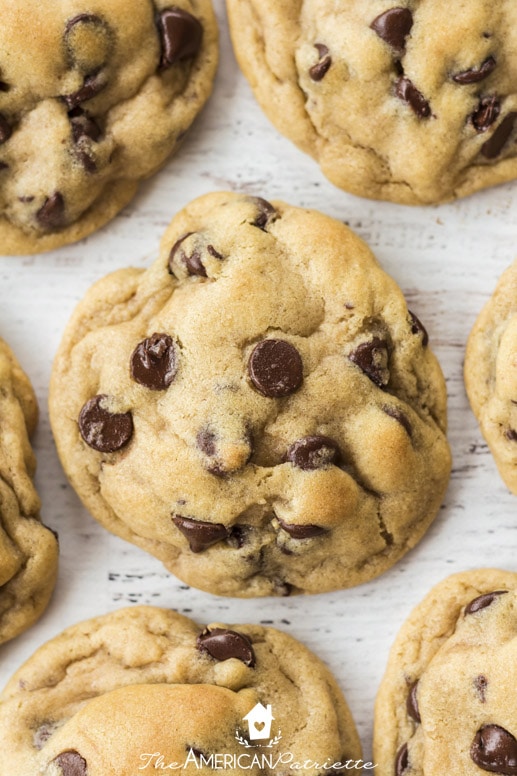
Mmmm-mmm. So soft and gooey on the inside, and just the slightest bit of crisp on the outside.
Basically, in my opinion, the perfect chocolate chip cookie.
Don’t you think?!
Now, if you WANT to make the dough ahead of time and then bake them the following day, you can do that. If you do, I’d make the dough, roll it out, and then store the dough balls in air-tight containers in the refrigerator.
When you bake them after they’ve chilled in the fridge for several hours or over night, I’d add an additional minute of bake time (so, bake for 10 minutes at 375 vs. 9 minutes).
The chilled ones will puff up even more. Here’s a side-by-side comparison of baked cookies with non-chilled & chilled dough:
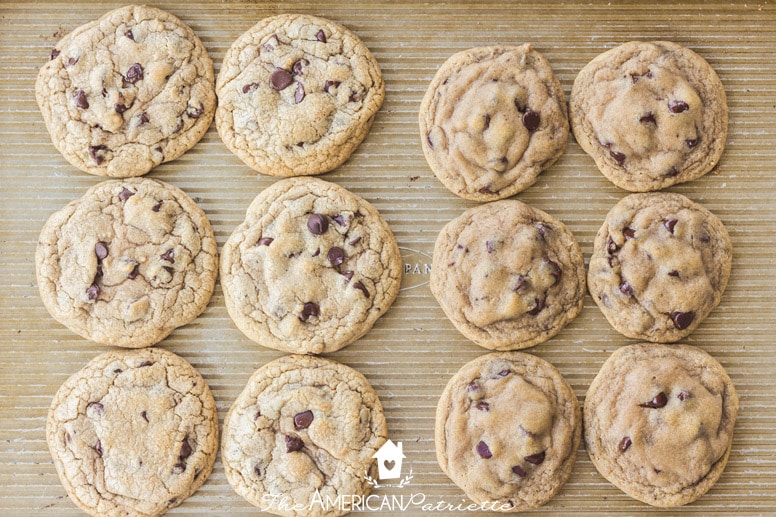
You can tell the ones that were chilled are on the right.
But, the whole point of this recipe is to finally produce a delicious chocolate chip cookie that doesn’t have to be chilled before baked. The non-chilled ones don’t spread, they come out soft and gooey, they stay soft for a day or two, and they’re just downright delicious.
Questions about how to make no-chill soft and chewy chocolate chip cookies:
- Does the brand of chocolate chips matter? You’re going to love this answer. Yes and no. Here’s the deal: I’ve used both brand name & store brand semisweet chocolate chips. MY store brand in Texas (H-E-B, I love you) works just fine, and that’s what I almost always use unless there’s a big sale on Hershey’s, Nestle, or Ghirardelli chocolate chips that would make them cheaper than the store brand.
BUT, I have had store brand chocolate chips that are too waxy. So, if your store brand/off-brand chocolate chips don’t have a good flavor or texture, then spend the extra .50 & get the good ones (duh). Overall, I don’t think you need to have the best-of-the-best chocolate chips in order to make fantastic chocolate chip cookies.
Also: yes, you can totally make this recipe with semisweet chocolate chunks vs. chocolate chips if you want an even meltier chocolate chip cookie. - How long to they keep? Honestly, ours don’t last too long around here because my family goes bonkers for cookies & we also love to share with our neighbors, but when I was making a bazillion test batches before I finally settled on this recipe and thus had a surplus of chocolate chip cookies, I really felt like their quality diminished after about two days. If you store them in an airtight container, they’ll stay delish and fresh-tasting for about two solid days. If you’re wanting them to last longer than that, I would make as much dough as you’ll want, but then store the dough in the fridge until you’re ready to bake & eat cookies! OR, eat what you want and then freeze the rest. They freeze & thaw well! 🙂
- Can you freeze them? Yep! Roll them out into dough balls & then store them in a plastic zipper bag. When you’re ready to bake them, if you remove them from the freezer & bake them while they’re still frozen, you’ll want to add a minute or two to the bake time.
- Can you chill the dough? Yes, like I mentioned above, if you’re wanting these cookies to last you for a few days, I’d make as much cookie dough as you need, and then refrigerate it until you’re ready to bake & eat the cookies. Again, they’ll last for a day or two, but they’re just so much better the day they’re made!
- Do I have to use a mixer? If you have a stand or a hand mixer, I would definitely use one of those. Technically, you could make these by hand, but because the mixer does a good job of helping you aerate the creamed butter & sugar (which helps make the cookies soft), I would use a mixer if you have one! I do think it’ll affect the texture of the final cookie.
Happy baking! When you make these, come back and leave a comment to let me know whatcha think! I hope you get to share lots of joy with these cookies! 🙂
Soft and Chewy Chocolate Chip Cookies
Ingredients
- 2 sticks 1 c cold unsalted butter (not margarine!)
- 1 1/2 c packed brown sugar
- 1/2 c granulated sugar
- 2 eggs room temperature (see my trick if you forget to take ’em out ahead of time!)
- 3 tsp vanilla extract
- 3 c + 2 tbsp all-purpose flour
- 1 tsp baking soda
- 1 tsp salt I use sea salt, but regular table salt is fine
- 2 c semisweet chocolate chips
Instructions
- Preheat the oven to 375.
- If you're like me and always forget to remove your eggs from the fridge ahead of time to get them to room temp, place eggs in a bowl in the sink and allow hot tap water to slowly run over them while you prep the other ingredients. Then just let them sit in the bowl of hot water until you're ready for 'em.
- Cut each stick of cold butter into large chunks (about 5 chunks per stick) and place in a glass (not ceramic!), microwave-safe bowl or measuring cup – Pyrex is my fave to use in the microwave! Heat in the microwave for 30 seconds – you want part of the butter to be melted but NOT hot, and the other part of the butter to still be solid but a little soft. 30 seconds always works for me & my microwave.
- Pour butter into mixing bowl & begin to cream with a stand or a hand mixer. Add in sugars and cream together on medium speed for 2-3 minutes.
- While the butter & sugars are creaming together, pour 3 c flour (leave that other 2 tbsp for later!), baking soda, and salt in a separate bowl and gently mix together with a whisk, and then set aside. Don't be tempted to add these individually into the mixing bowl. Doing it this way ensures they don't get over-beaten into the batter & cause tough cookies. Boo!
- Add in vanilla & egg to the creamed butter and sugar until egg is combined, scraping the bowl to make sure everything evenly mixes together.
- Slowly add in the flour mixture to the creamed butter, and mix together until just combined – this shouldn't take more than a few seconds.
- Gently add in the chocolate chips.
- Now, for a silly-but-always-works trick for helping those cookies not to spread: sprinkle in the remaining 2 tbsp of flour into the cookie dough and quickly mix together – just a couple of rotations around the bowl!
- You're getting closer to delicious chocolate chip cookies, friend! Wahoo! Now, start to roll out your cookie dough – the dough balls should be about 2 inches in diameter. Once you've rolled out 12 and placed them on your baking pan (BEST baking pans EVER), bake on the center rack in the 375 degree preheated oven for 9 minutes.
- While those cookies are baking, roll out the other half of the dough and place on a second baking sheet. If your kitchen gets really hot when your oven is on like mine does, stick the baking sheet with the cookie dough balls on it in the fridge for a few minutes until the cookies in the oven finish up.
- Remove the baked cookies from the oven, and allow them to sit on the baking pan for 5-10 minutes before placing them on a cooling rack. Place the second pan of cookie dough balls in the oven & bake.
- Enjoy those cookies with your friends & fam! Bring some joy to your neighbors! Cheer up a friend! (Basically, have fun with these and make other people happy with 'em. :D)
Oh MY, it looks great! Can’t wait to cook em this Sunday!
I have never, never been able to make chocolate chip cookies that come close to my mom’s famed cookies… until now. These are amazing! Mine used to always spread, so apparently the flour trick at the end really does work. They have just enough crust on the outside to bite into, but stay perfectly soft on the inside.
I’ve made these only once with all purpose flour, but all other times with whole wheat flour, and they still come out great!
Love this!!
My cookies are baking as I am typing this comment. I followed the directions exactly & my cookies have TOTALLY spread & are like pancakes! Ugh! This always happens to me. I used my oven thermometer too. I’m sure they will taste good but I was looking for a thicker chocolate chip cookie recipe. Not sure what went wrong. I am chilling the rest of the dough to see what happens when I bake them. Bummed 🙁
Hi Anita!
I am so sorry this happened to you! I actually just made a batch yesterday, too, and mine spread a lot as well. I’ve probably made this recipe no fewer than 100 times, so I KNOW it works, but the last couple of times I’ve made them, mine have spread quite a bit, and it’s made me wonder if they changed something in the flour I always use. (I always, always, always use my store brand flour; I also almost always buy store brand of my other groceries, and I’ve noticed some changes in a few other products I buy, so it made me start to think that the store did an overhaul on some of their ingredients)
Anyway, it made me think that I should test this out with some different flour brands and see if the same thing keeps happening.
When you were rolling your dough, was the dough really sticky, or were you able to roll dough balls pretty cleanly? When I’ve made this recipe (seriously, like dozens and dozens of times), my dough was never sticky. It hardly stick to my hands at all. But, the last few times I’ve made it and my cookies spread, I remember the dough being very sticky and clearly needing more flour. So, that all being said, I need to test this with some other flour brands and see what’s going on – see if different flour brands react differently, and then alter the recipe accordingly!
Excellent cookies, will be keeping for my new chocolate chip cookie recipe. I just had to cook my a little longer than 9 minutes but so delicious!!
So, so glad!!! 🙂
I had the pleasure of getting one of these cookies gifted to me by a co worker. When I tell you that hands down, this is the best cookie I have tasted!!! I warmed it up in the microwave and it was like a warm hug on a cold day. It was a party in my mouth. I am so glad that you took the time to try different things until you came up with this master piece. I didn’t even share with my kids….that was my way for selfcare… Anytime, you want to bake and have me taste test. I am happy to do so!!!
Ha! This made me laugh out loud! Love that so much!! I’ll gladly send cookies with Aaron to work for you to be a taste-tester! 🙂
These are superb!
🙂 🙂 🙂
These are the chocolate chip cookies I have been looking for!! I have been to many sites, have tried theirs, but was always disappointed in taste and the waste of ingredients. I have to say, Mauri, that I was skeptical about your recipe; thinking it was going to be another disappointment. But lo and behold…I was impressed. The cookies came out just as you said they would; thick, soft and chewy. I will admit I am a baker who weighs out my ingredients. So when you said to just scoop into the flour bucket and level it off, I was skeptical. Thinking, “that’s going to be way more flour than I normally use.” But the end results were worth it. Thank you Mauri for all the “hard” work in the baking of many cookies until you made your discovery. One final note, I live at high altitude, 4500 feet, and I made no changes to the recipe.
Althea! This totally made my day!! I worked tirelessly on this recipe (which was totally not a sacrifice, and my family didn’t complain one bit that we had entirely too many chocolate chip cookies around our house) because as much as I LOVE to bake and absolutely think that some dessert recipes are worth the fuss, chocolate chip cookies, to me, are one of those desserts that I think should be super easy and not intimidating at ALL, especially since they’re just a quintessential last-minute “I need to make something to cheer someone up or bring some joy into our home” treat! I am THRILLED to hear this recipe worked so well for you! I played around with it so many times to make sure I could advocate for it! 🙂
Hi there , i tried these today , oh my god they were awesome, I’m not a choc chip fan so substituted them for some lightly roasted macadamias , yumm!!! So easy to make and my work colleagues loved them, I’m gonna do some for Christmas presents this year.
Thanks so much for sharing your recipe , I love it.
Yay, I’m so glad!! 🙂
Mauri, I made your cookies today. I am known for going a bit off-road with recipes, but I stuck to yours! You are right! They are every bit as good as you said! And, thanks to my daughter, I even used the cookie sheets you rave about. Yes, they are all that! Thanks for teaching this old dog a new trick!
Thank you so much, Mrs. Moore! Yes, I am so notorious for not following directions with recipes…I often just use them as a guide but kind of do my own thing. But, I’ve definitely noticed that with baking, there are certain steps I need to actually follow in order for it to turn out well, so that’s exactly why I write such detailed posts on those recipes. Because I know people like ME will read them and ask, “Do I really have to do that step like that?” I always like to know WHY I need to do something!
And YES! Those pans are SO AMAZING!! I just cannot speak more highly of them!!
We’ve baked half batches of these twice this week – they’re soooo good warm from the oven, and I’d rather have them fresh than reheat in the microwave – and I accidentally baked them with half the listed amount of sugar, and they were still amazing.
My only comment is that I think the nutrition info may be a touch off; MyFitnessPal estimated one cookie from the listed recipe at about 290 calories, 42g carbs, 13.8g fat, and 2g protein. For comparison, a single Oreo cookie is about 70 calories and 10.5g carbs, so I think the higher estimate makes sense.
Hi Danielle,
I’m so glad these worked out for you! I’ll have to try them out with less sugar – that’s good to know!
And thanks for the info on the nutrition. I have no idea how My Fitness Pal calculates anything – it’s an automatic calculator after I put in my ingredients. I should probably just see if I can turn it off!
It’s just a food-tracking app that also lets you enter recipes to calculate calorie counts per serving. I wonder if the default calculator on your site somehow skipped a line or two?
Okay, Mauri Jane! You have inspired me — tomorrow, I am going to try this recipe. And you know me, I cannot bake!! But, I’m feeling pretty confident thanks to this amazing tutorial of a recipe! I feel like you’re standing beside me coaching me through!
Thanks for being my baking buddy!!